Description
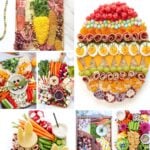
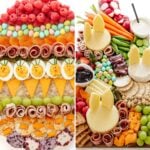
Hop into Easter with a fun Easter Charcuterie Board! Learn how easy it is to make a simple and elegant Easter Bunny Board or a fun Easter Egg Charcuterie Board. Make sure to also check out the post for lots more Easter charcuterie board ideas and photos.
Ingredients
Easter Bunny Charcuterie Board
- Round shaped cheese (for the bunny head: brie, camembert, provolone, etc.)
- Firm white cheese (for the bunny ears: white cheddar, provolone, mozzarella, etc.)
- Toothpicks (I like to use these ornate toothpicks)
- Other charcuterie board ingredients (meats, fruit, veggies, nuts, crackers, chocolates, additional cheeses, etc.)
- Board or platter, any shape or size
Easter Egg Charcuterie Board
- Board or platter, oval or egg shaped (or cut a large egg shape out of a piece of parchment paper and place on a rectangular board to use as a guide when arranging your ingredients)
- Charcuterie Board Ingredients (variety of items in different colors like meats, cheese, fruits, veggies, nuts, crackers, etc.)
Instructions
Easter Bunny Charcuterie Board
- Assemble one or more cheese bunnies: Using the tip of a sharp paring knife, cut out bunny ears from thick slices of firm white cheese. The slices need to be thick enough to insert a toothpick – at least a 1/4 inch thick. You can cut the ear shapes freehand or make a template from parchment paper to use as a guide. Attach the ears to the “head” by inserting 2 toothpicks near the top of the round cheese where you would like to position the ears. Push them all the way down. If you are using the same ornate toothpicks that I use, insert the flat end into the round cheese with the pointed end sticking out. Then attach the ears by gently pushing them down onto the exposed pointed ends of the toothpicks.
- Add cheese bunnies to board: Place the cheese bunny or bunnies onto the board or platter.
- Fill in the rest of the board: Fill in the remaining areas with your favorite charcuterie board ingredients. For my board, I focused on spring inspired colors and ingredients. I included: radishes, carrots, sugar snap peas, cucumbers, dip, prosciutto, salami, crackers, chocolate mini eggs, dried apricots, pistachios, grapes, raspberries, strawberries, cornichons, wine jelly and a few additional cheeses.
Easter Egg Charcuterie Board
- Assemble the board: Simply arrange each of your ingredients into rows on your oval shaped board or egg-shaped parchment paper guide. Have fun and get creative! For inspiration, you can see what I used in each row in the “Easter Egg Charcuterie Board” section in the post above.
Notes
- There are no rules! These are just the basic steps since the beauty of a charcuterie board is how versatile and customizable they are. Get creative and have fun with it! Make them any size you like and fill them in with your favorite charcuterie board goodies. The possibilities are endless! Use the ideas and photos in the post for inspiration.
- Prep time, cook time and yield will vary depending on the board you choose to make, foods/ingredients included and the size of your board. It can be simple or elaborate, small or large.