This post may contain affiliate links. See my disclosure policy.
Pinwheels are one of those easy, flexible recipes you’ll find yourself coming back to again and again. They’re endlessly customizable and work for everything from parties to packed lunches. Below, you’ll learn how to make pinwheel sandwiches with a simple template plus lots of filling ideas for inspiration.
What Are Pinwheel Sandwiches (and Why I Love Them)
Pinwheel sandwiches (aka pinwheels or tortilla rollups) are made by layering a variety of fillings onto flatbread (like big flour tortillas or lavash), then rolling it up and slicing. Once cut, you get these pretty little rounds that look like pinwheels… hence the name.
Here are 4 reasons why I love these:
- Endlessly customizable: This is such a versatile recipe, there are so many ways to fill these! Once you know the basic template, the options are endless.
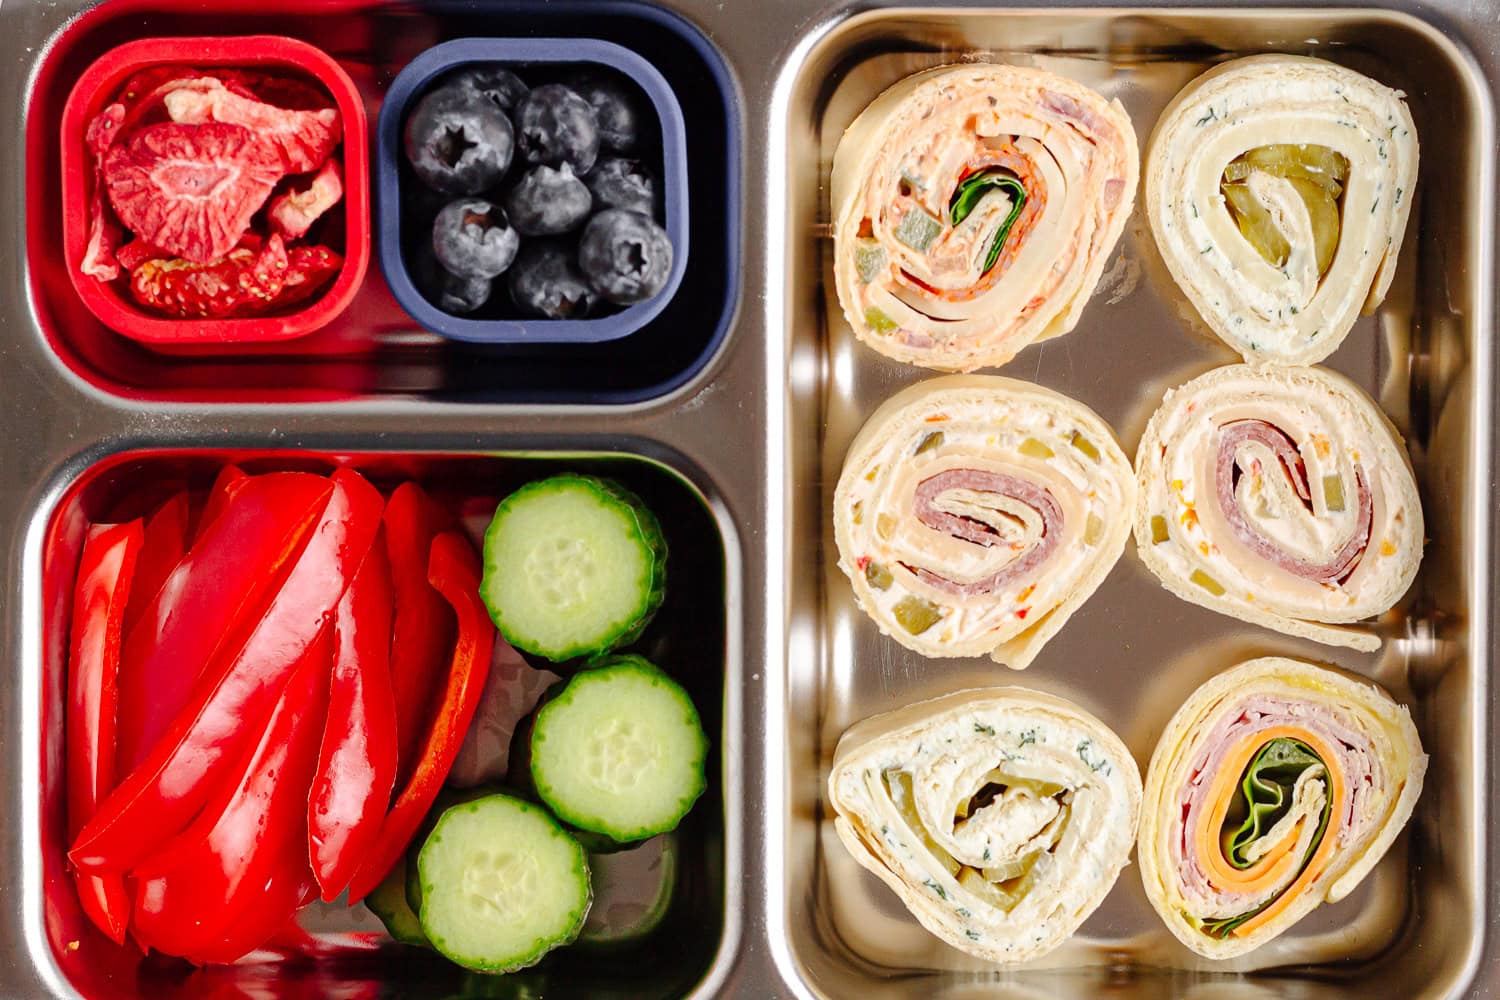
- Perfect finger food for any occasion: Easy party appetizer, game day snack, picnic or lunch box idea… pinwheel sandwiches fit right in everywhere. They’re easy to grab, easy to eat and always a hit!
- No cooking required: Enough said! Got to love a delicious no-cook recipe!
- Make ahead friendly: You can prep these up to 24 hours in advance, which is always a win!
Ingredients You’ll Need
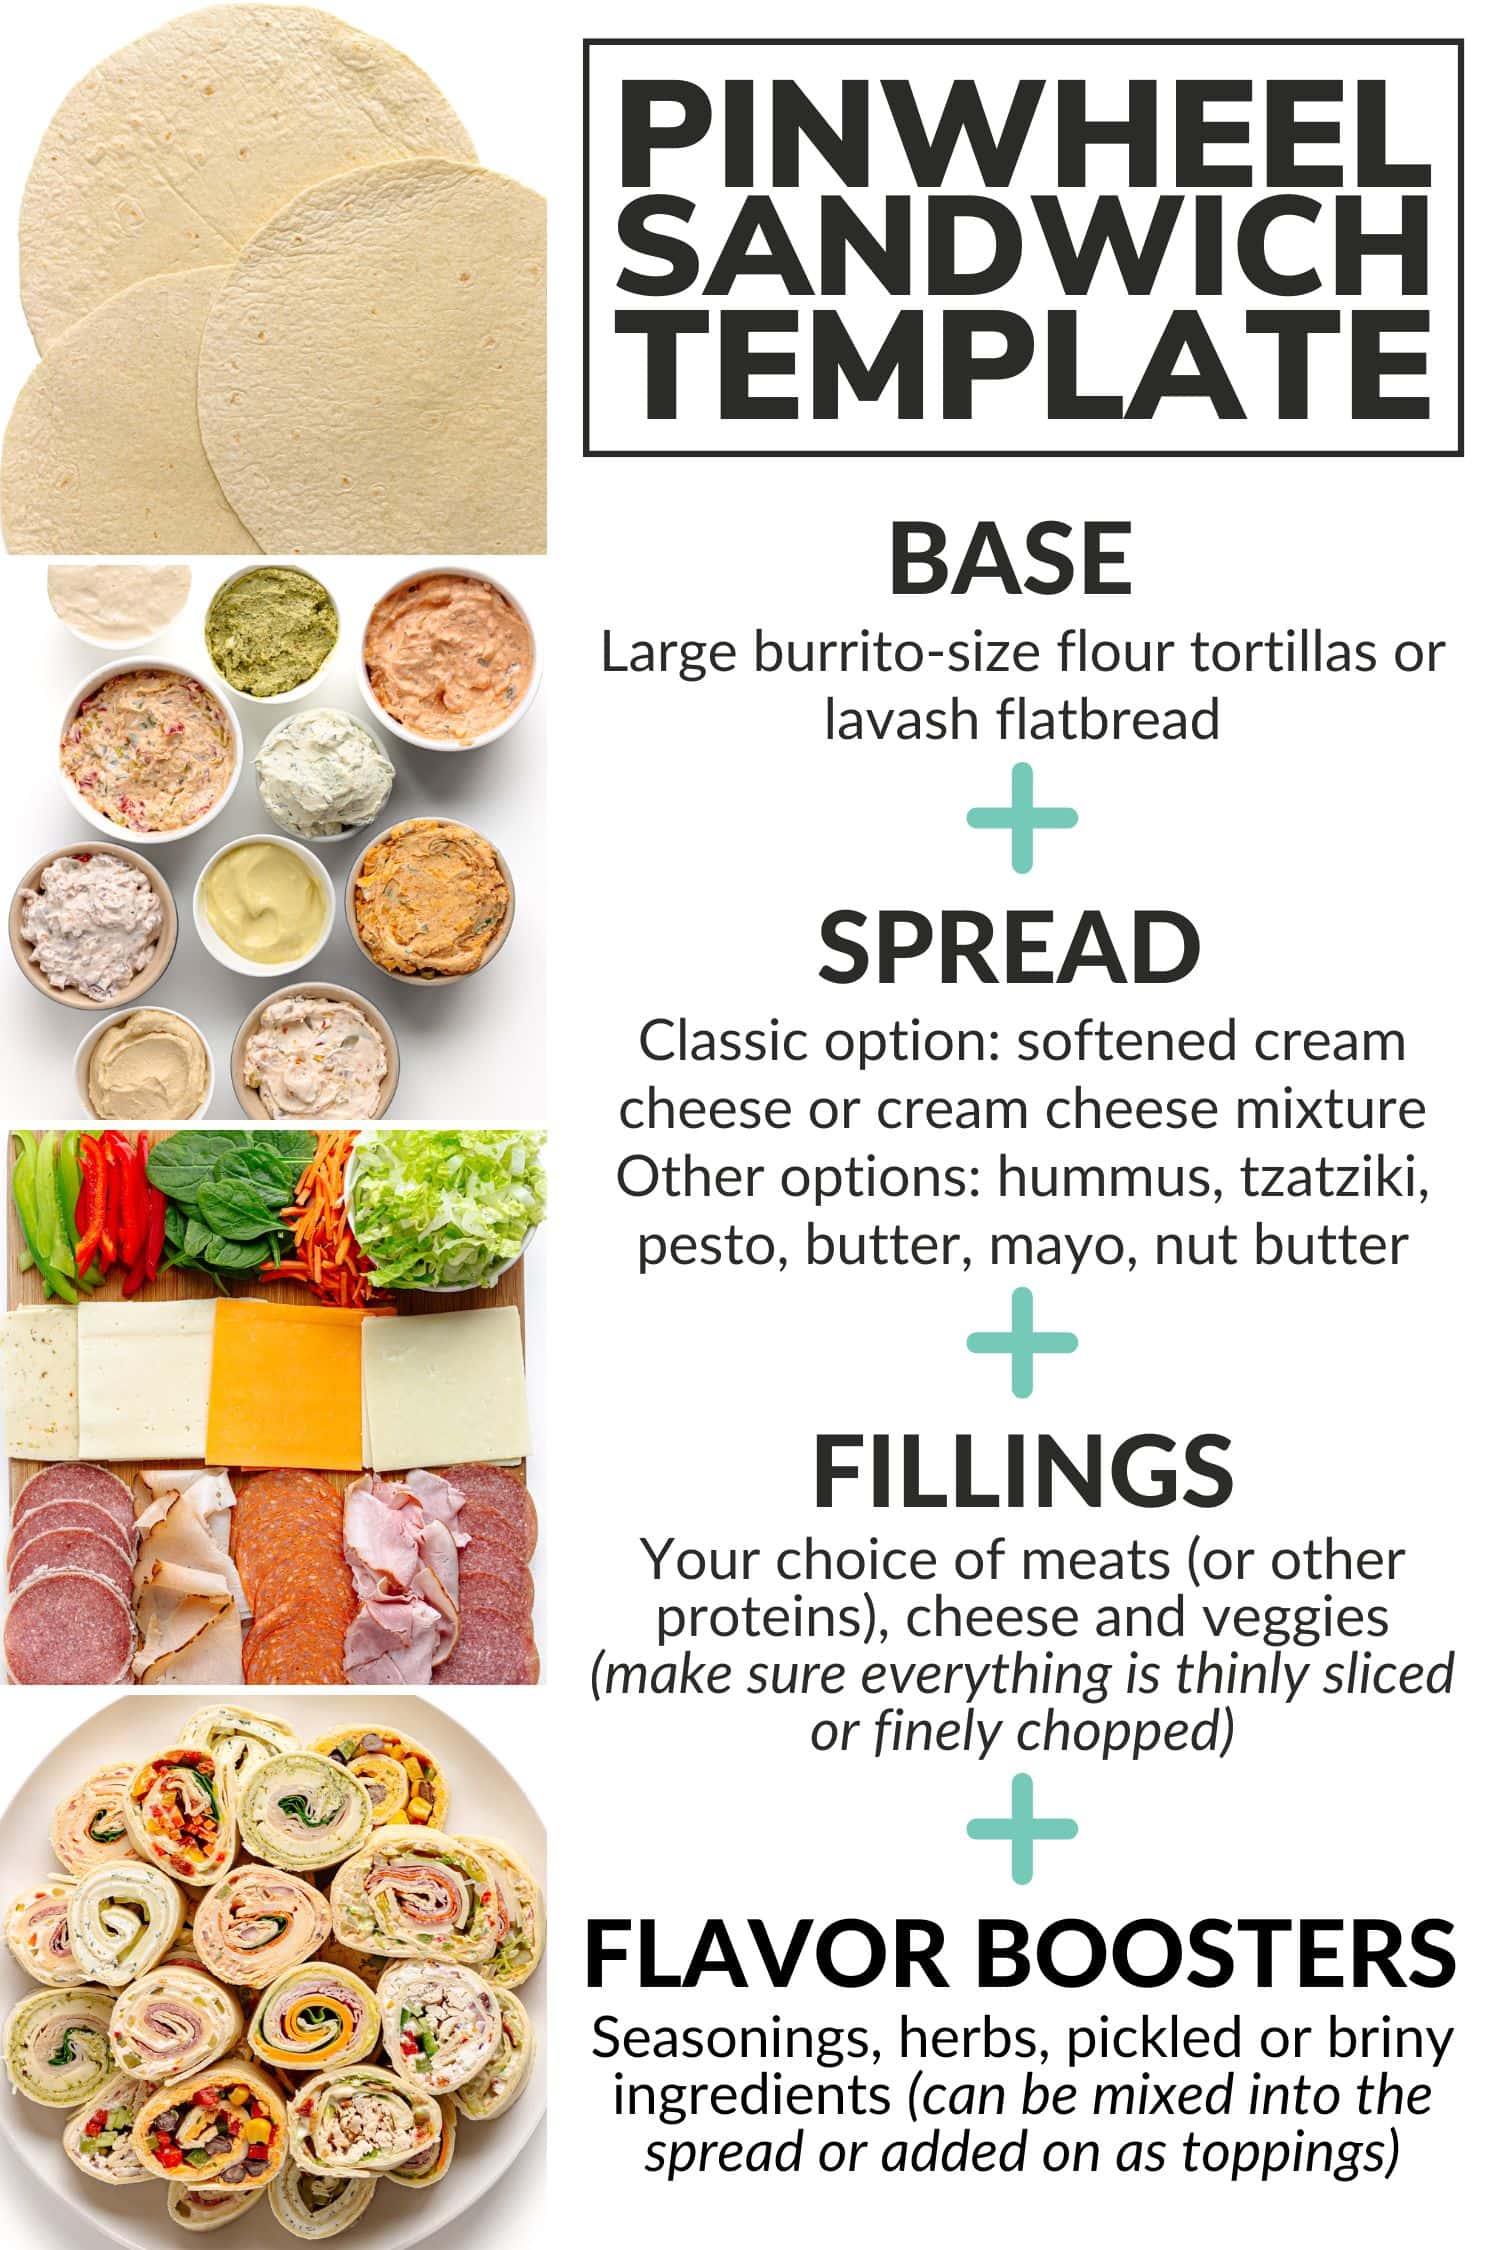
Think of this recipe as more of a pinwheel sandwich template than a strict recipe. Once you know the basics, you can get creative and play around with the fillings based on what you love (or what’s hanging out in your fridge). Here’s a breakdown of the basic components:
- Base: Large burrito-size flour tortillas or lavash flatbread work best. They’re soft, flexible and the large size means easier rolling and prettier pinwheels.
- Spread: This is what “glues” the pinwheels together. Softened cream cheese or a flavorful cream cheese mixture is classic but hummus, tzatziki, pesto, mayo, butter or even nut butter are also options.
- Fillings: Add your choice of meats (or other proteins), cheese and veggies. Just be sure everything is thinly sliced or finely chopped so the pinwheels roll up nicely.
- Flavor Boosters: Seasonings, herbs, pickled or briny ingredients – anything that adds a little pop of extra flavor and deliciousness! They can be mixed into your spread or added on as fillings.
How To Make Pinwheel Sandwiches
Making pinwheel sandwiches is a simple 3 step process…
Step 1: Assemble
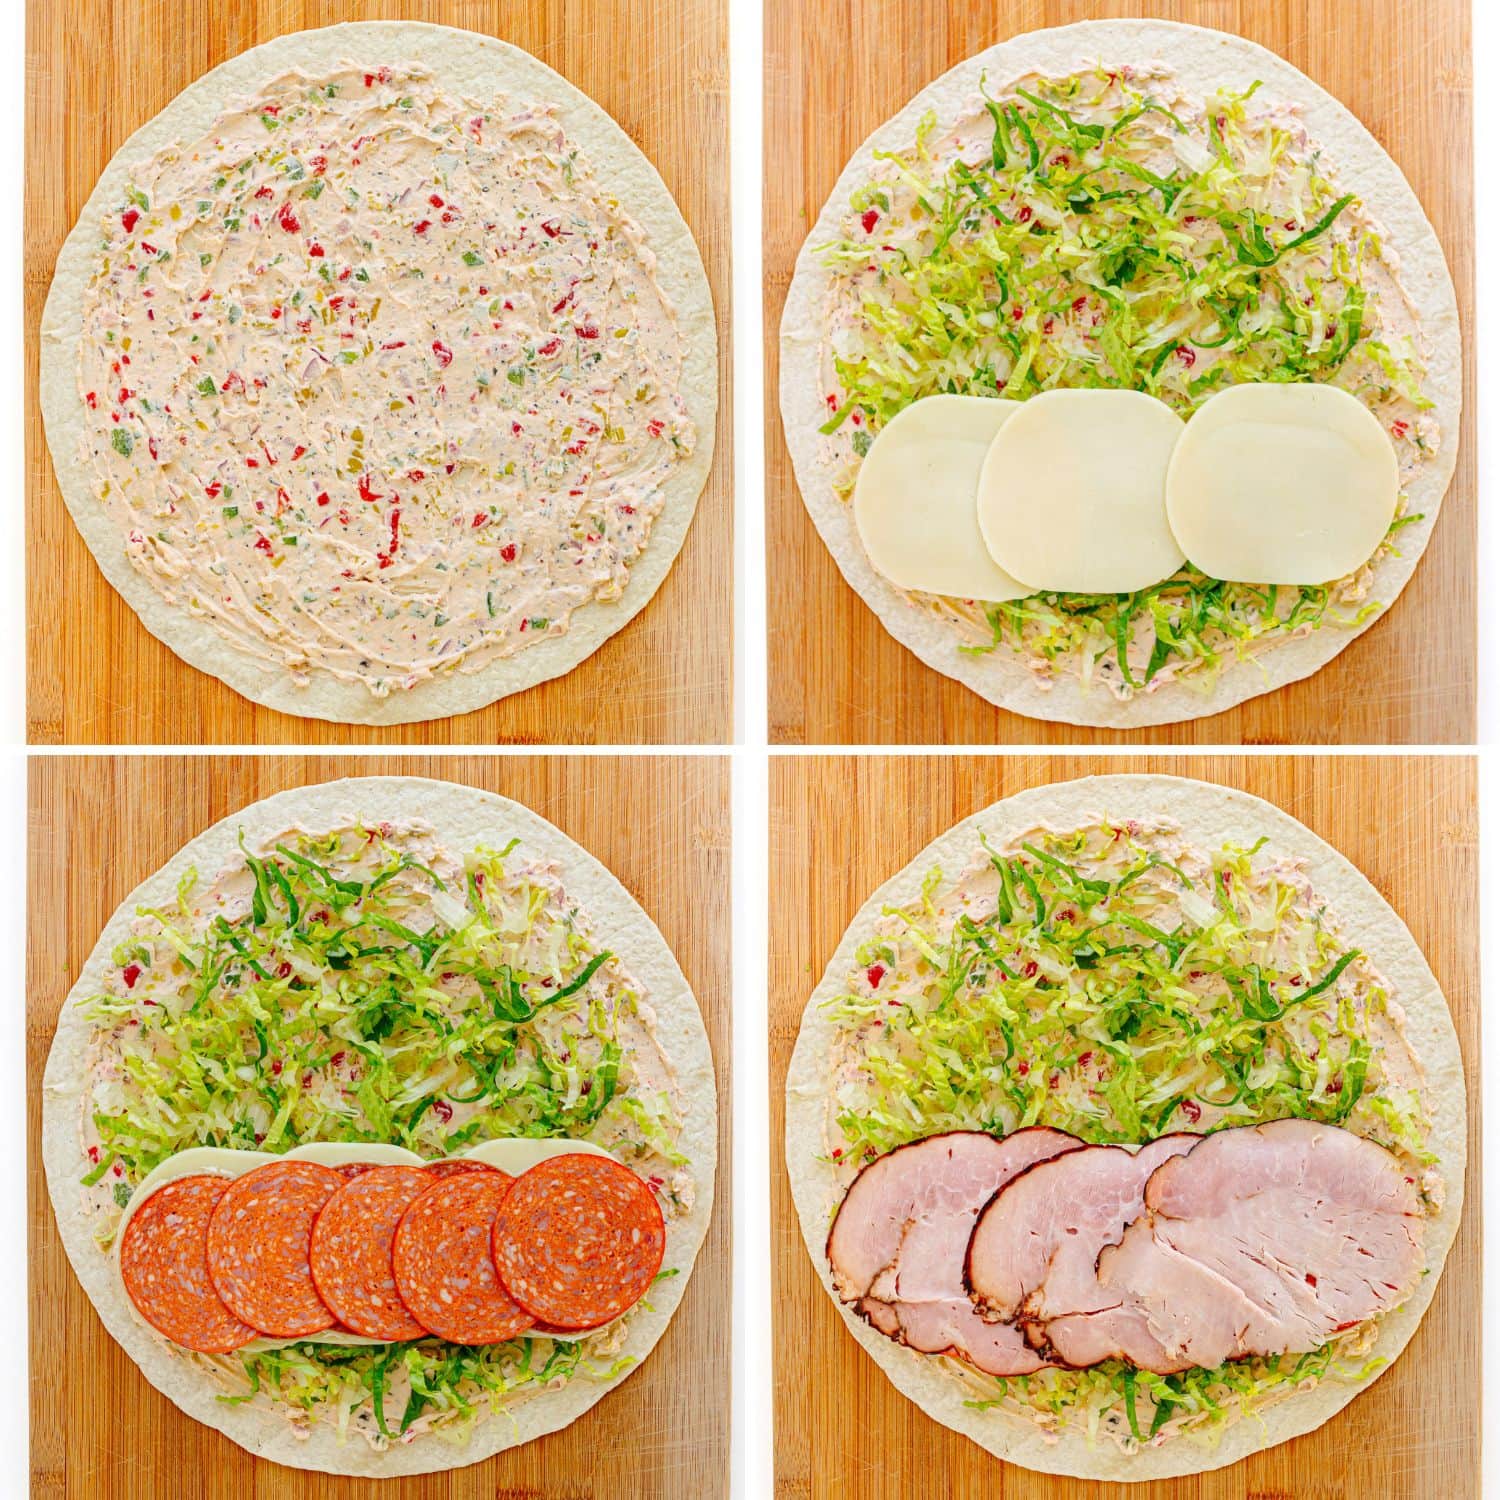
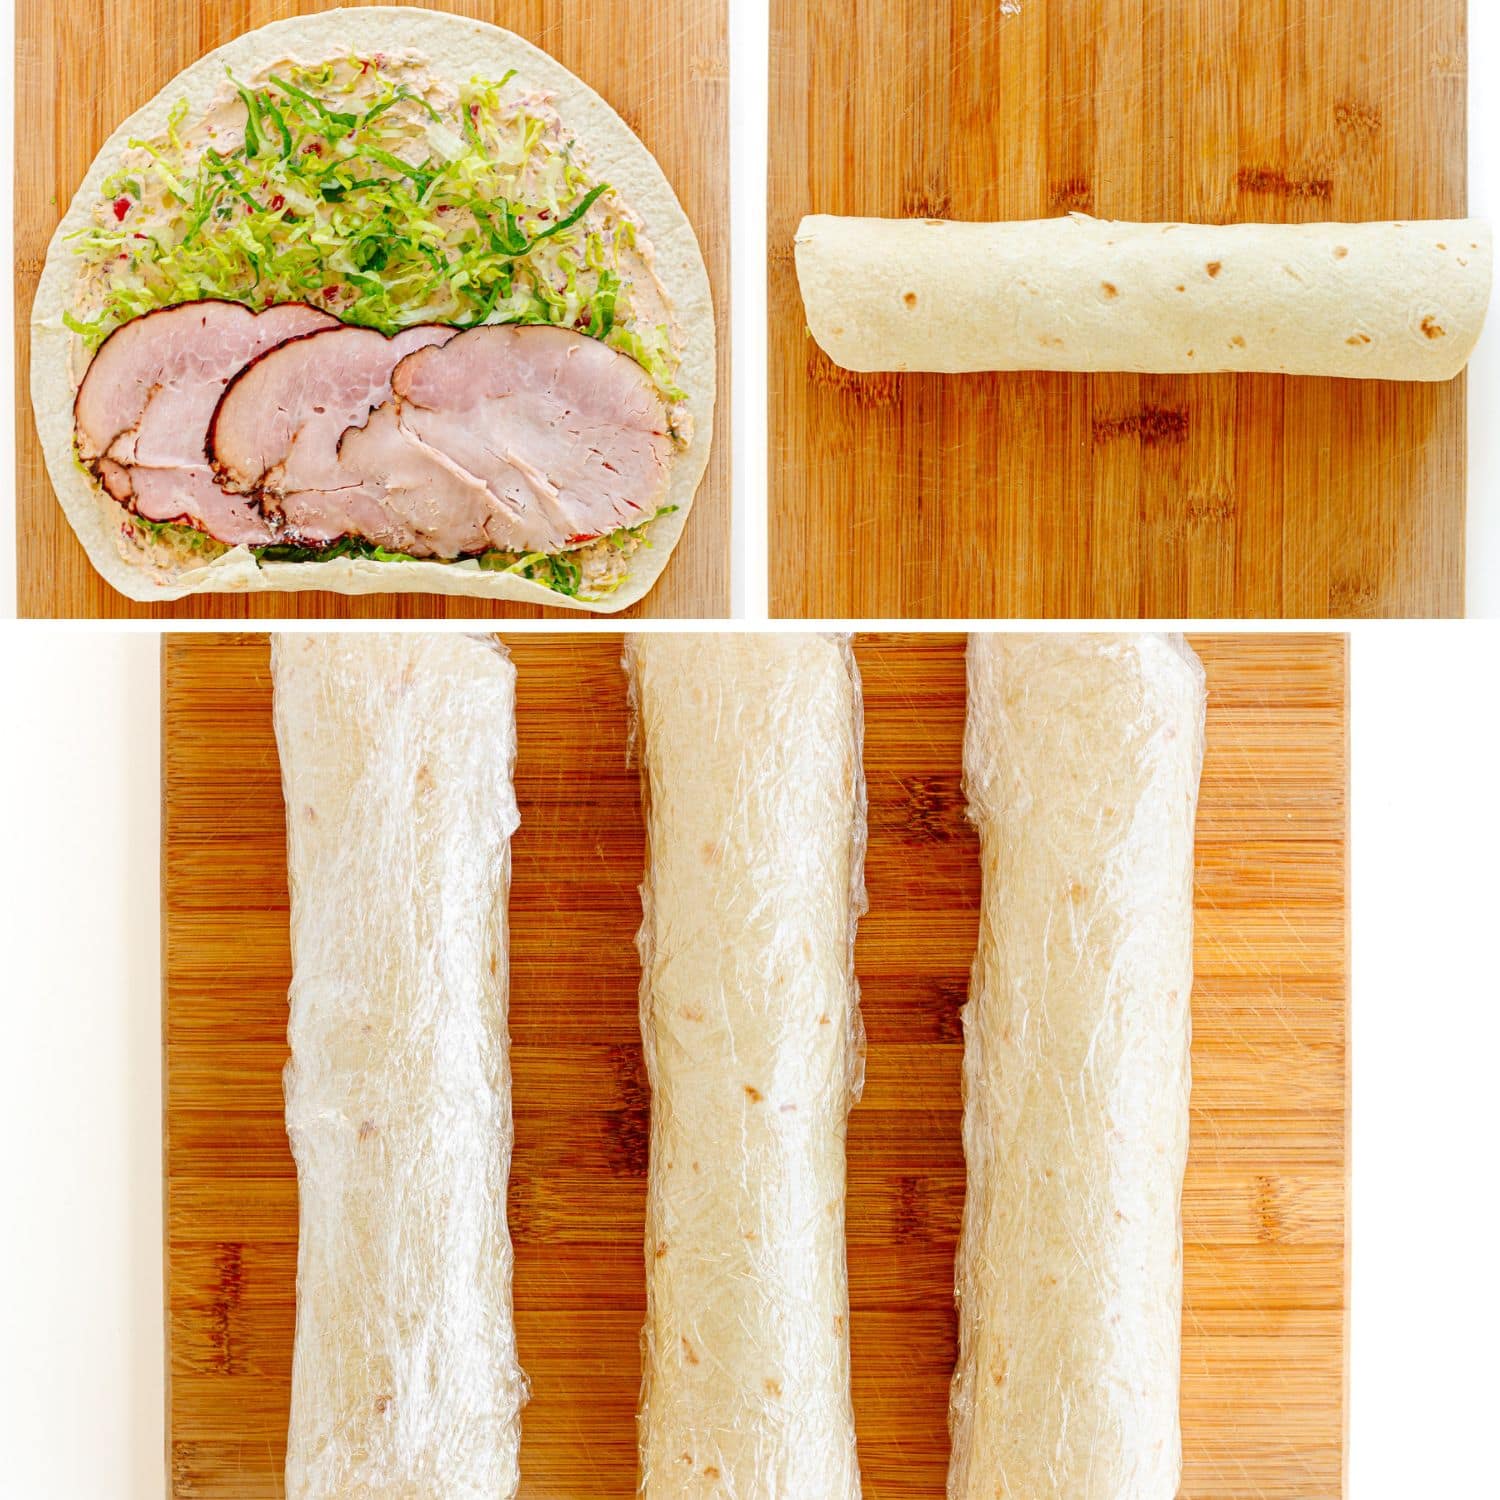
Lay your tortilla or lavash bread flat and evenly spread on your chosen spread over the surface, leaving a small border around the edges. Sprinkle on any finely chopped ingredients. Then layer your remaining fillings (like meats and cheese) in an even row slightly below the center, closer to the bottom edge. (FYI: The photos below show these Italian Pinwheels being assembled).
Step 2: Roll and chill
Starting from the bottom, roll up tightly into a log. Some shifting of the fillings is totally normal (that’s why placing them slightly below center helps). Wrap each roll tightly in plastic wrap and refrigerate for at least 1 hour. This helps the pinwheels firm up and hold their shape when you slice them.
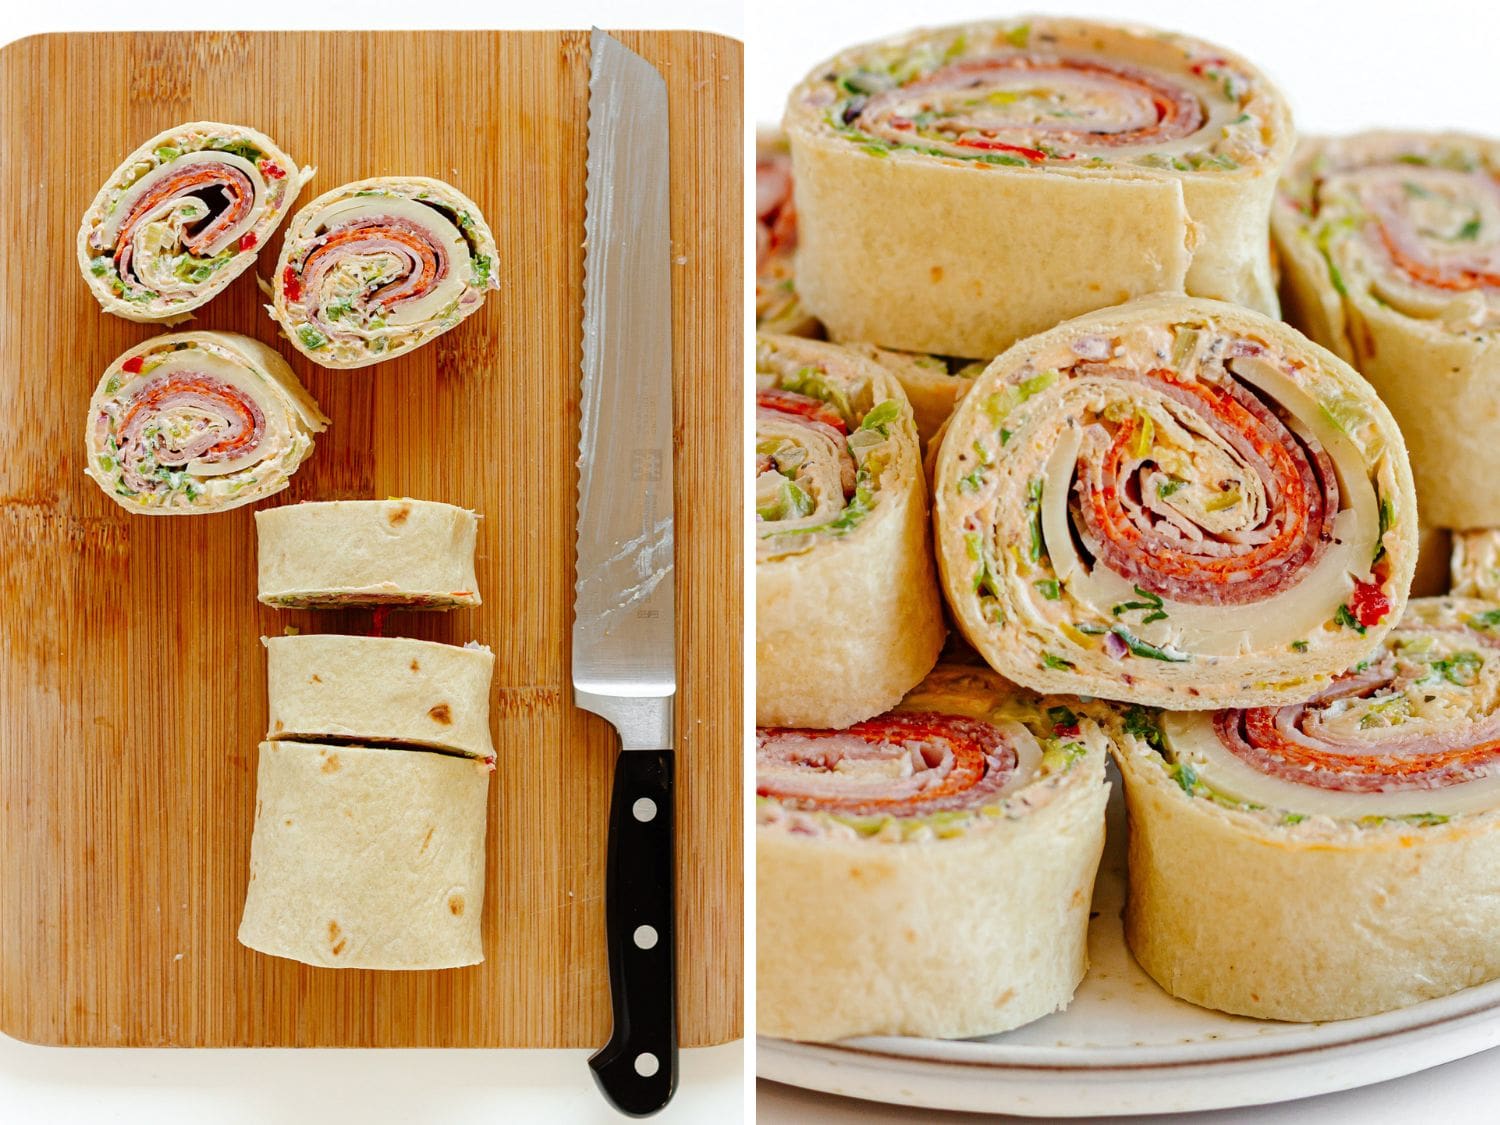
Step 3: Slice and serve
Slice seam-side down with a serrated knife into 1-inch thick slices. A little tip: For the best presentation, trim off the ends first (perfect little chef’s snack!). Serve the pinwheels however you like – party platter, lunchboxes or straight from the cutting board!
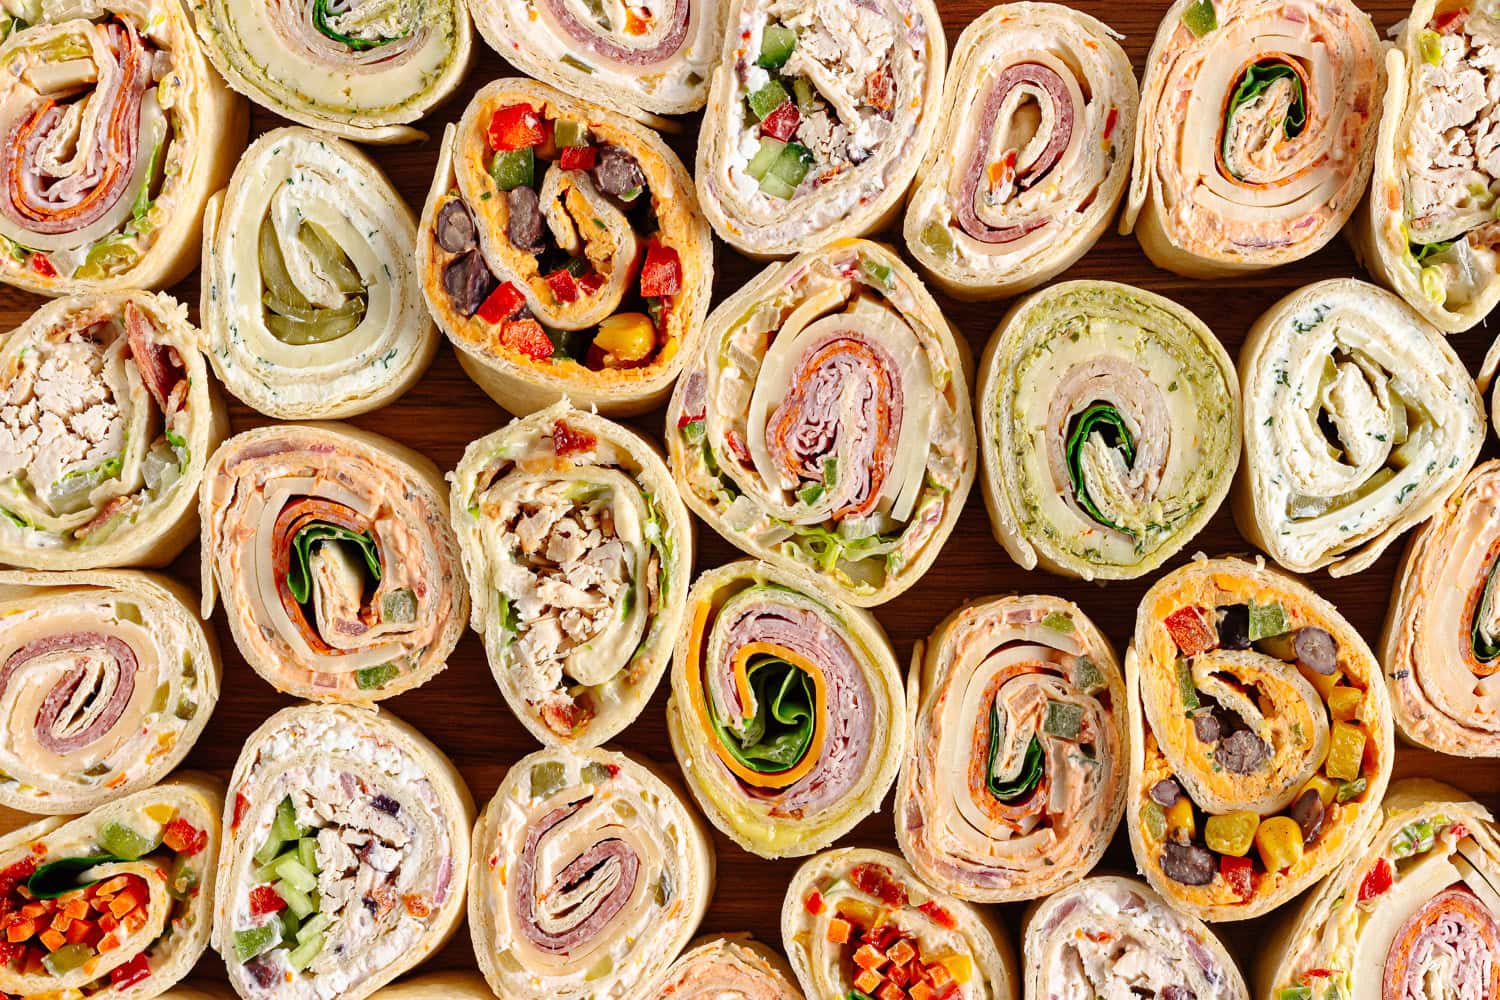
Once you’ve got the basic template down, the possibilities are endless. Get creative with the fillings or check out the pinwheel filling ideas I put together below!
Helpful Tips
A Few Tips
- Don’t skip the chill time: Try to give the pinwheels at least an hour in the fridge before slicing. This helps them firm up so they hold together nicely. Short on time? Slice and serve by using sandwich picks to help hold them together.
- Use a serrated knife: Grab a sharp, serrated knife for slicing. It makes clean cuts without squishing the pinwheels.
- Don’t overfill: Less is more here! Too many fillings makes the pinwheels harder to roll and more likely to fall apart.
- The type of cream cheese matters: If choosing cream cheese as your spread, use the brick-style and make sure it’s softened. Tub-style spreadable cream cheese doesn’t firm up the same way once chilled so the pinwheels won’t hold their shape as well.
- Watch out for wet ingredients: Juicy tomatoes and similar fillings can make pinwheels soggy. Pat them dry first if you really want to use them.
- Use fresh tortillas or lavash: Fresh is best since they are more flexible and roll easily without tearing or cracking. If they feel a little stiff, a quick 15-20 seconds in the microwave softens them right up.
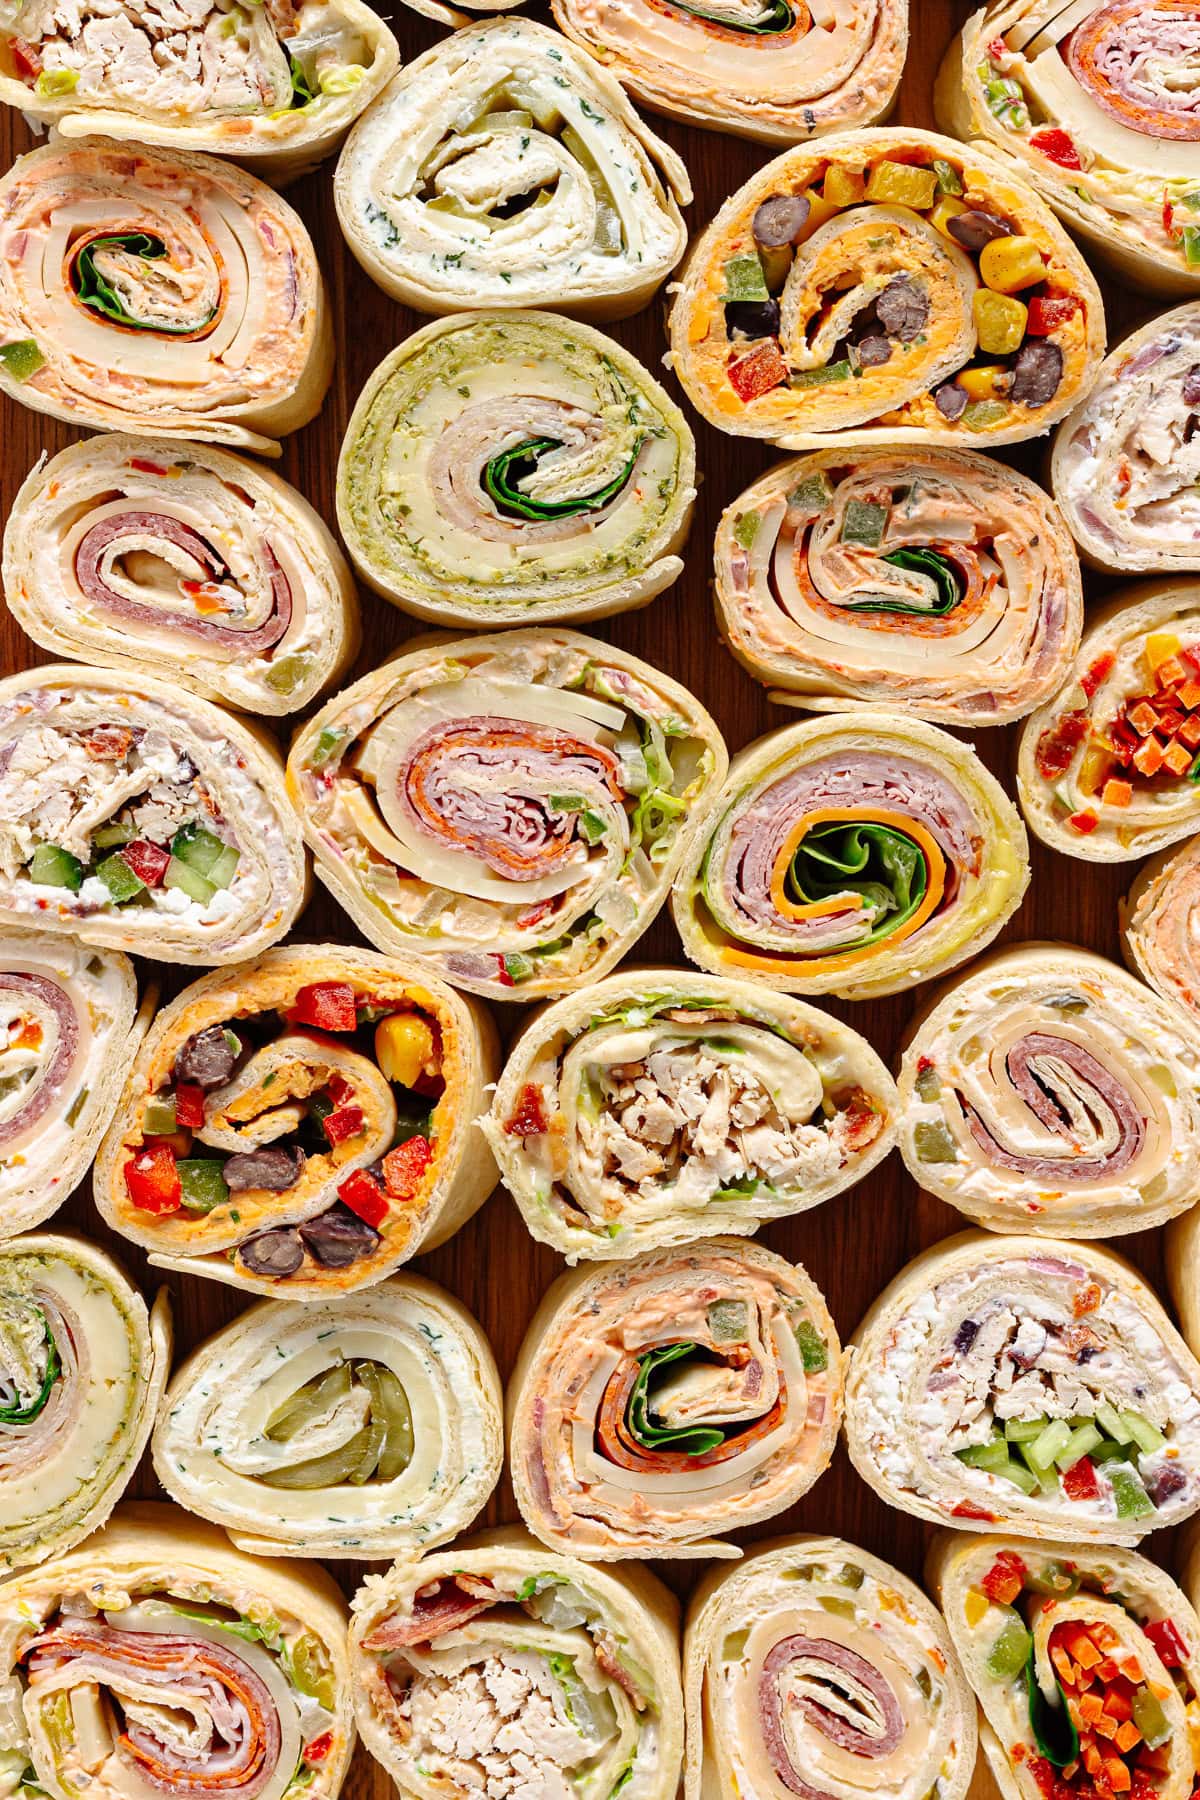
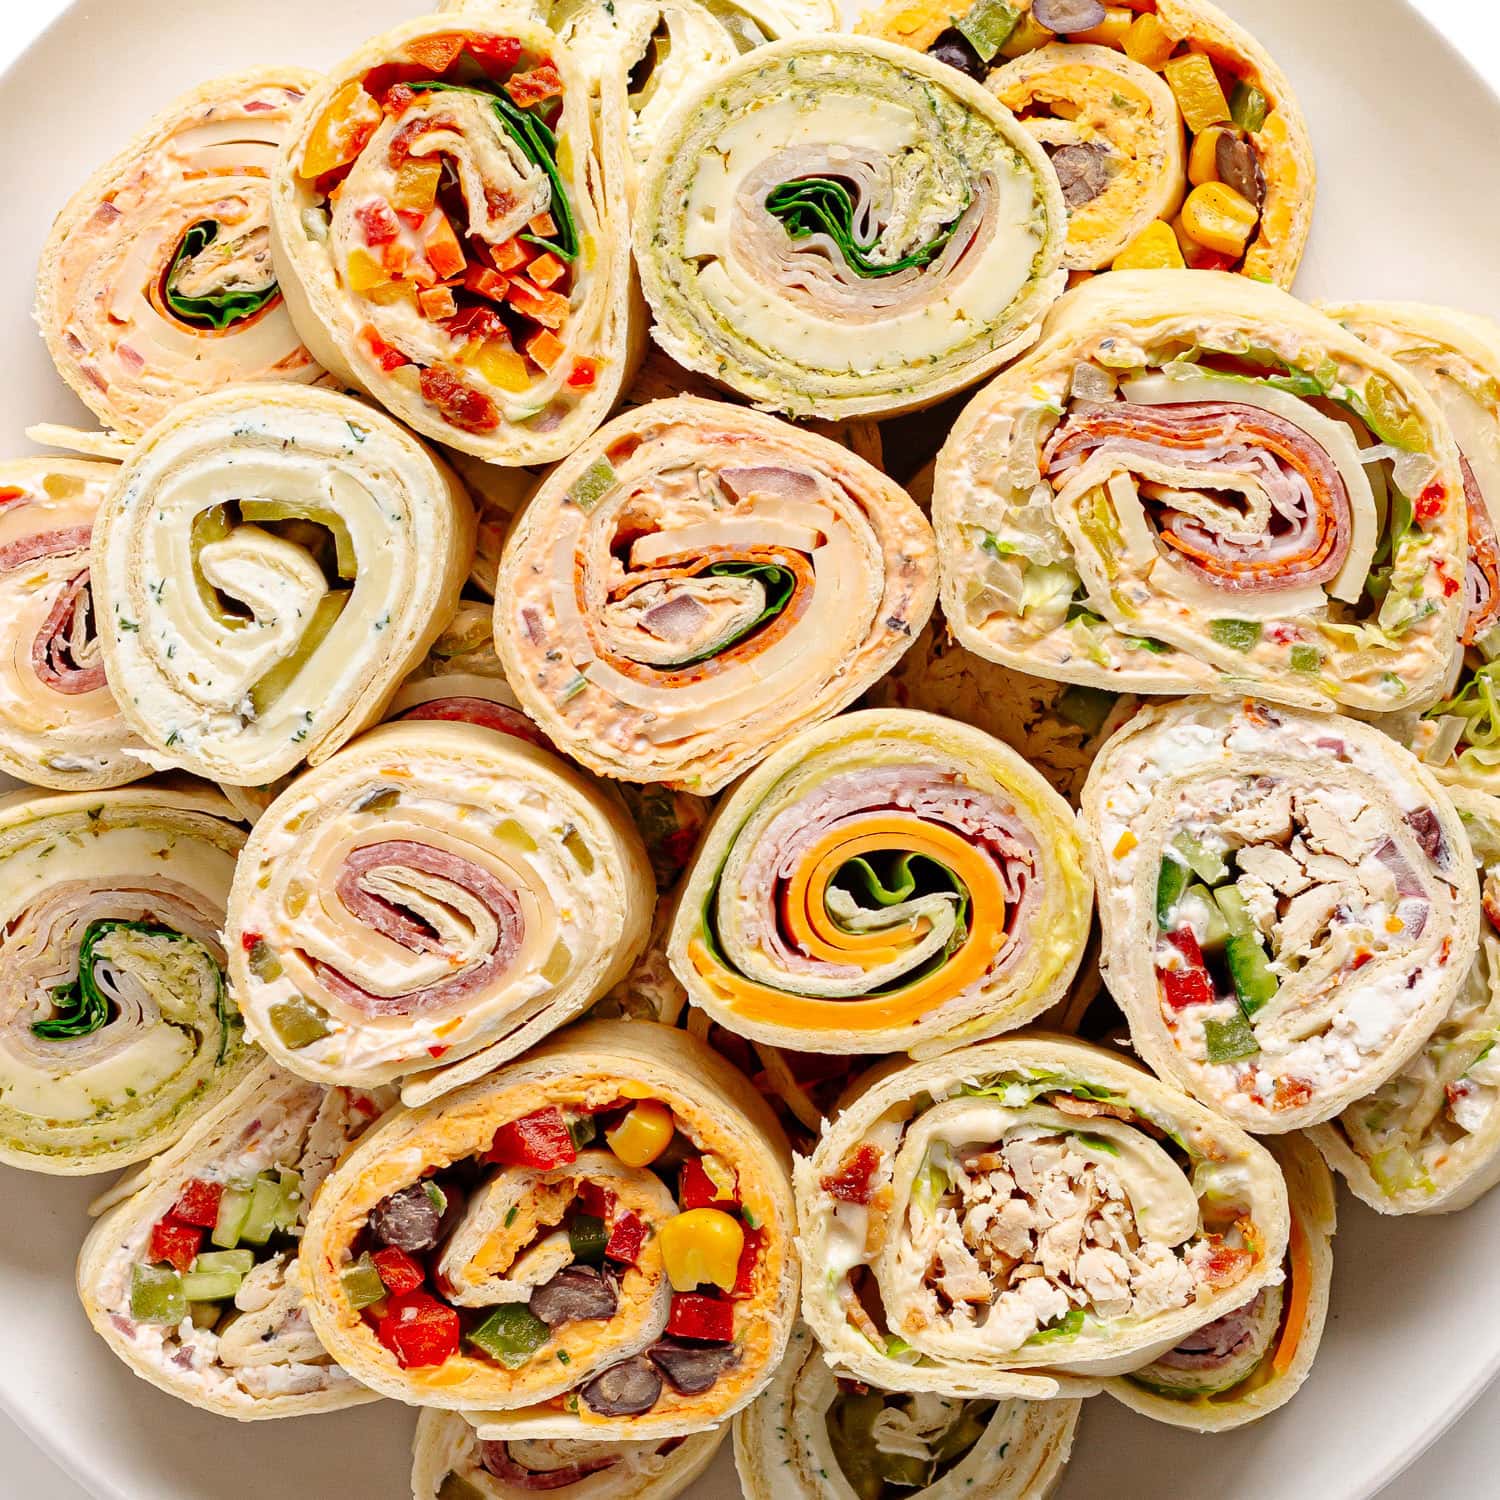
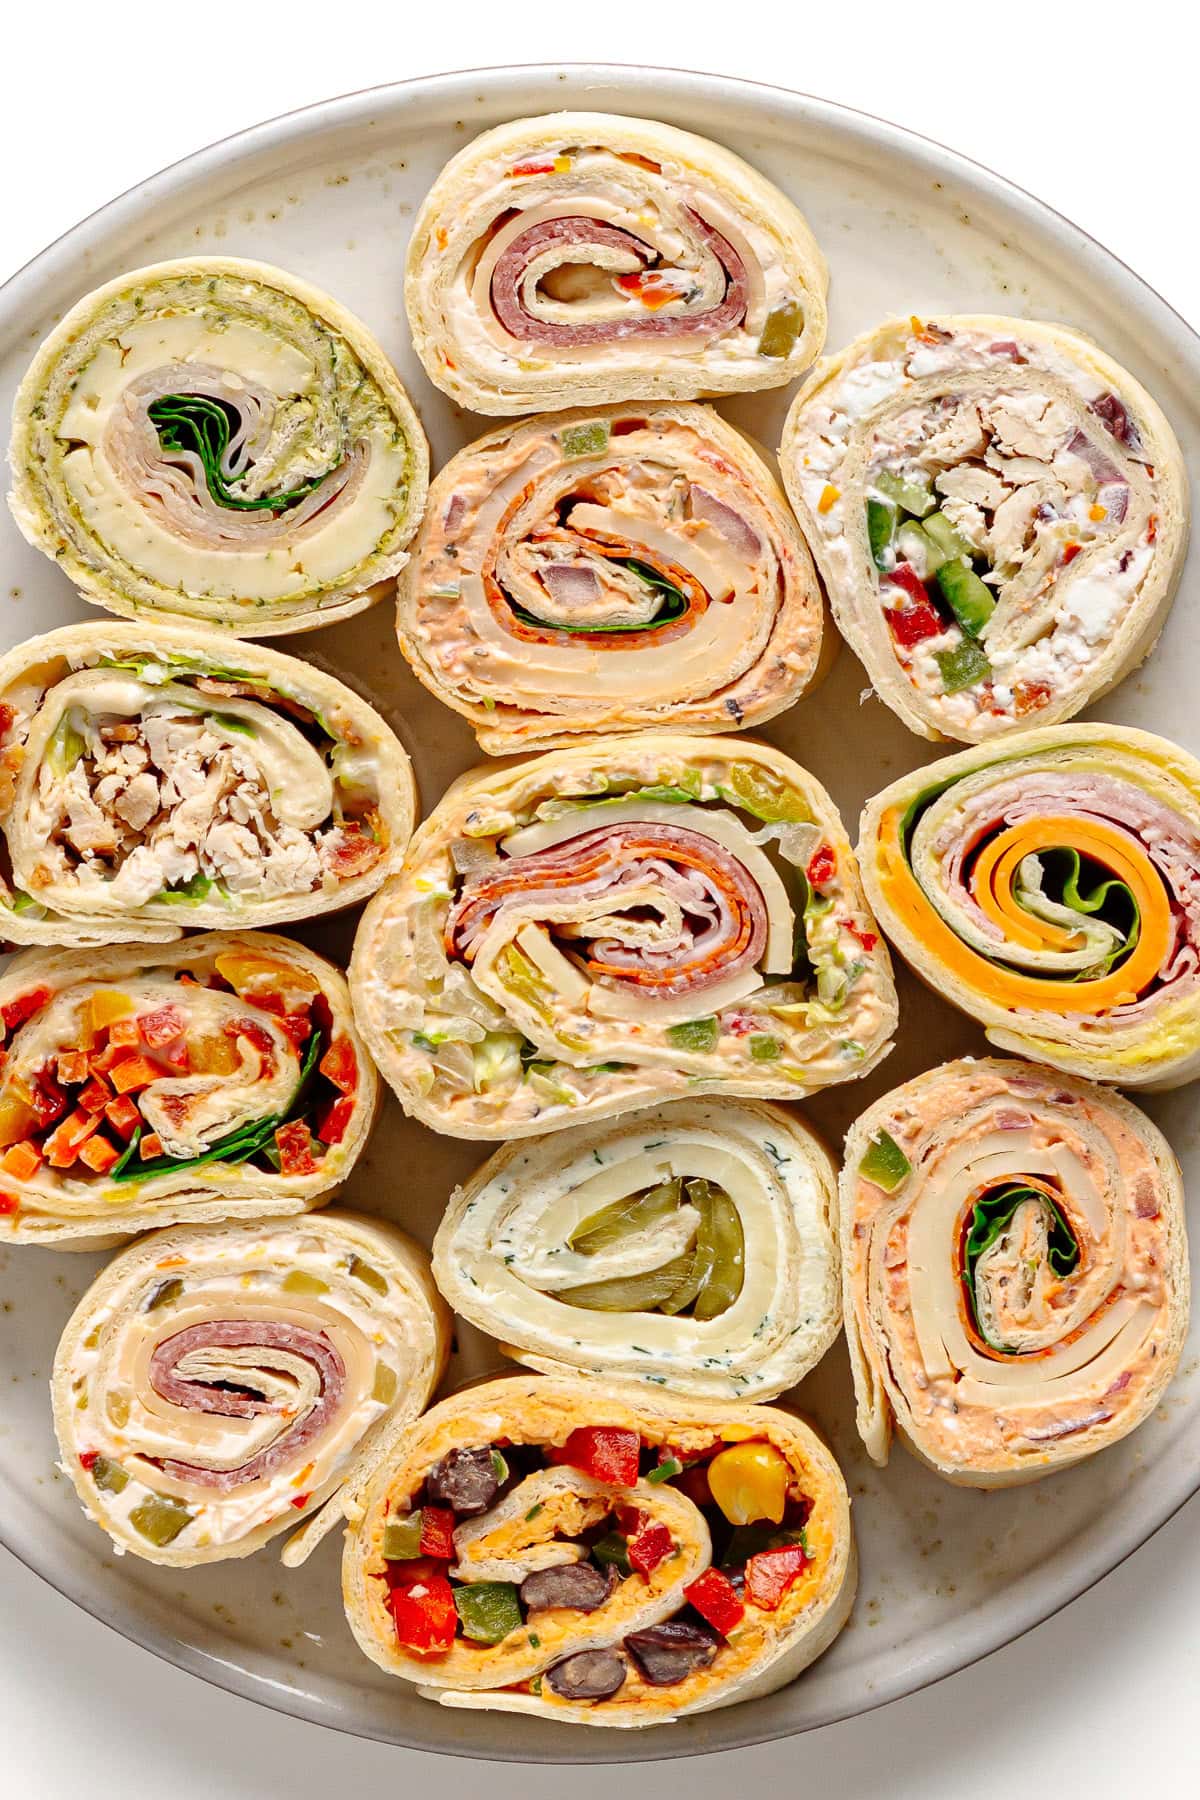
Pinwheel Sandwich Ideas
The beauty of pinwheel sandwiches is that you don’t really need a recipe… just a simple template! That said, a little inspiration never hurts. Here are 10 delicious filling ideas to help get you started.
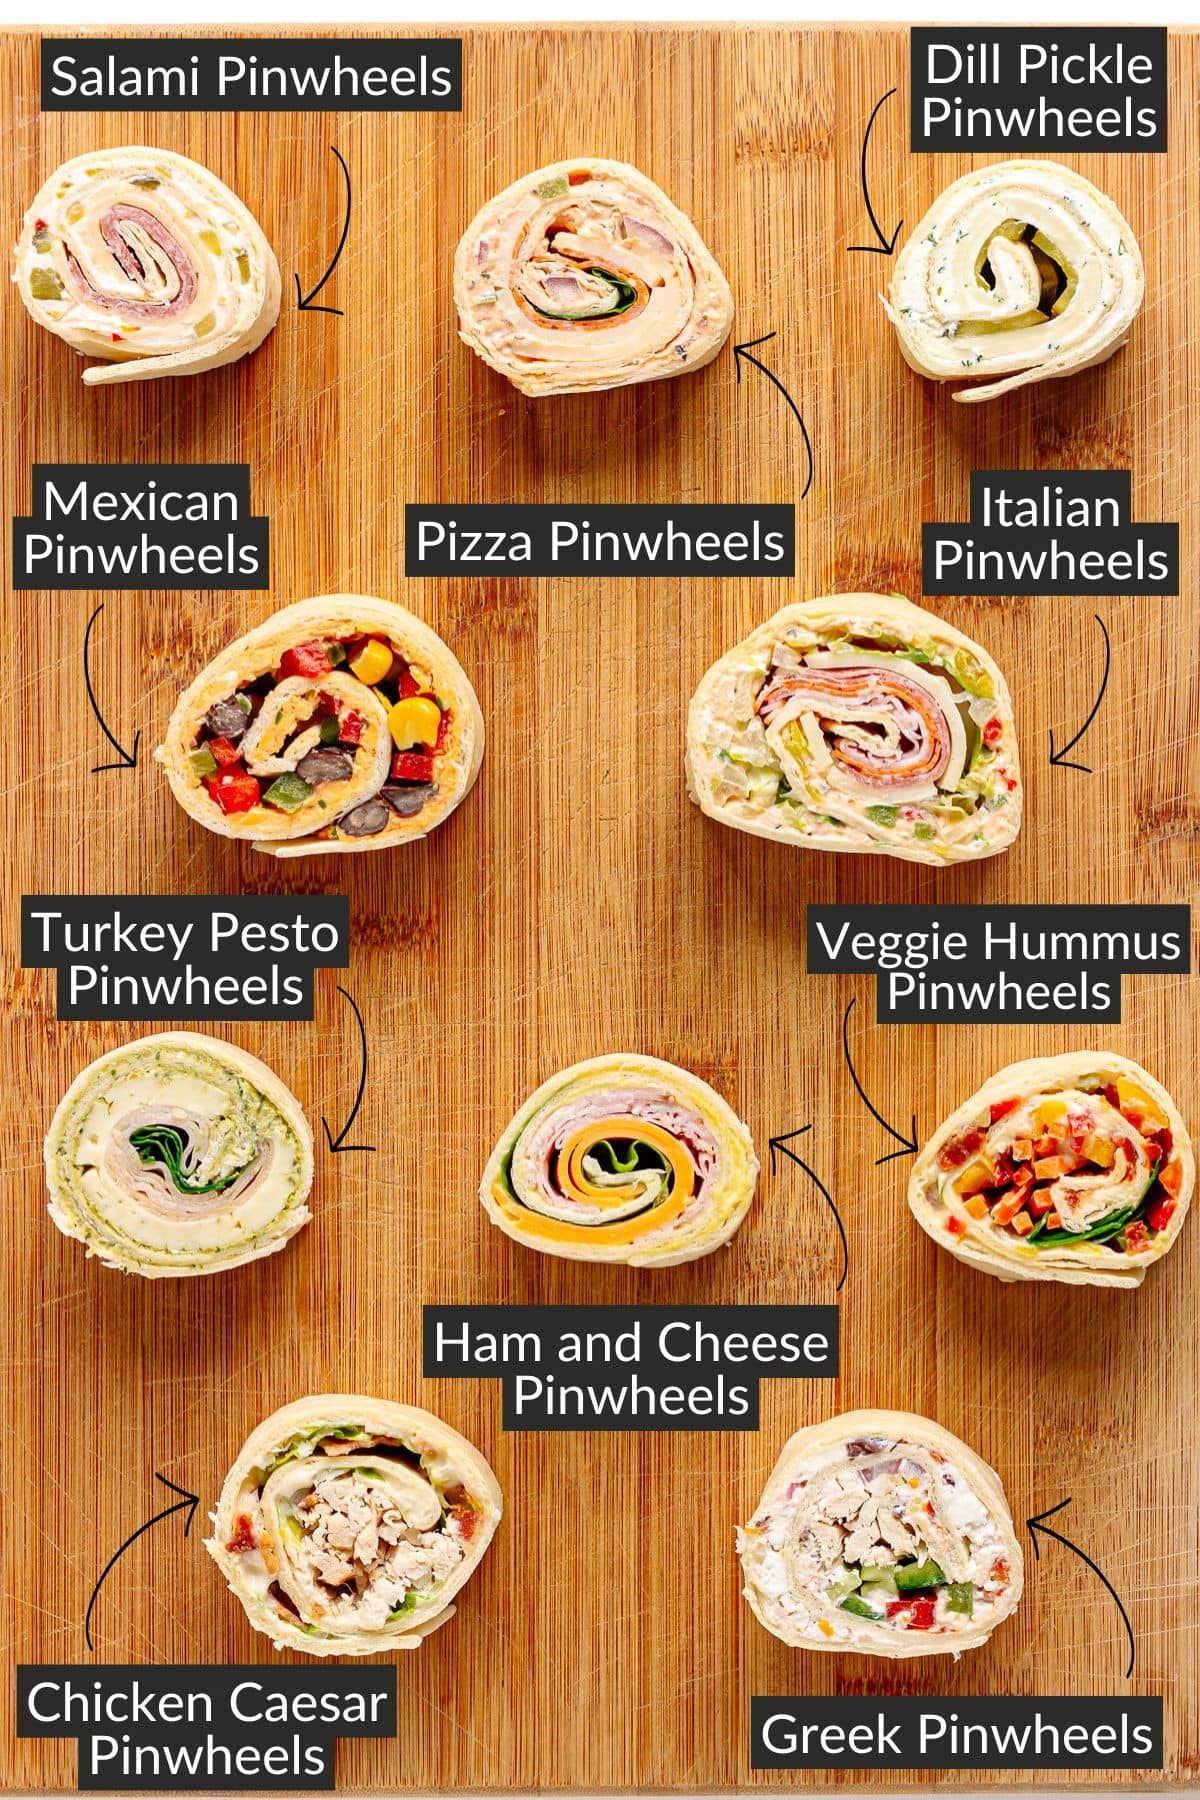
Turkey Pesto Pinwheels
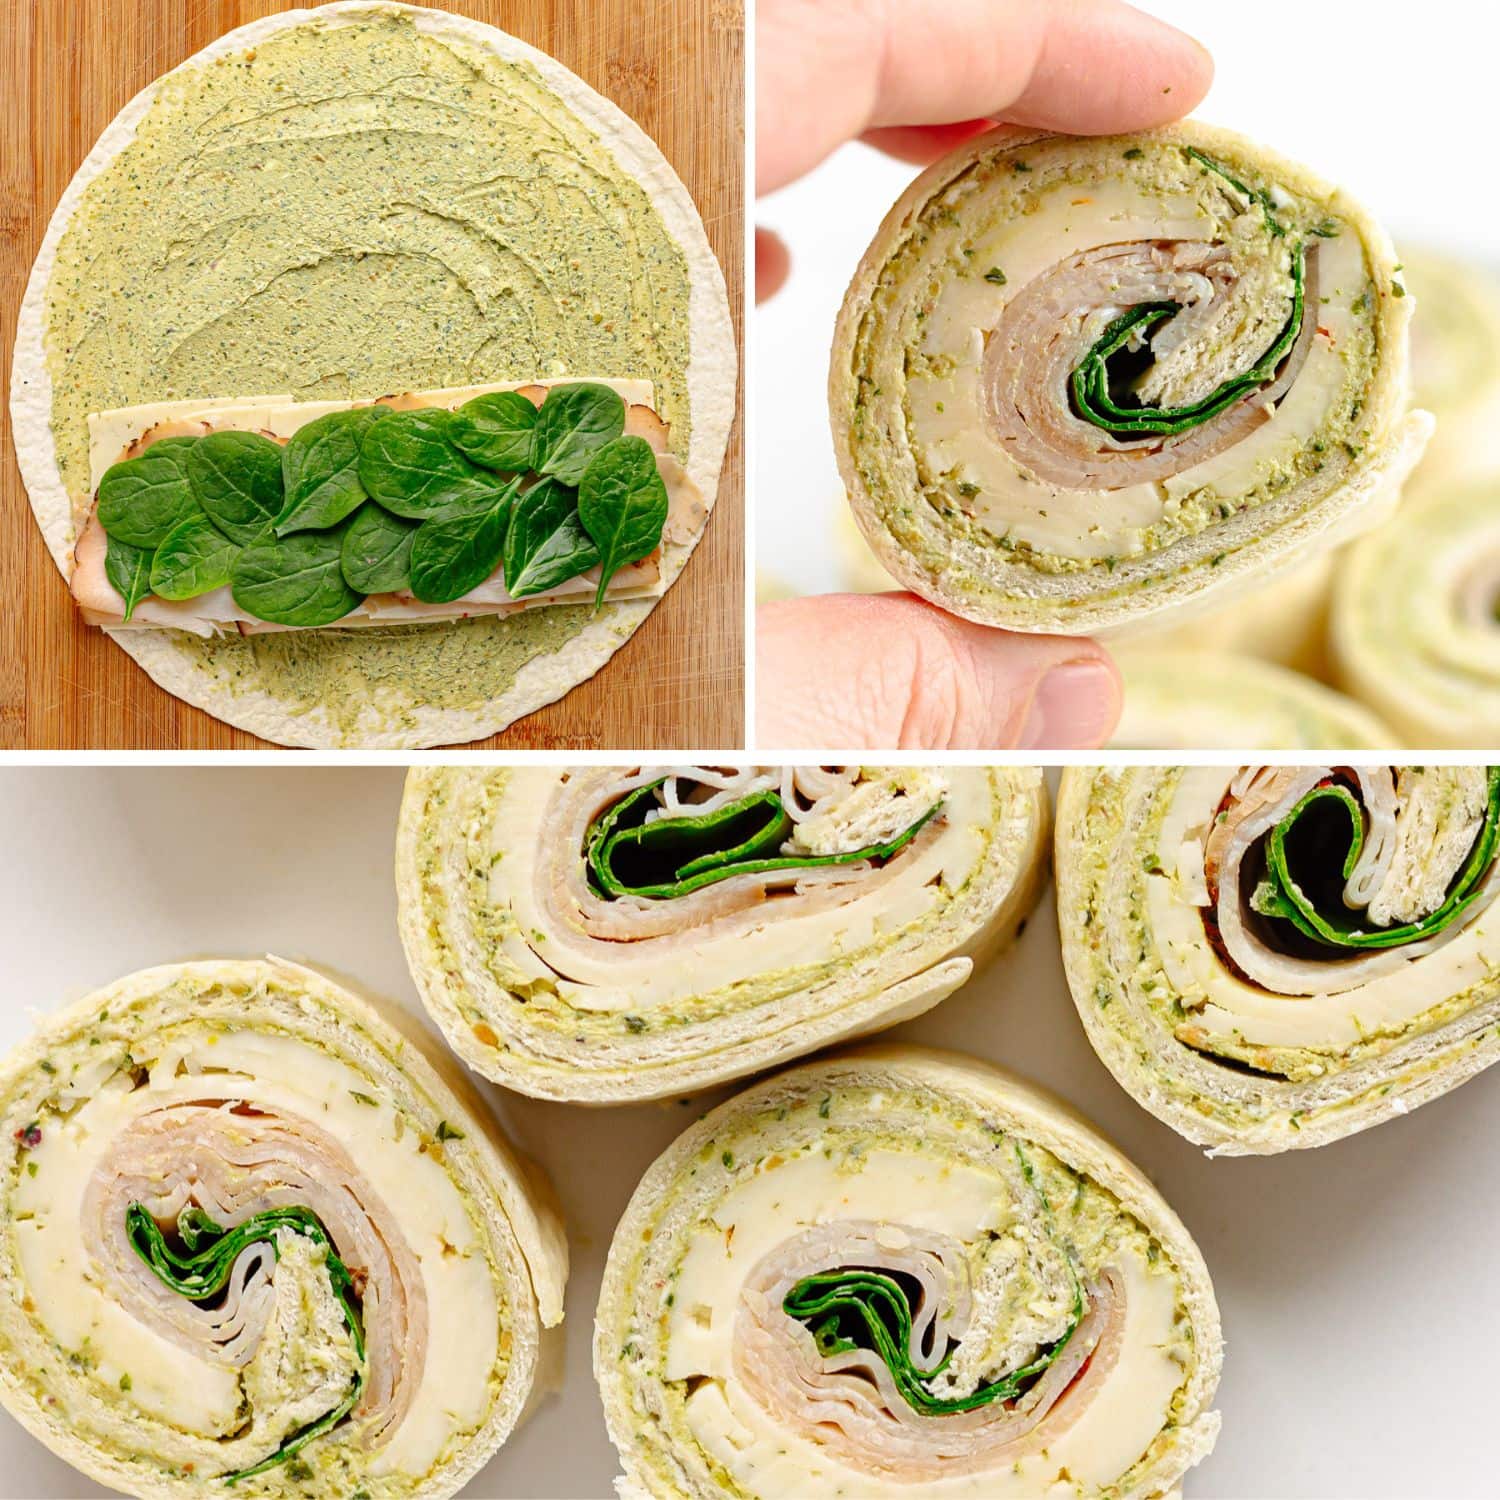
- Spread: Softened cream cheese mixed with pesto (I used this pistachio pesto)
- Fillings: Sliced Havarti cheese, thinly sliced deli turkey and baby spinach leaves
Chicken Caesar Pinwheels
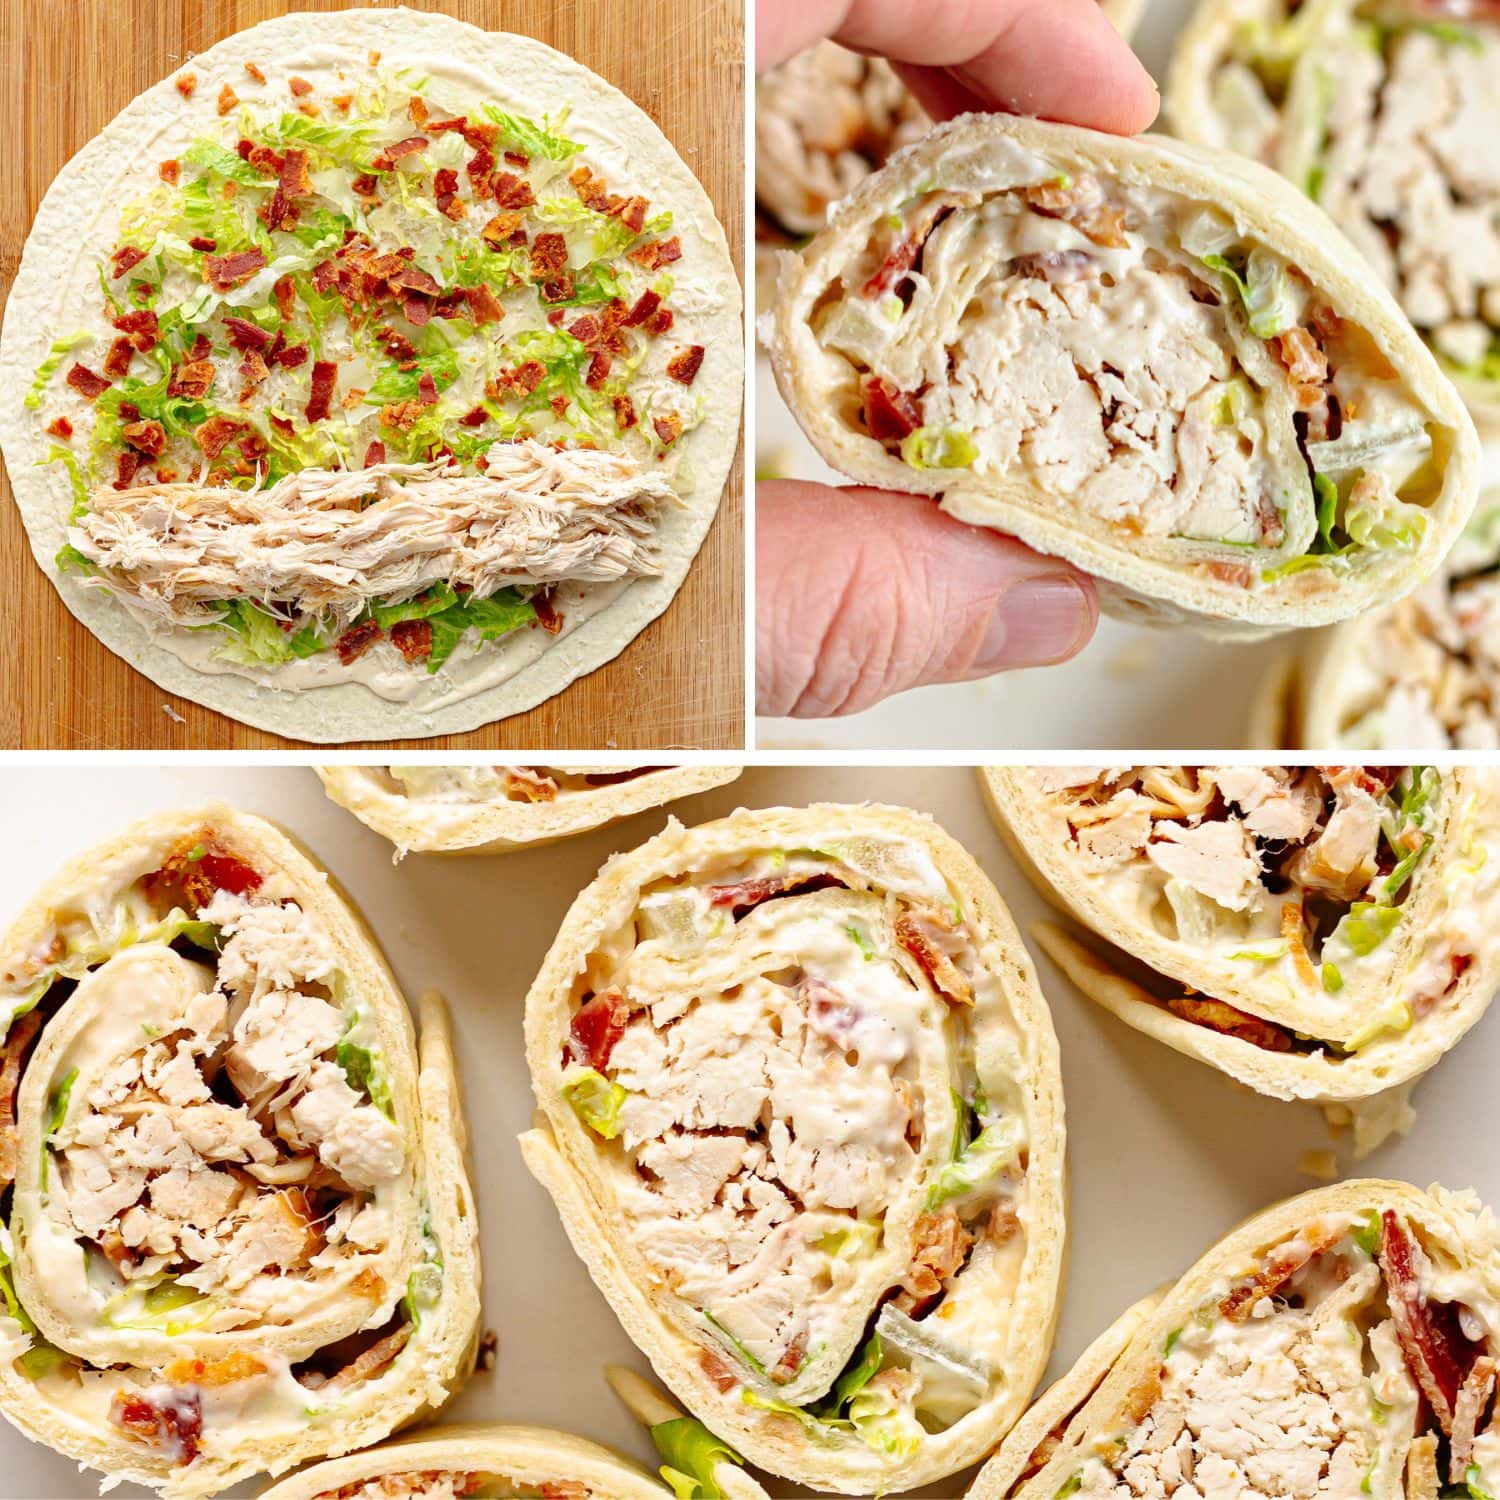
- Spread: Caesar dressing
- Fillings: Freshly grated parmesan, finely shredded romaine lettuce, crumbled bacon and shredded chicken
Ham and Cheese Pinwheels
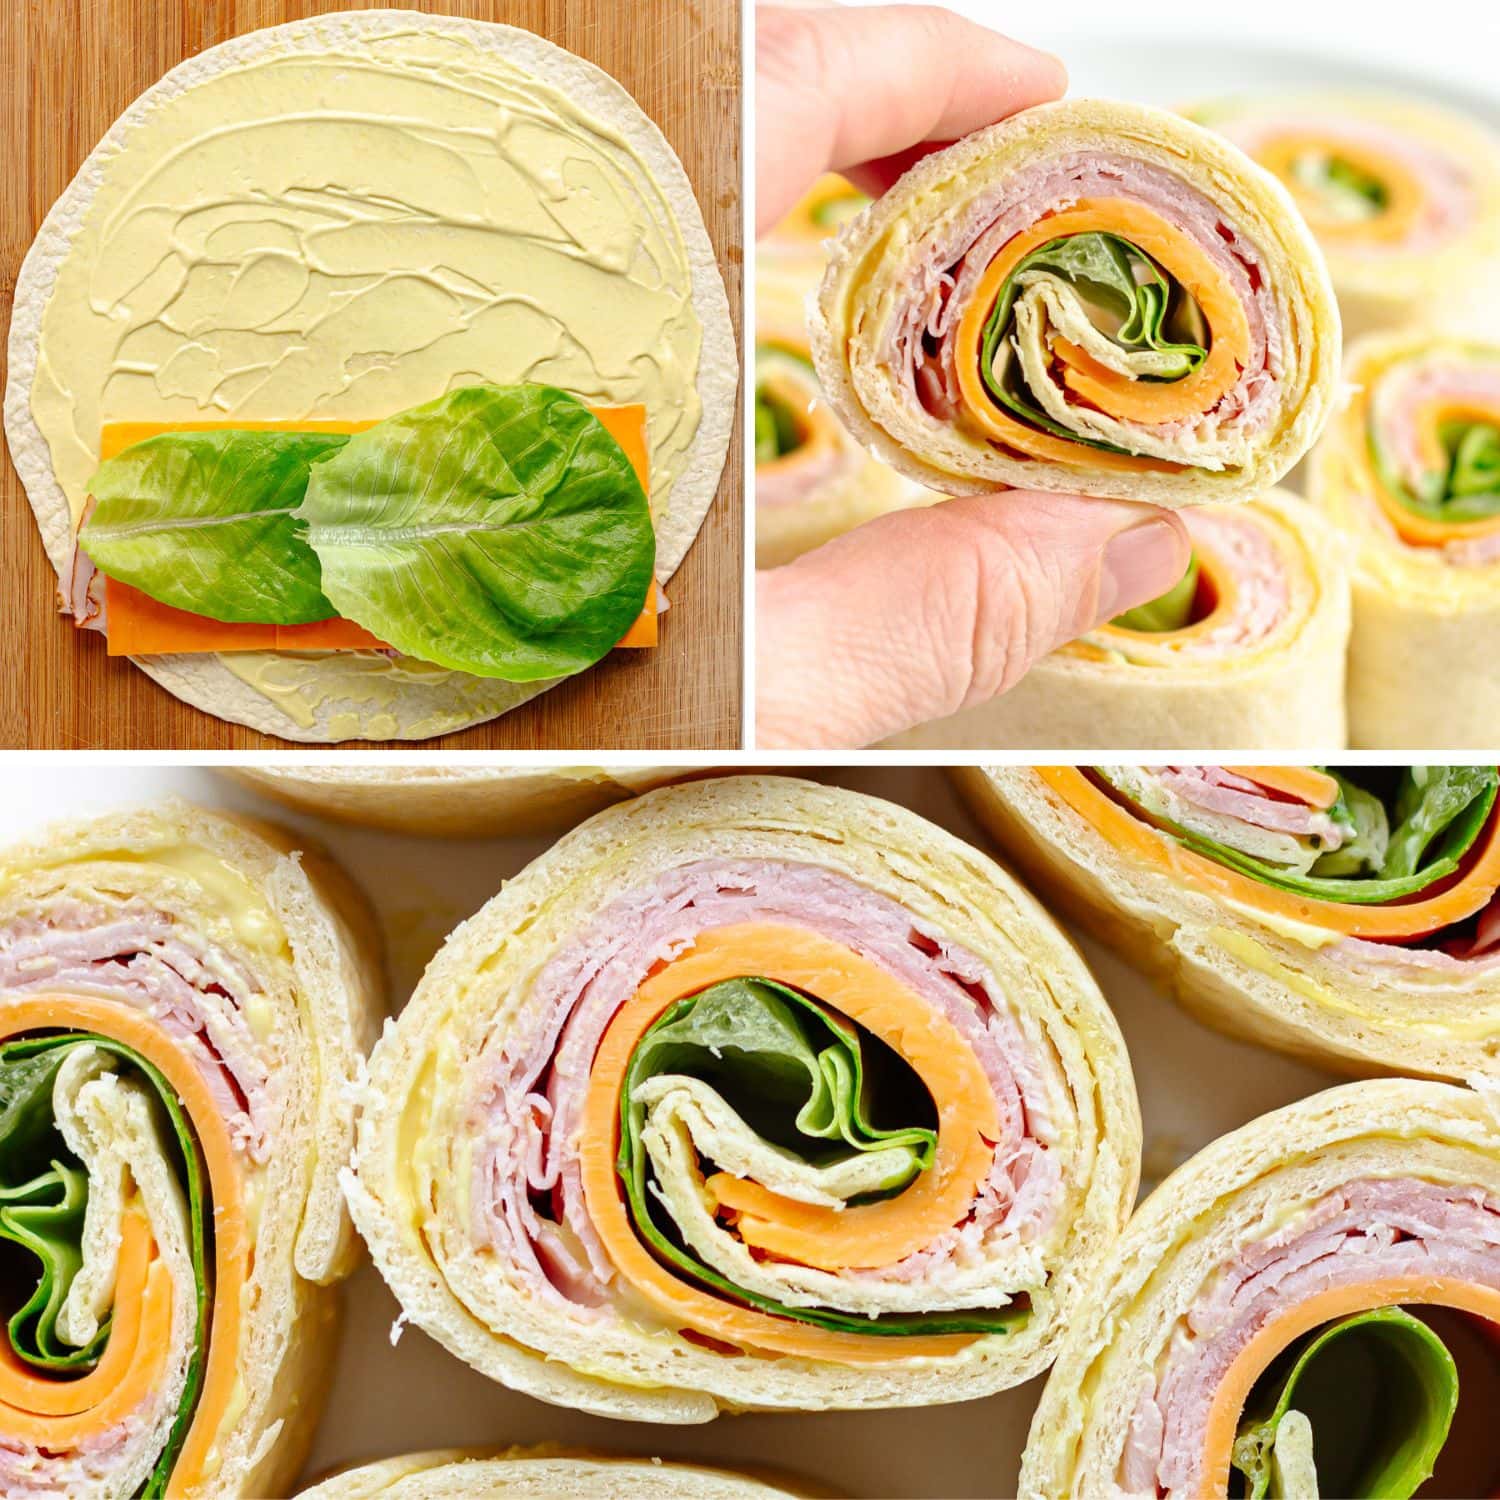
- Spread: Mayo and mustard
- Fillings: Thinly sliced deli ham, sliced cheddar and butter lettuce
Greek Pinwheels

- Spread: A mixture of softened cream cheese, tzatziki, dried oregano, finely chopped olives, sun-dried tomatoes and red onion
- Fillings: Crumbled feta, shredded chicken, cucumber and bell peppers (cut into matchsticks)
Veggie Hummus Pinwheels
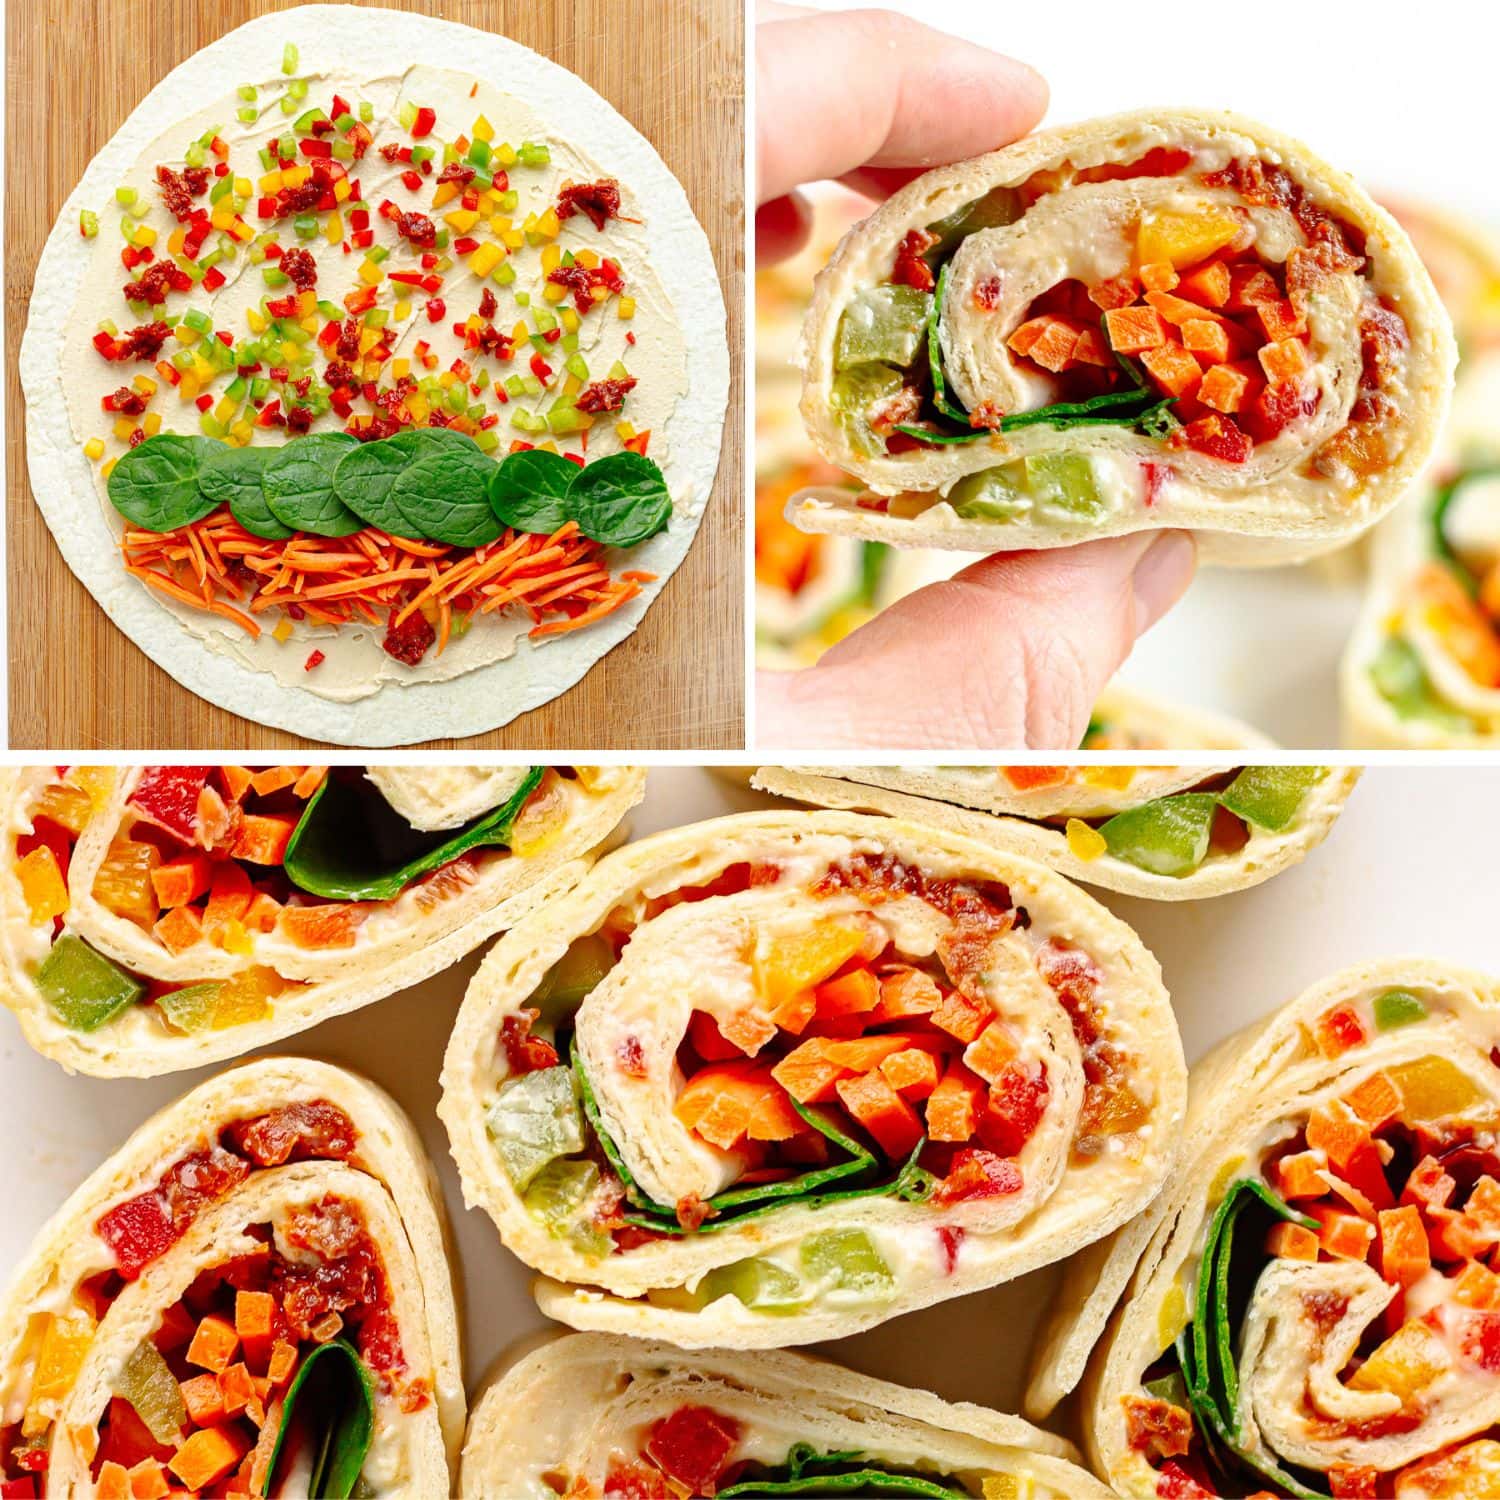
- Spread: Hummus
- Fillings: Diced bell peppers, finely chopped sun-dried tomatoes, shredded carrots and baby spinach leaves
Salami Pinwheels
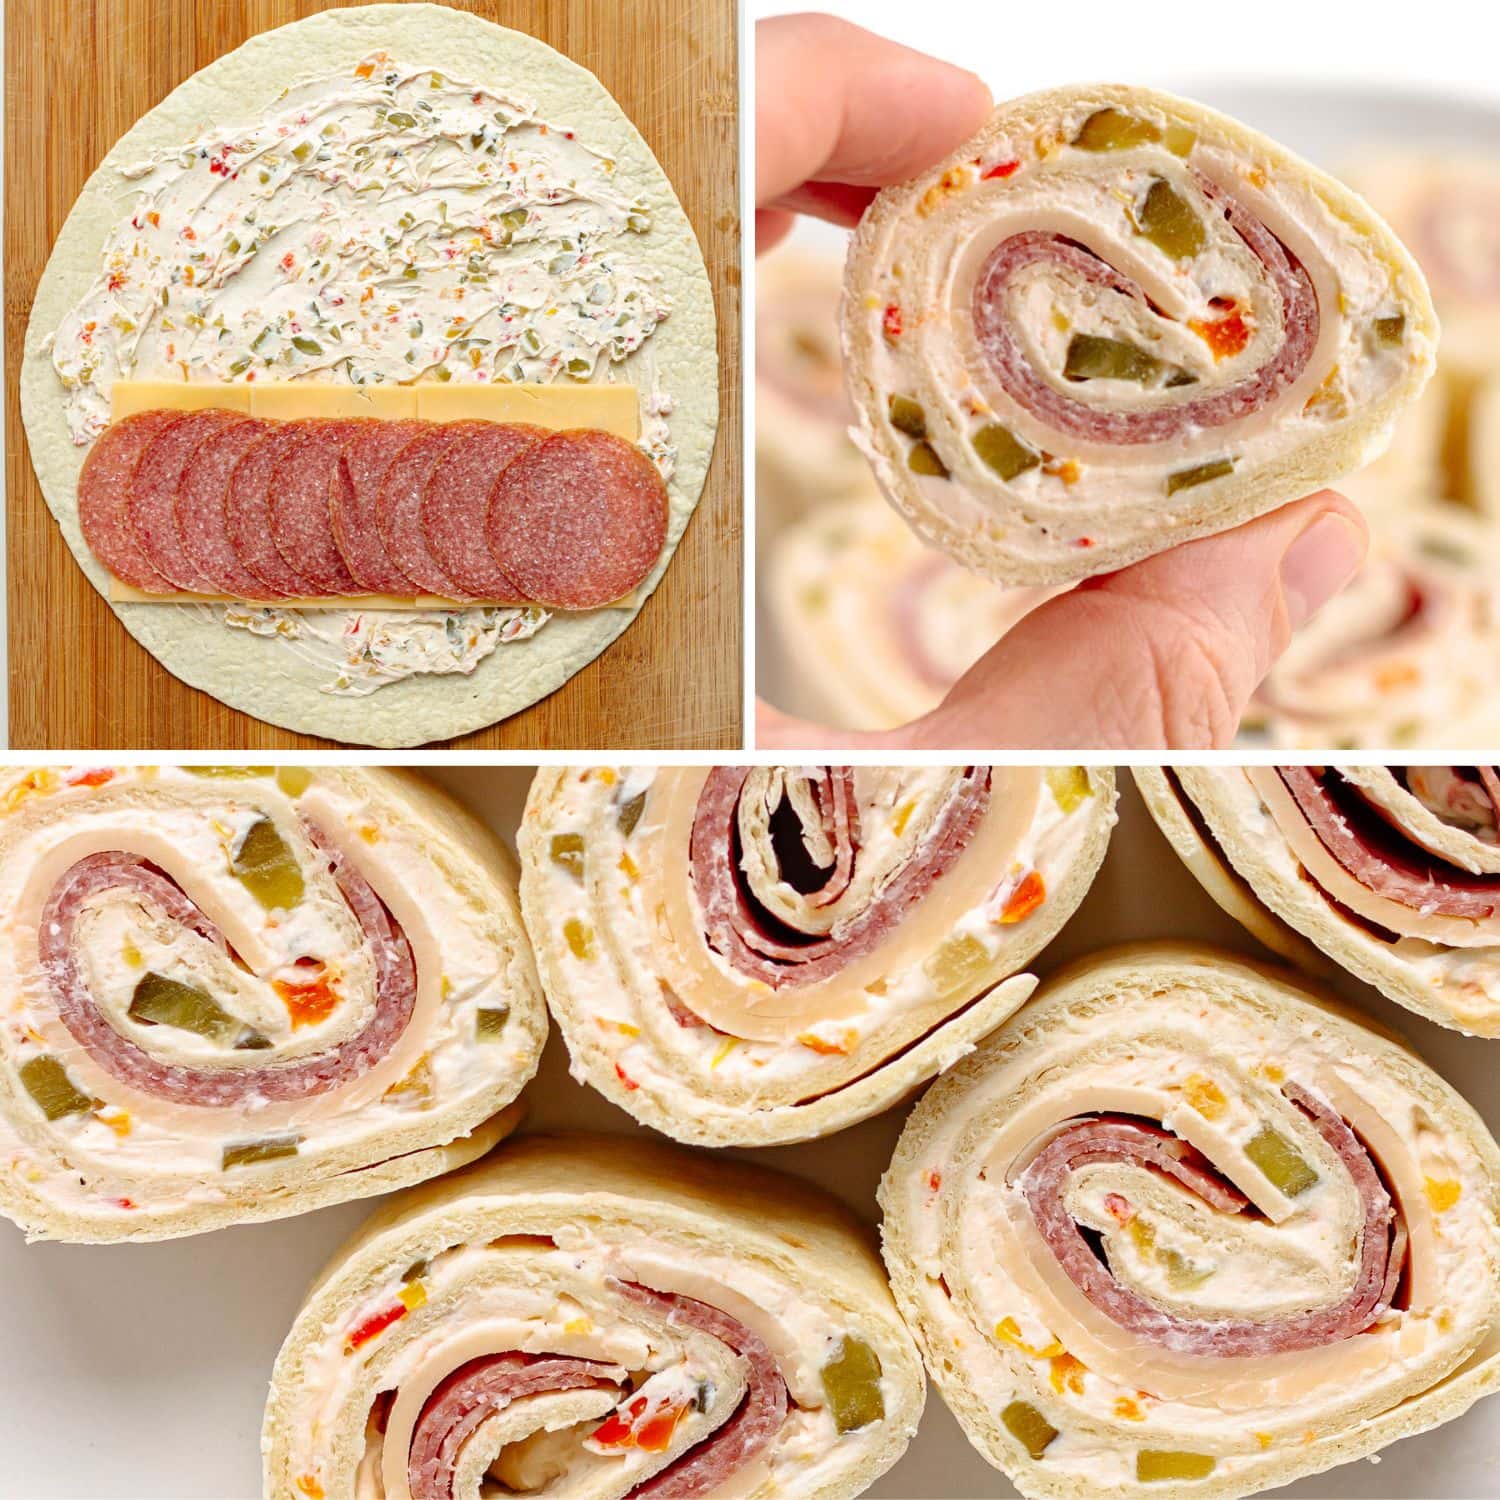
- Spread: Softened cream cheese mixed with finely chopped pickled banana peppers and pickles, seasoned with salt and pepper
- Fillings: Thinly sliced salami and gouda
Mexican Pinwheels
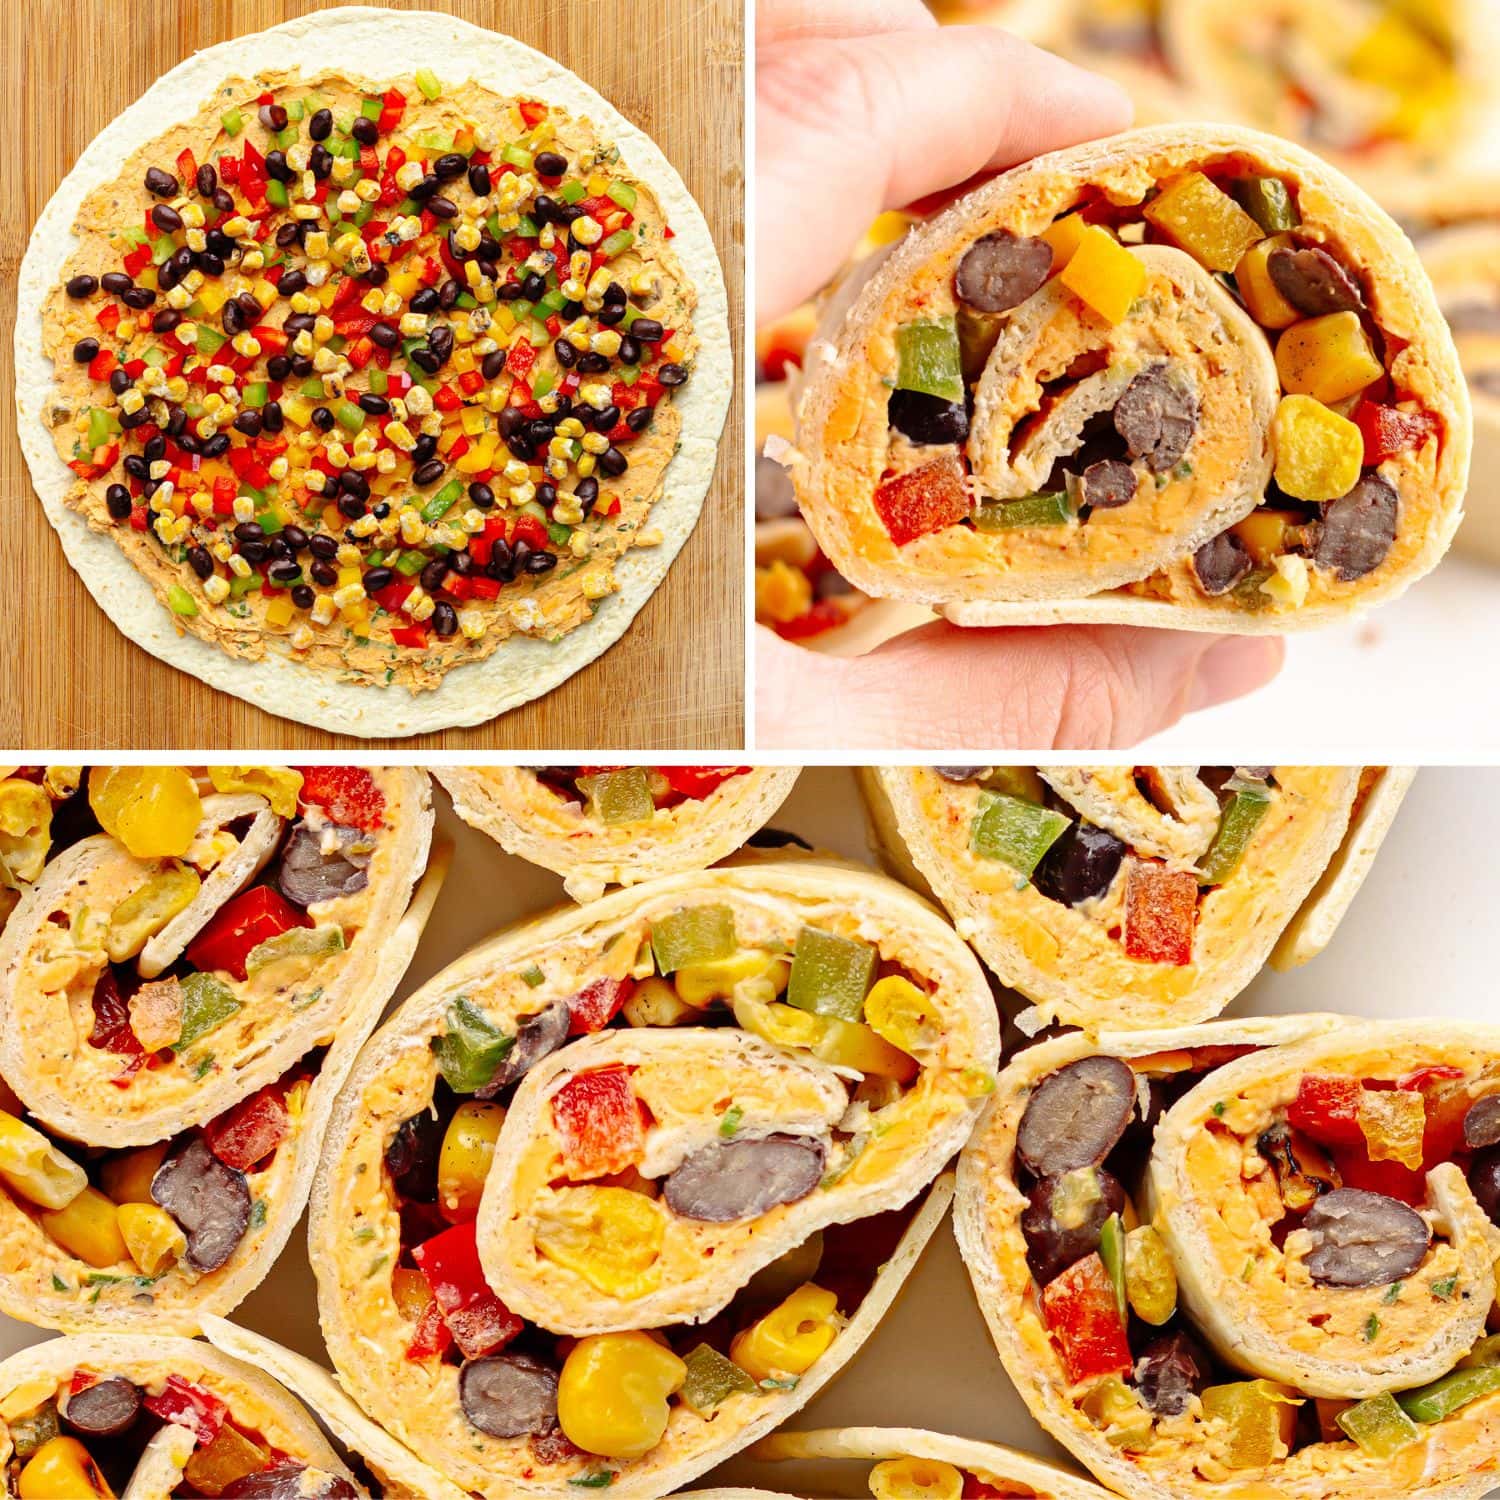
- Spread: Softened cream cheese mixed with shredded cheddar, chopped green onions, salsa and taco seasoning
- Fillings: Black beans, diced red bell peppers and corn kernels
Pizza Pinwheels
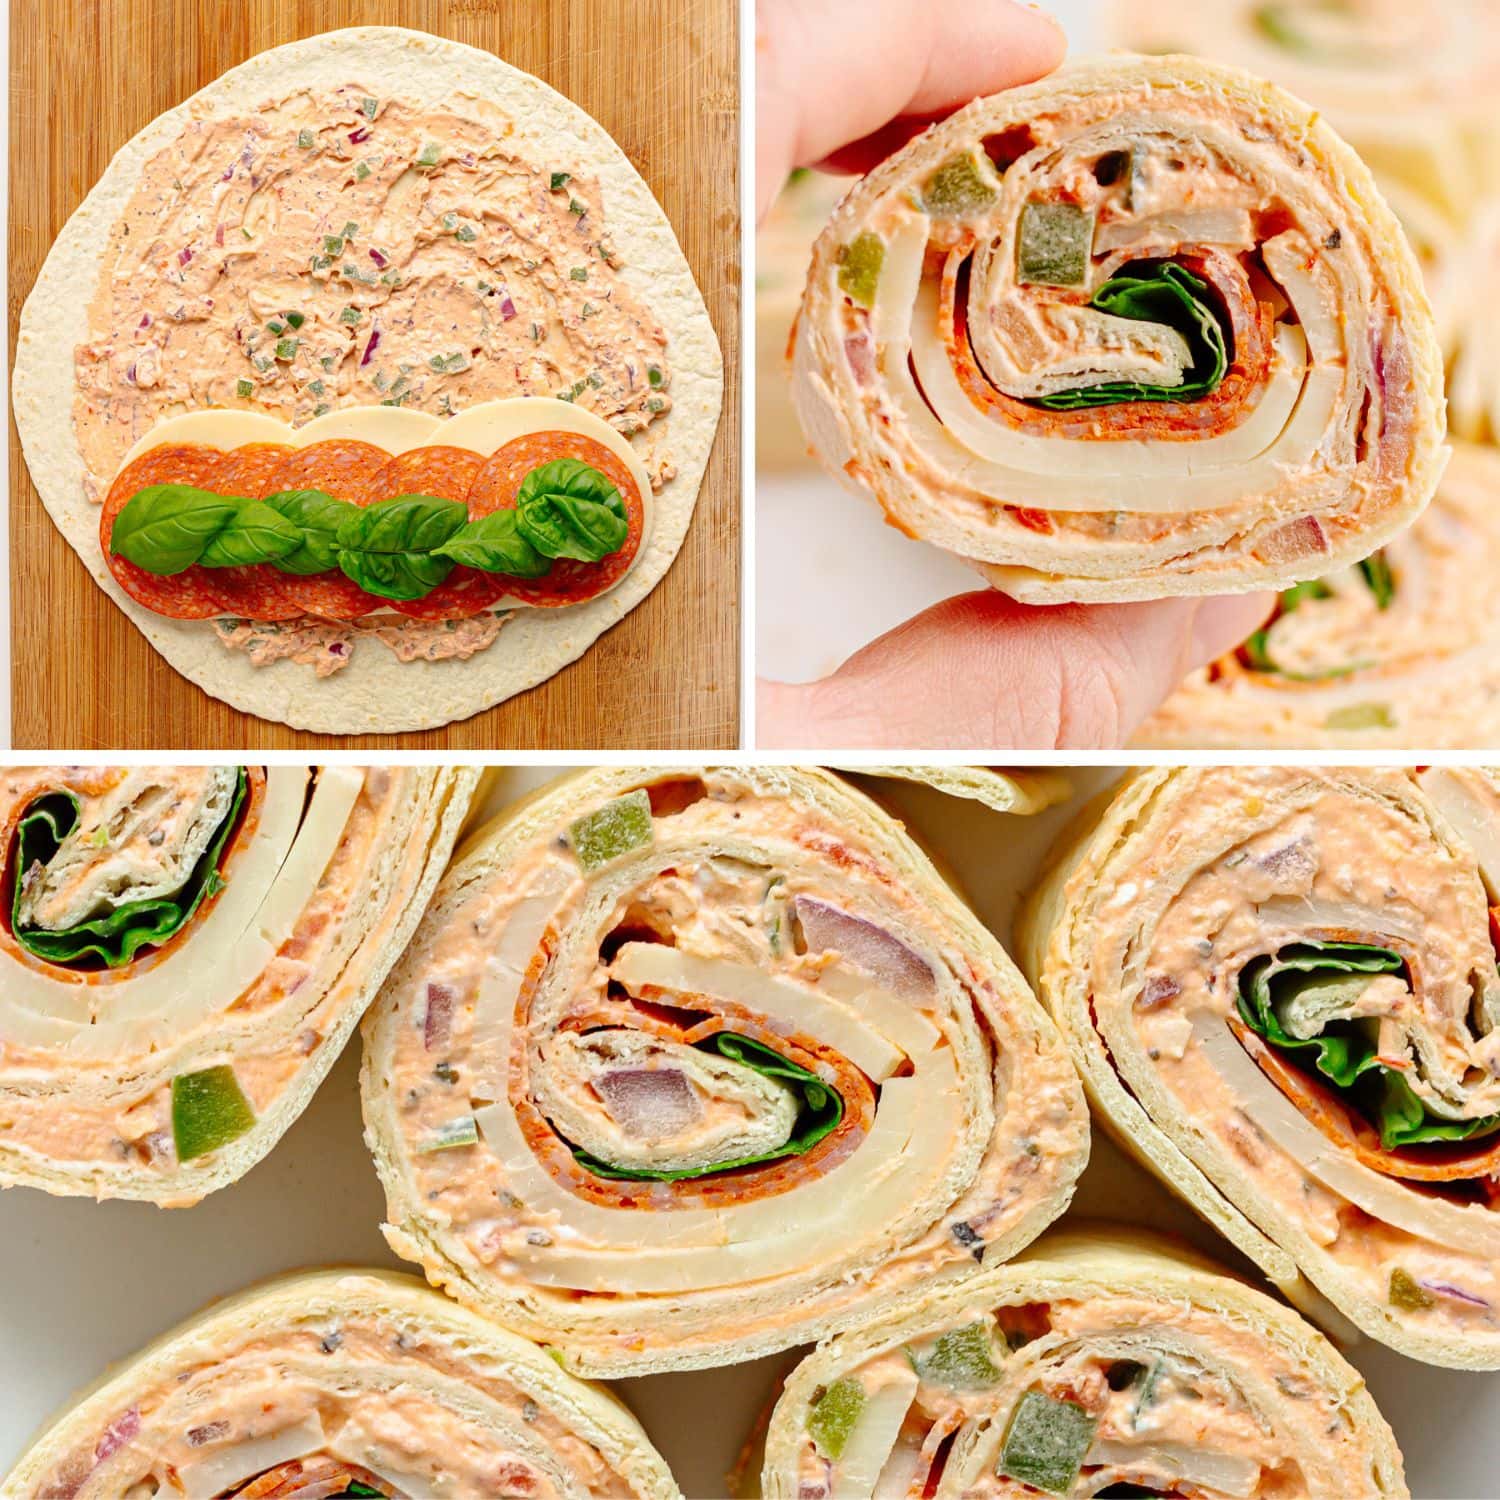
- Spread: Mixture of softened cream cheese, marinara sauce, finely chopped green bell pepper and red onion plus Italian seasoning
- Fillings: Deli-style pepperoni, provolone slices and fresh basil leaves
Dill Pickle Pinwheels
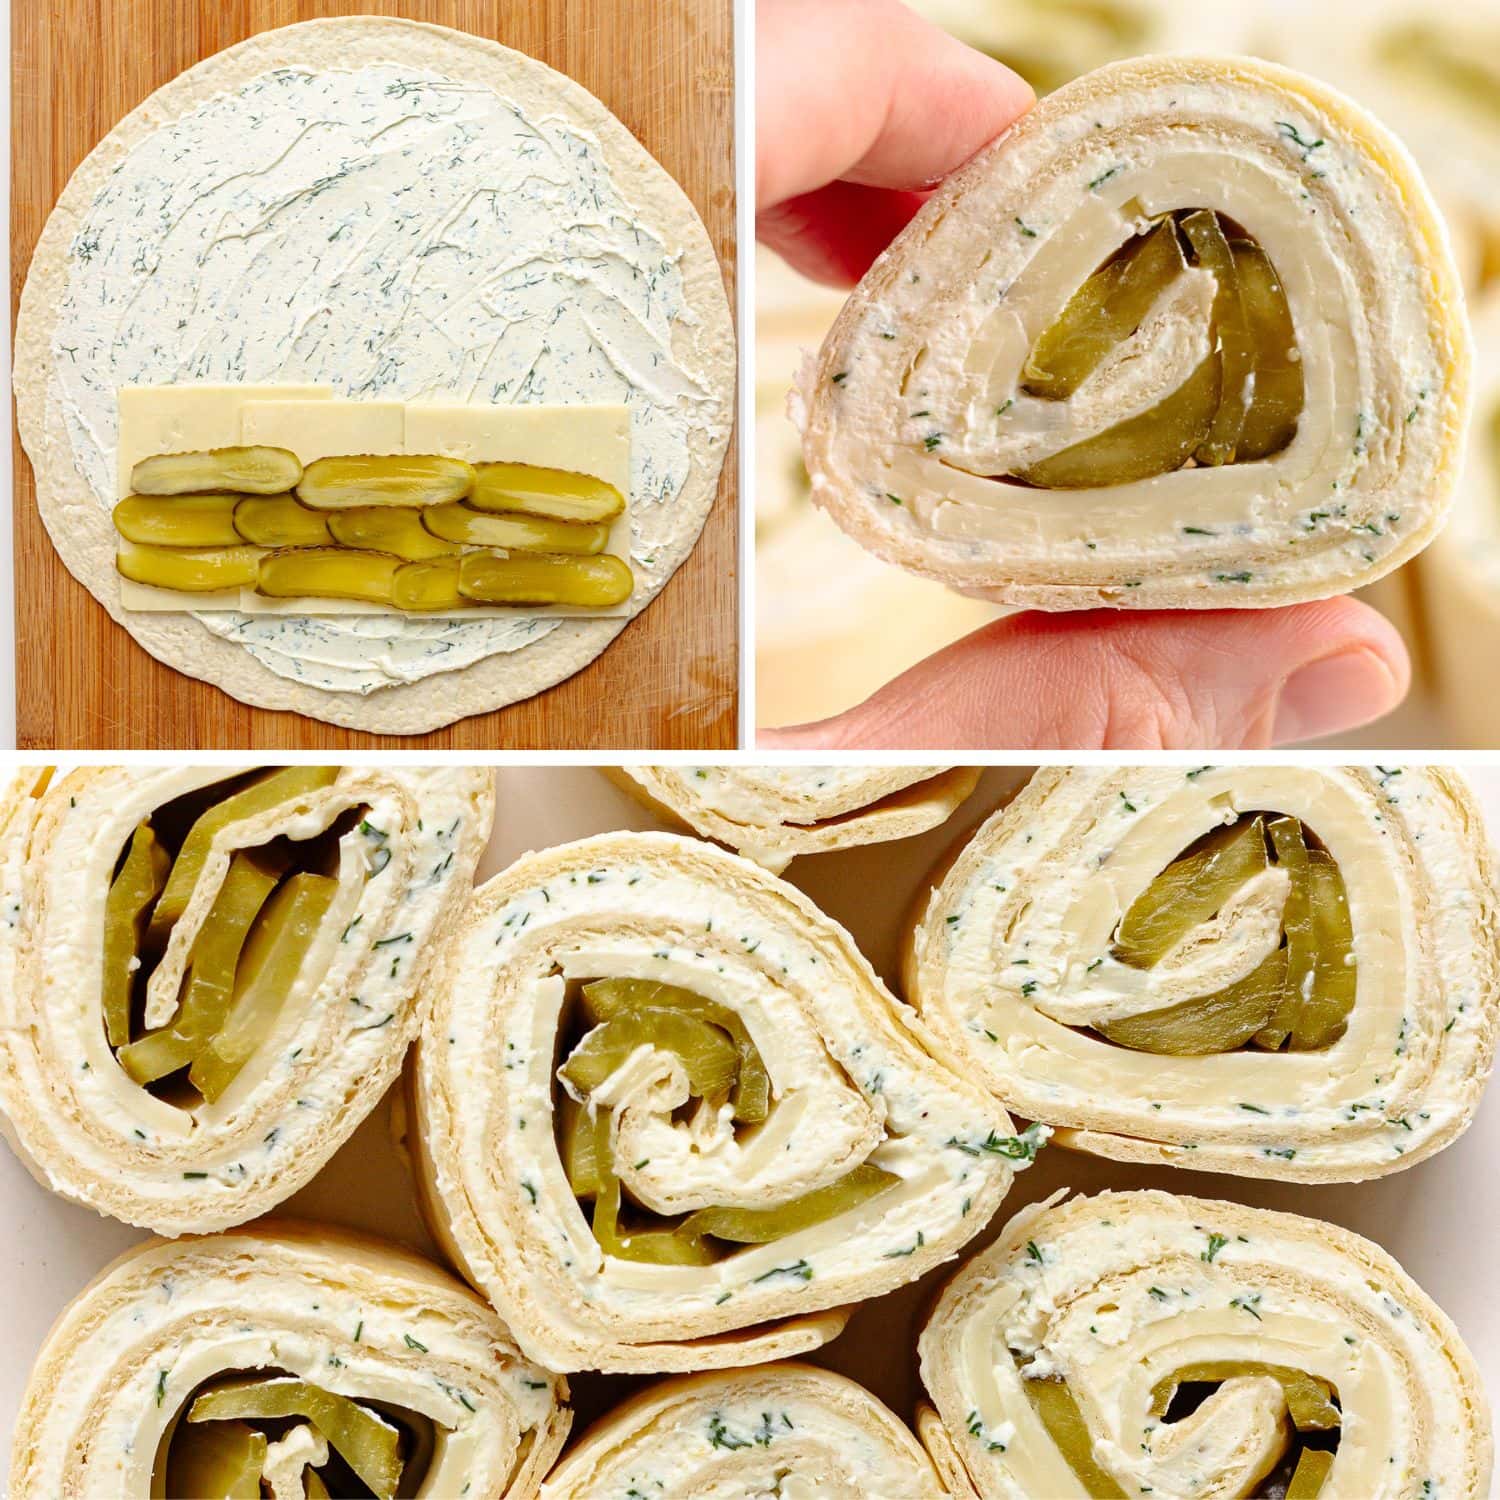
- Spread: Softened cream cheese mixed with a splash of pickle juice, chopped dill, garlic powder, onion powder, salt and pepper
- Fillings: Thinly sliced dill pickles and white cheddar
Italian Pinwheels
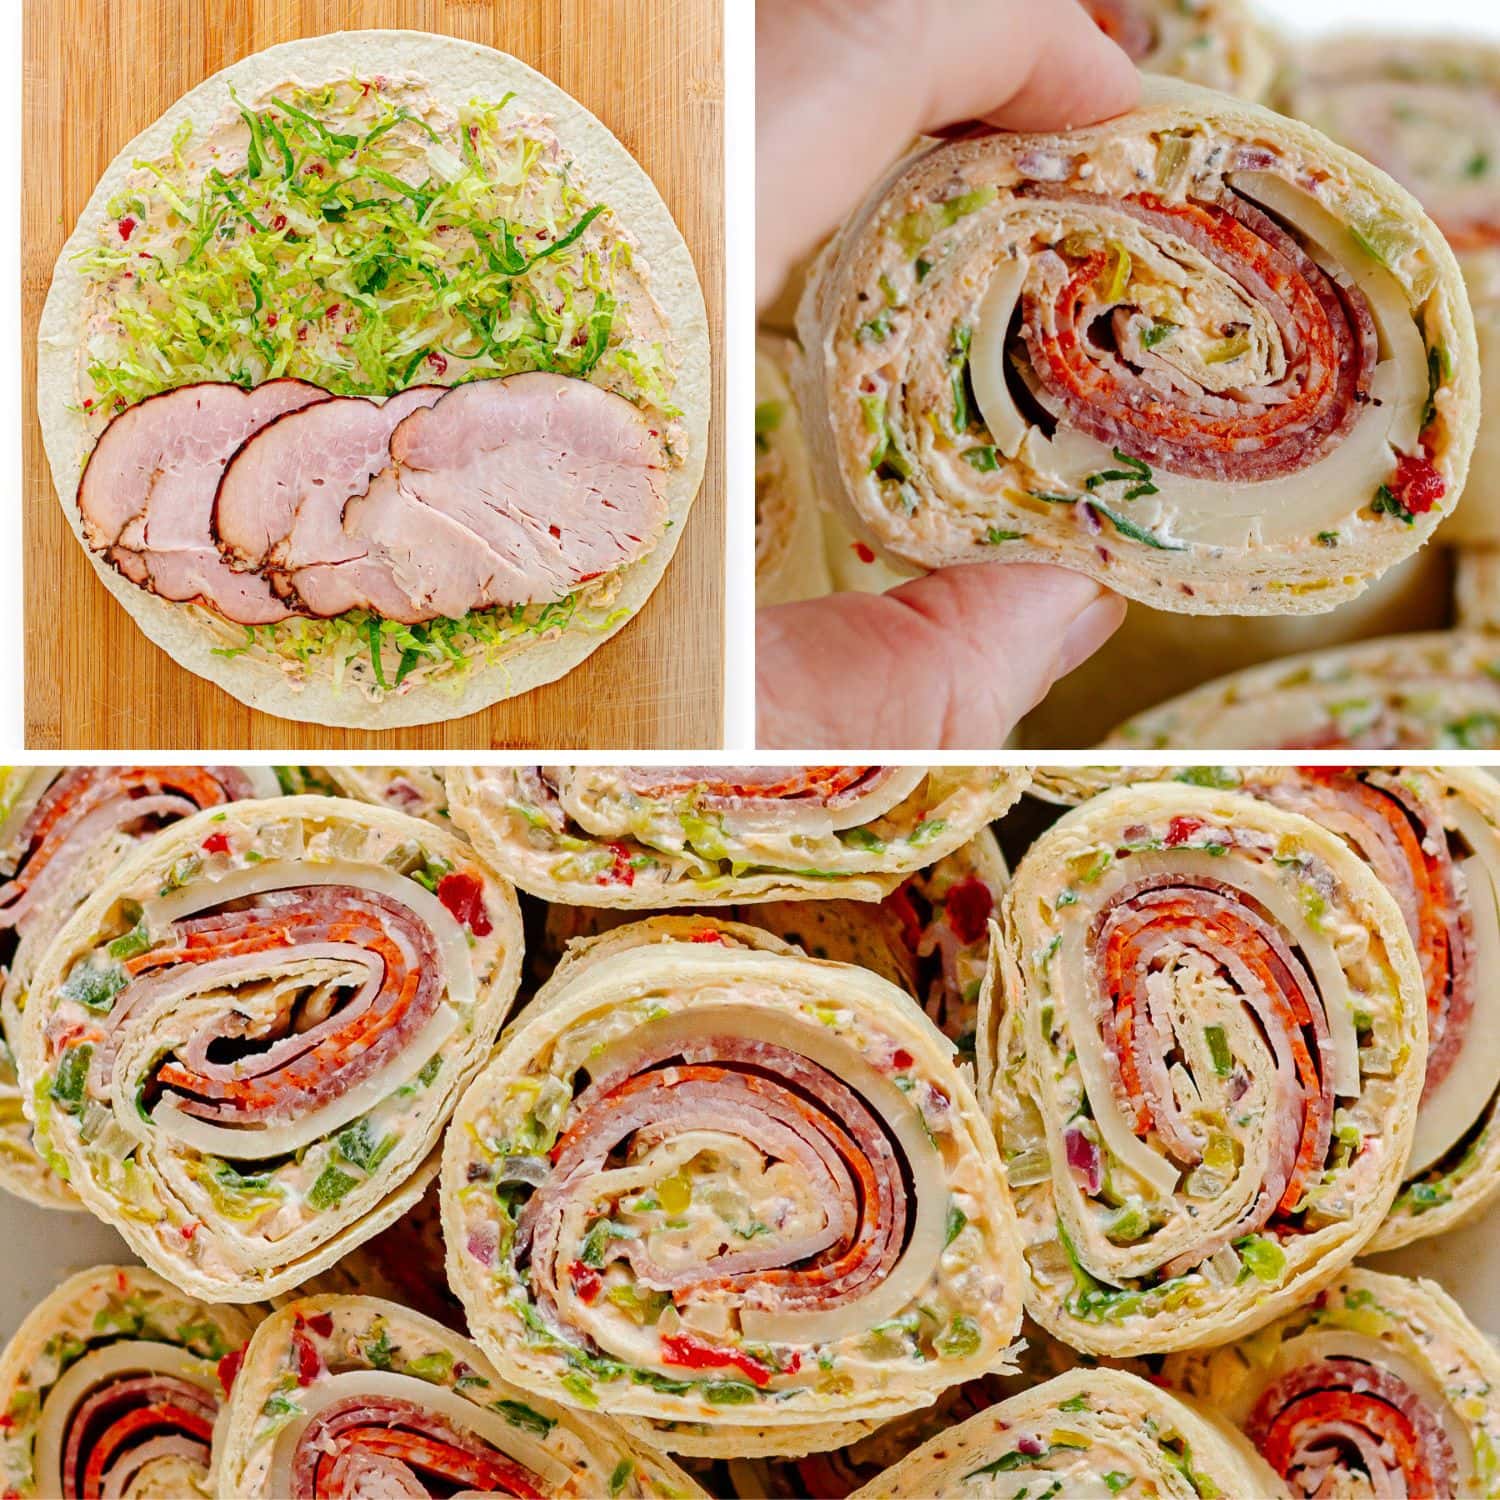
- Italian Pinwheels Recipe (full recipe with step-by-step photos)
- Spread: A super delicious Italian sub inspired cream cheese spread (recipe linked above)
- Fillings: Finely shredded romaine lettuce, provolone cheese, salami, pepperoni and ham
FAQ
Absolutely! Pinwheel sandwiches are great for making ahead. You can prep them up to a day in advance, although I think they’re best within about 6-8 hours before the crunchier ingredients start to soften too much. To make them ahead, assemble and roll them up, wrap tightly in plastic wrap and store in the fridge. Slice just before serving.
Store leftovers in an airtight container in the fridge for up to 2 days.
I wouldn’t recommend it since freezing would significantly change the texture once thawed.
The chill time helps everything firm up so the pinwheels hold together and slice cleanly. That said, if you’re short on time, you’ve got options. You can pop the wrapped rolls in the freezer for about 10 minutes for a quick chill or slice right away and secure them with sandwich picks to keep everything together.
Did you try this pinwheel sandwich template? What fillings did you use? Share your combo in the comments – I can’t wait to hear!

How To Make Pinwheel Sandwiches
- Prep Time: 10 min
- Cook Time: 0 min
- Total Time: 10 min
- Yield: varies
- Category: Appetizer, Lunch, Snack
- Method: No Cook
- Cuisine: American
Description
Think of this recipe as more of a pinwheel sandwich template than a strict recipe. Once you know the basics, the options are endless! Get creative with the fillings based on what you love or have on hand. And if you’re looking for ideas, check out the post for some delicious filling combinations I put together.
Ingredients
Base
- Large burrito-size flour tortillas or lavash flatbread
Spread
- Classic option: softened cream cheese or a flavorful cream cheese mixture
- Other options: hummus, tzatziki, pesto, butter, mayo, nut butter
Fillings
- Your choice of meats (or other proteins), cheese and veggies (make sure everything is thinly sliced or finely chopped)
Flavor Boosters
- Seasonings, herbs, pickled or briny ingredients (can be mixed into the spread or added on as toppings)
Instructions
- Assemble: Lay the tortilla or lavash bread flat on a cutting board. Spread your chosen spread evenly over the surface, leaving a small border around the edges. Sprinkle on any finely chopped ingredients, then layer the remaining fillings in an even row slightly below the center, closer to the bottom edge.
- Roll and chill: Starting from the bottom, roll up tightly into a log and wrap in plastic wrap. Refrigerate for at least 1 hour to help the pinwheels firm up and hold their shape when you slice them.
- Slice and serve: Place seam-side down and slice with a serrated knife into 1-inch thick pieces. For the cleanest look, trim off the ends first. Serve on a platter, pack into lunchboxes or enjoy straight from the cutting board.
Notes
- Don’t skip the chill time: Try to give the pinwheels at least an hour in the fridge before slicing. This helps them firm up so they hold together nicely. Short on time? Slice and serve by using sandwich picks to help hold them together.
- Don’t overfill: Less is more here! Too many fillings makes the pinwheels harder to roll and more likely to fall apart.
- Use a serrated knife: Grab a sharp, serrated knife for slicing. It makes clean cuts without squishing the pinwheels.
- Watch out for wet ingredients: Juicy tomatoes and similar fillings can make pinwheels soggy. Pat them dry first if you really want to use them.
- Use fresh tortillas or lavash: Fresh is best since they are more flexible and roll easily without tearing or cracking. If they feel a little stiff, a quick 15-20 seconds in the microwave softens them right up.
- Need ideas? Check out the post for some delicious filling combinations for inspiration.