This post may contain affiliate links. See my disclosure policy.
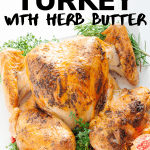
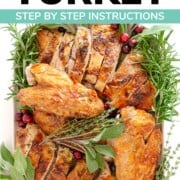
Looking for a delicious roast turkey recipe? Then you will love this spatchcock turkey with herb butter! Crispy skin, juicy flavorful meat and it only takes 90 minutes to cook! Learn how easy it is to spatchcock and dry brine your Thanksgiving or holiday turkey.
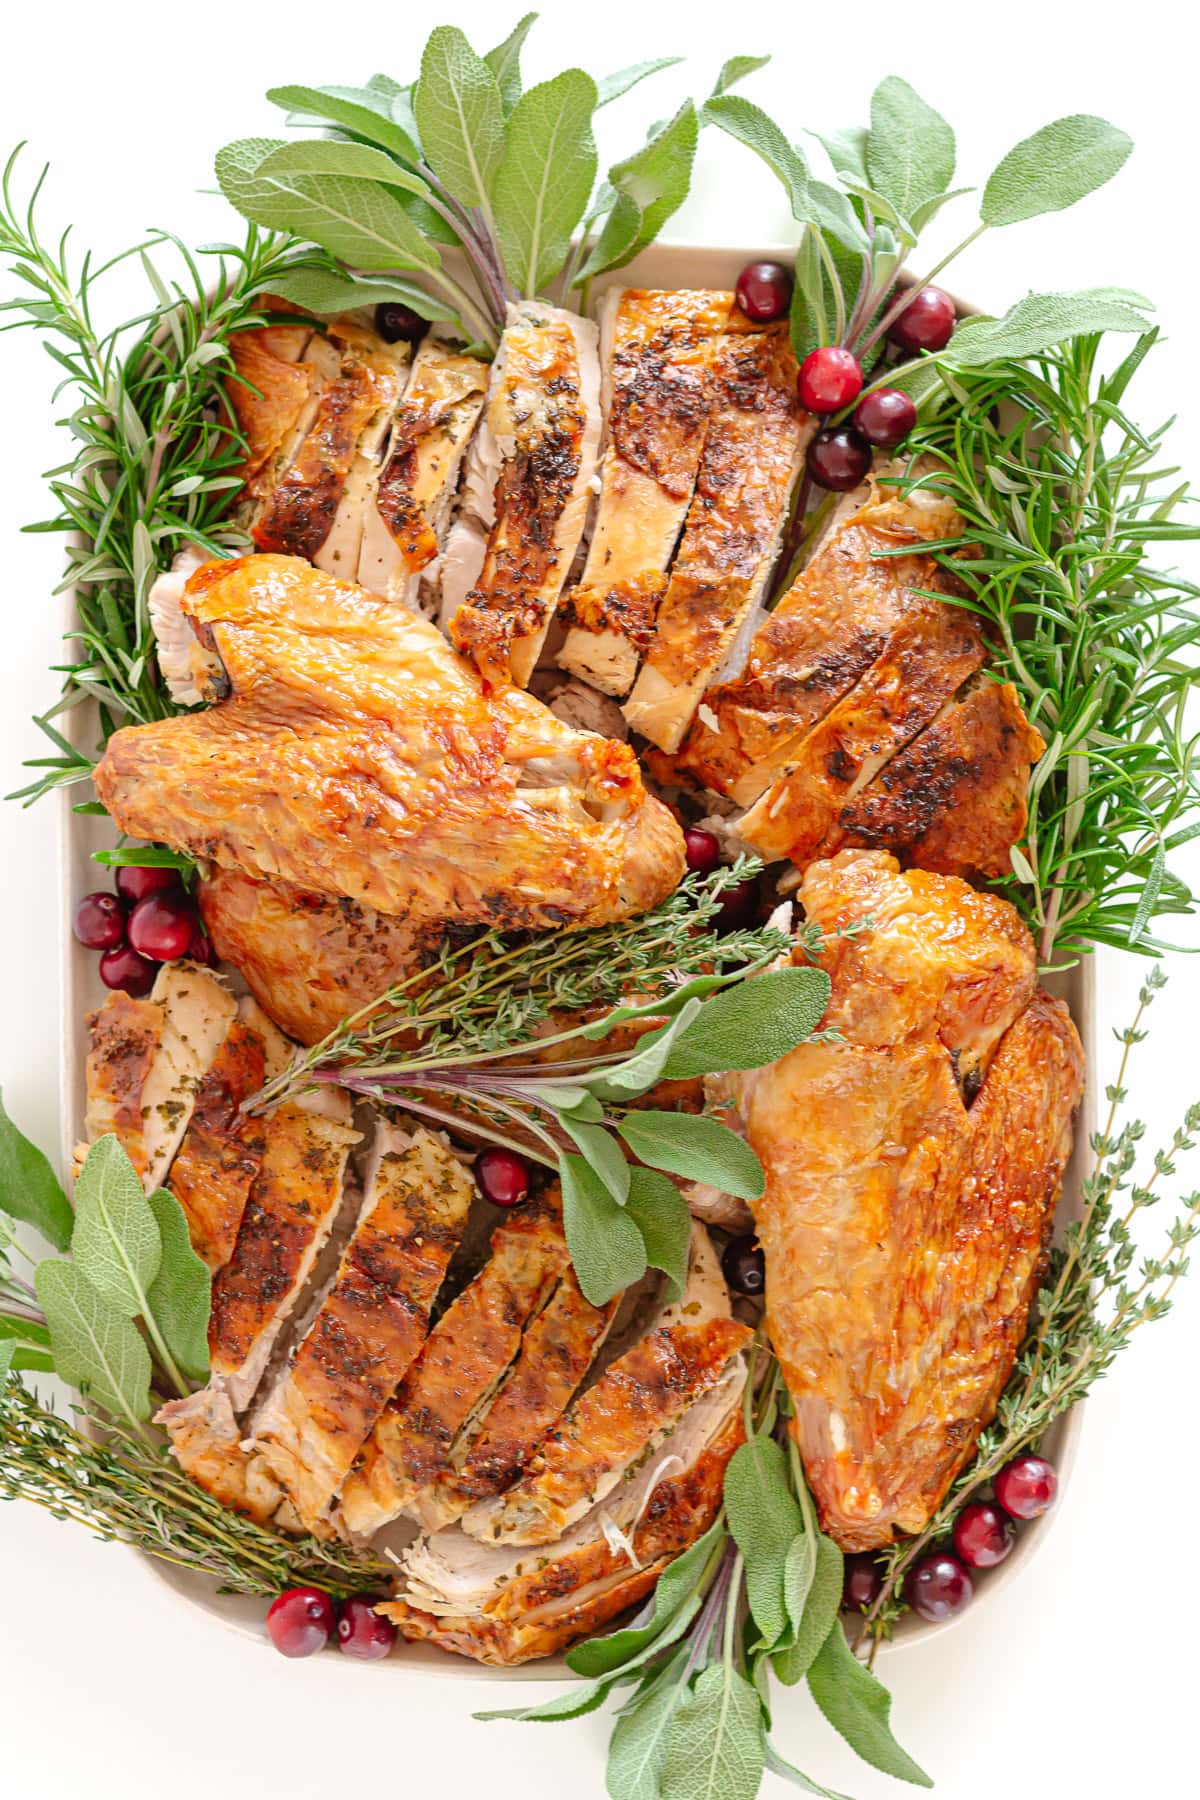
Table of Contents
- Why You’ll Love This Spatchcock Turkey Recipe
- Equipment Needed
- Ingredients You’ll Need
- What Is Spatchcock Turkey?
- Benefits Of Spatchcocking Your Turkey
- How To Spatchcock A Turkey
- How To Dry Brine A Turkey
- Step-By-Step Roast Spatchcock Turkey
- Spatchcock Turkey Cooking Time
- How To Carve A Spatchcock Turkey
- What To Serve With It
- Ways To Use Leftovers
- Dry Brine Spatchcock Turkey With Herb Butter Recipe
Why You’ll Love This Spatchcock Turkey Recipe
A spatchcocked turkey that is dry brined and finished with herb butter is my absolute favorite way to cook a turkey. I’ve been making it this way for years now – it’s the best!
- Crispy Skin + Juicy Meat: It cooks more evenly which results in a turkey with crispy skin and juicy, flavorful meat.
- Cooks Faster: Takes just 90 minutes (or less) to cook!
- Easier To Carve: A spatchcock turkey is much easier to carve.
- Perfect For The Holidays: A super delicious way to cook your Thanksgiving, Christmas or holiday turkey!
Equipment Needed
To make this roast spatchcock turkey recipe, you will need the following equipment:
- Baking Sheet: A regular rimmed, uncoated baking sheet (half-sheet sized)
- Wire Rack: An oven proof, stainless steel wire rack that is designed to fit inside your baking sheet. Make sure the rack you use is not coated and oven safe to high temperatures. This wire rack is perfect for the job. You can also buy it as a baking sheet and rack set if you need both.
- Poultry Shears: A sharp pair of poultry shears are required if you are spatchcocking the turkey yourself.
- Digital Meat Thermometer: A digital meat thermometer is the best way to ensure a perfectly cooked turkey.
Best Thermometer For Turkey
Use a tag team duo of two thermometers!
- Alarm Thermometer: Insert the probe in the thickest part of the breast (making sure not to touch bone). This allows you to track the internal temperature while roasting without needing to open the oven door and it also provides an alert when it is time to pull the turkey out.
- Instant Read Meat Thermometer: To quickly verify the doneness temps in the breast and thighs.
The dream team duo that I love to use for perfectly cooked turkey is the ChefAlarm and the Thermapen.
Ingredients You’ll Need
Obviously you will need a turkey! A 12-14 pound bird is recommended for this recipe. Besides the turkey, you will also need the following ingredients:
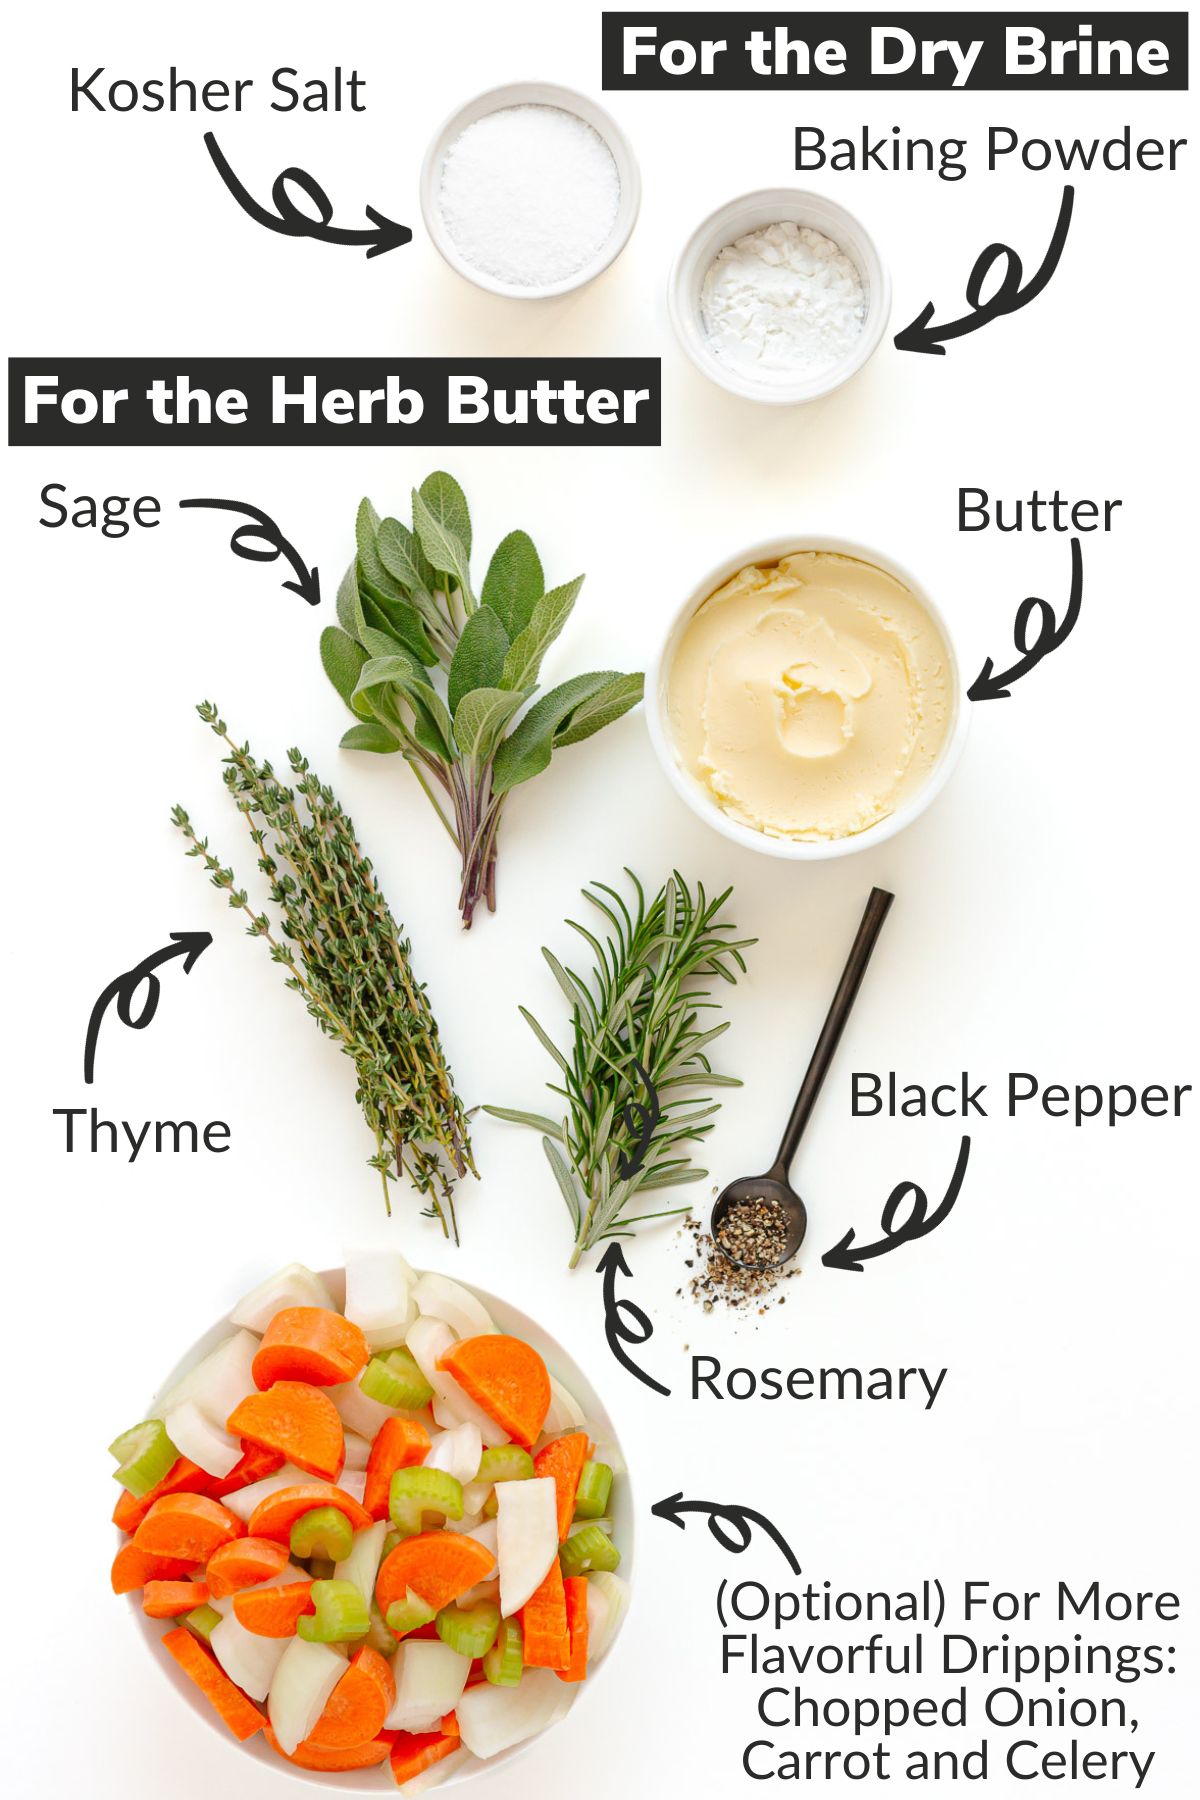
- Dry Brine Ingredients: The dry brine is simply a mixture of kosher salt and baking powder (aluminum free).
- Herb Butter Ingredients: The herb butter is a mixture of butter, sage, thyme, rosemary and freshly ground black pepper.
- Optional: I also recommend adding some chopped onion, carrot and celery under the turkey if you plan on using the drippings to make them extra flavorful.
Detailed ingredient list and directions located in the recipe card below.
Let’s get started! There are 4 steps to making this turkey: spatchcock, dry brine, spread on herb butter and roast. Let’s start off by learning how to spatchcock and dry brine a turkey…
What Is Spatchcock Turkey?
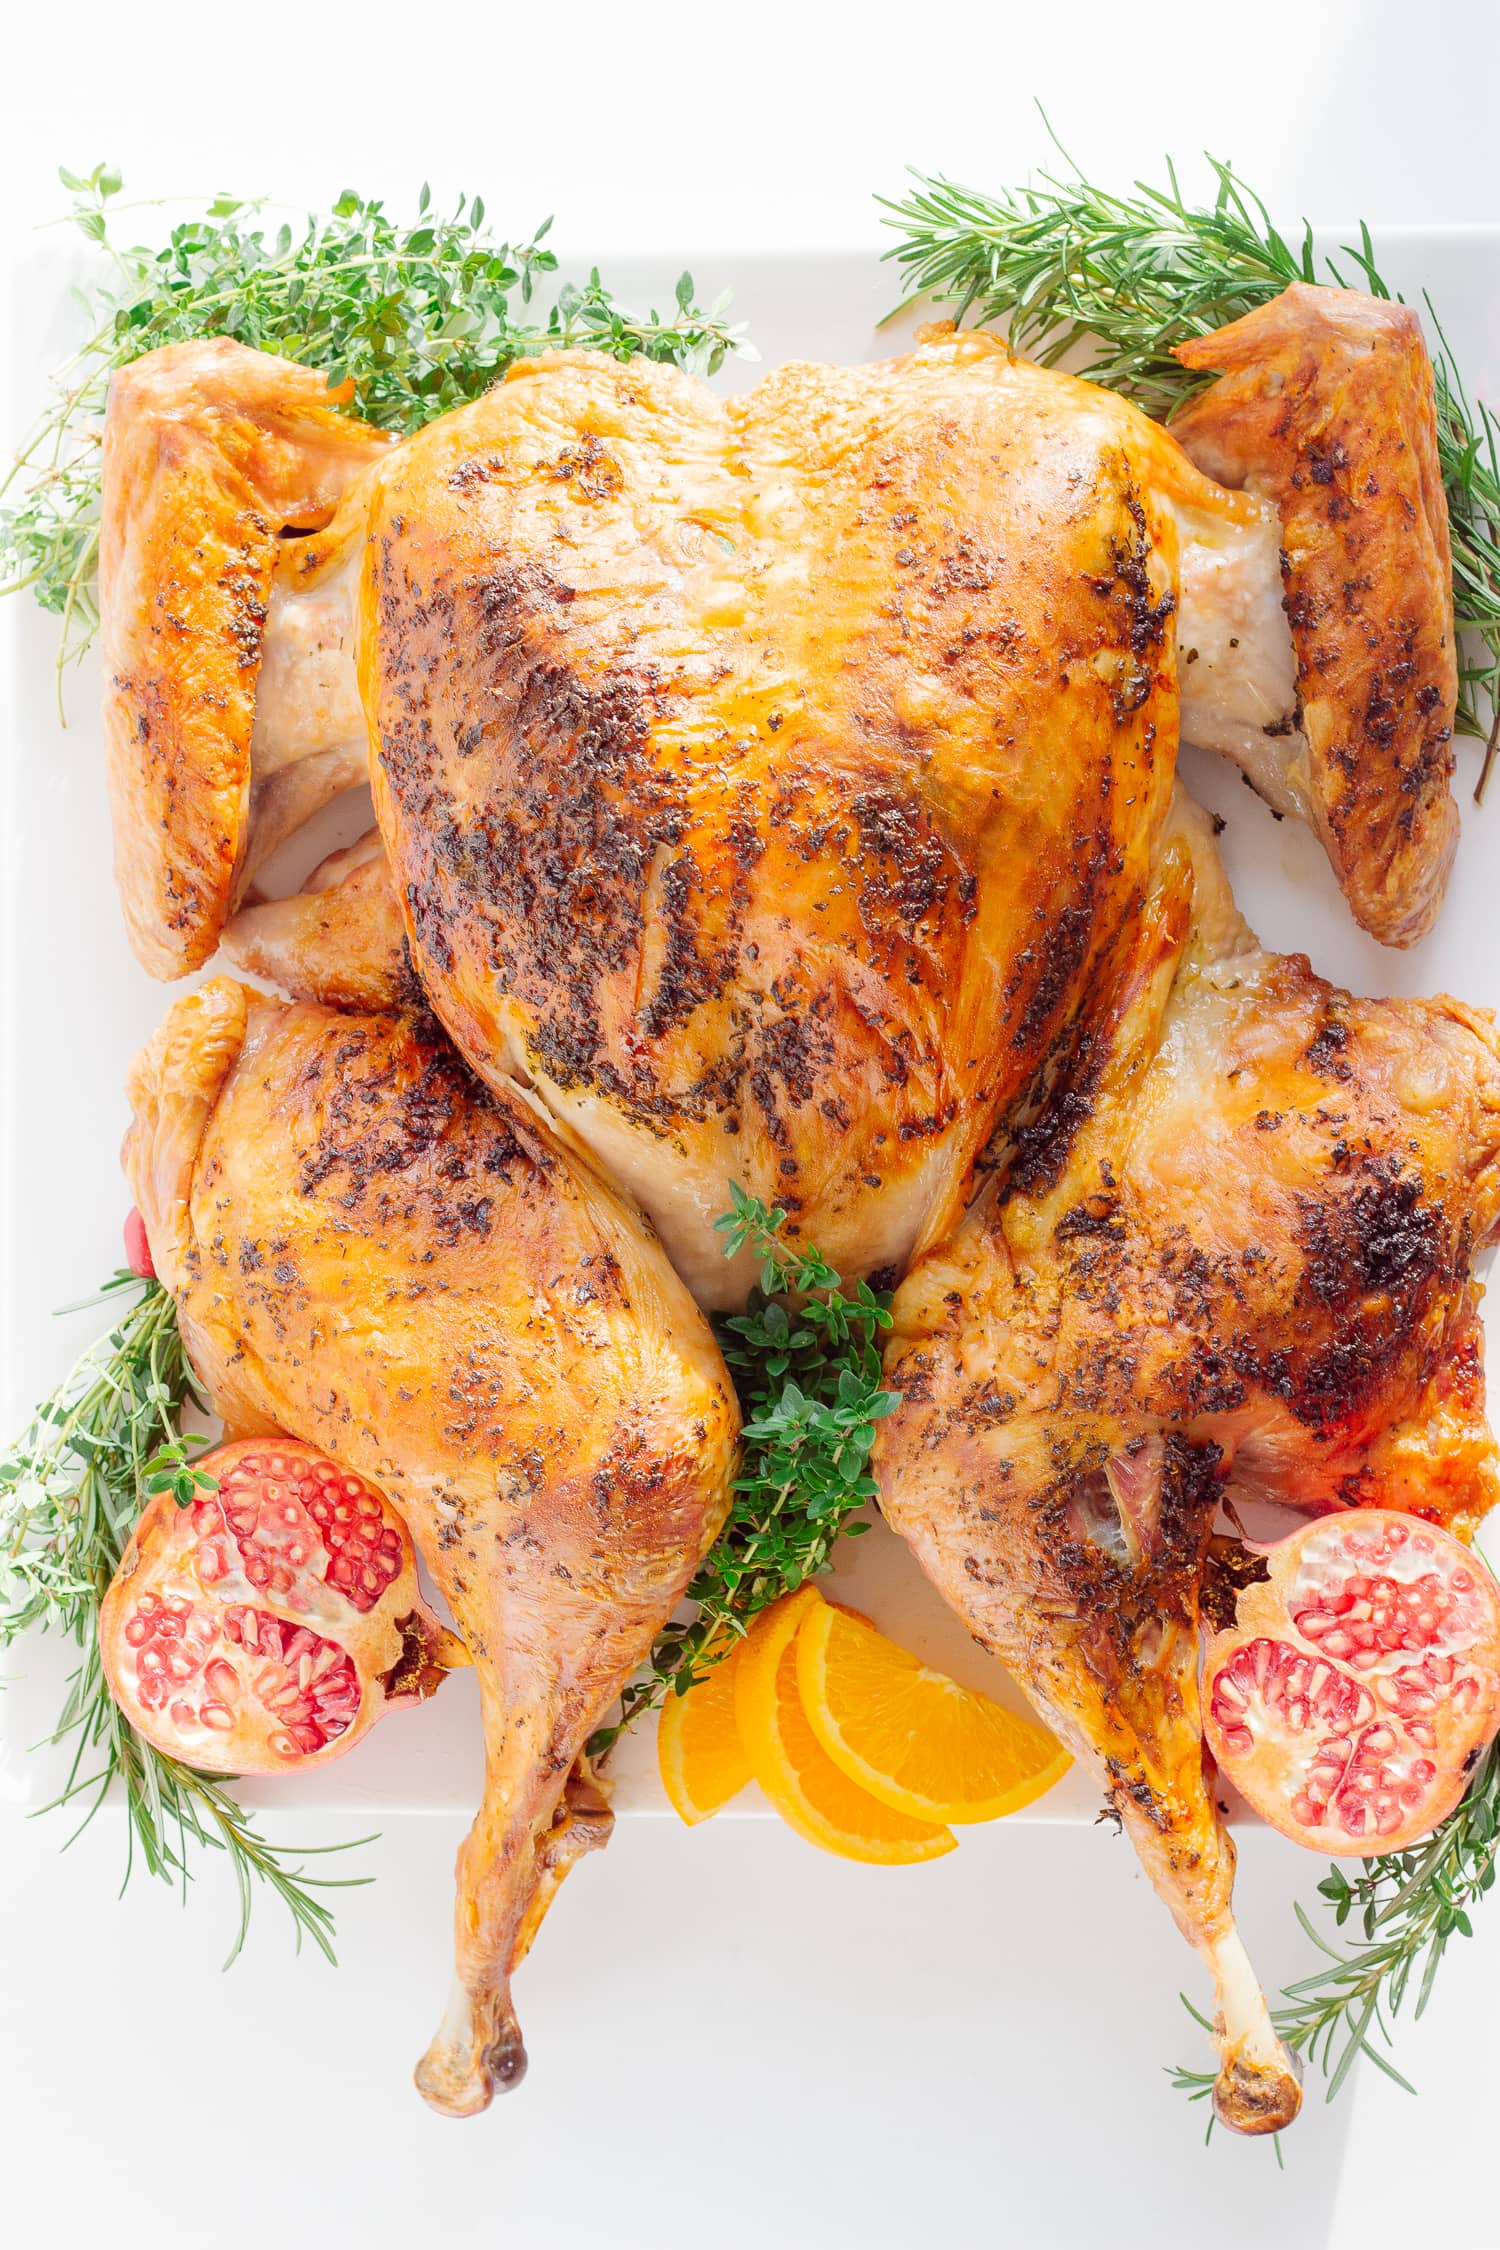
So you might be wondering what the term “spatchcock” even means (it is a funny little word). To “spatchcock” a turkey simply means to remove the backbone which results in a flattened turkey. So a spatchcocked turkey is just a whole turkey that has had its backbone removed. The turkey is then opened up and laid out flat before roasting. A spatchcock turkey is sometimes also called a butterflied turkey.
Benefits Of Spatchcocking Your Turkey
So why would you spatchcock a turkey? Here are 5 amazing reasons!
- Cooks Faster: Spatchcocking your turkey speeds up the cooking process – takes about half the time of the traditional method. The flatter surface cooks more evenly and can handle higher heat.
- Crispier Skin: All of the skin faces upwards and is evenly exposed to the heat resulting in more golden, crispy skin. It’s so good!
- Evenly Cooked, Juicy Meat: Since the turkey is flat, it cooks much more evenly. Both the breast and leg meat can be done at the same time resulting in juicier meat.
- Takes Up Less Oven Space: A flat turkey naturally takes up less space in the oven.
- Make Ahead Gravy: You can use the removed backbone to make this delicious Make Ahead Turkey Gravy recipe. The backbone and neck can be used to make a flavorful broth which allows you to make an amazing gravy in advance (just add in some turkey drippings before serving).
How To Spatchcock A Turkey
Ask the butcher to do it!!! This is my method of choice since it is obviously the easiest. Just make sure to tell the butcher to give you the backbone they cut out so that you can use it for broth or gravy.
If having a butcher do it for you isn’t an option, here are the steps to spatchcock a turkey yourself:
- Remove the neck and giblets from inside the turkey.
- Using a sharp pair of poultry shears, cut out the backbone of the turkey. Place the turkey breast-side down and cut along both sides of the backbone to remove. Hold onto it for your turkey gravy.
- Cut a small incision on the cartilage that is between the two breast bone. Optional: You can also remove the whole wishbone to make carving easier later.
- Flip the turkey over so that it is breast-side up and using both hands, firmly press down on the breast bone to flatten out the turkey (you will hear it crack). Trim off any excess fat or skin you might see near the neck and cavity areas.
You can also watch the process in this great short video I found: Click here to watch!
What size turkey is best for spatchcocking?
A 12-14 pound turkey is ideal since anything larger is difficult to fit on a baking sheet once flattened out. If you need more turkey than this, just roast two 12-14 pound birds. Or you can cut a large turkey in half down the middle and put each half on separate baking sheets (due to the larger breast size, you will probably need to decrease the cooking temperature and increase the time though).
How To Dry Brine A Turkey
To dry brine a 12-14 pound turkey, combine 3 tablespoons kosher salt with 1 tablespoon baking powder and sprinkle it all over the outside and underside of the turkey. You may have extra salt mixture. You want to sprinkle on an even layer all over the turkey but it doesn’t need to be a really thick layer. Discard any extra you might have.
Set a wire rack on top of a baking sheet and place the turkey on top, skin-side up. Loosely cover with plastic wrap and place in the fridge for 1-3 days. For really crispy skin, remove the plastic wrap and leave uncovered in the fridge for the last 12-24 hours.
Note: Make sure to use a natural turkey for this recipe. Dry brining is not suitable for a pre-seasoned or self basting bird. I like to order a local turkey from the butcher shop since it also provides the added bonus of having them spatchcock it for me. If you are in the US, ButcherBox is another option for sourcing a quality turkey.
What does brining do?
Brining improves a turkey’s ability to retain moisture. With dry brining, the salt first draws out the juices and then reabsorbs into the meat and starts breaking down tough muscle proteins, resulting in tender, juicy meat that is seasoned throughout.
Wet vs Dry Brining
There are 2 types of brining: wet and dry. Wet brining is done by placing the turkey in a big container of salted water whereas dry brining is just sprinkling the bird with a salt mixture. I like to dry brine since it is easier, less messy and results in crispy skin. There is no need to worry about water or turkey juices slopping around like there is with wet brining.
What kind of salt should you use?
Use kosher salt! The granules are larger and easier to distribute. Table salt is too fine and will make the turkey too salty.
Why is there baking powder in the dry brine?
Baking powder helps to make the skin crispy and who doesn’t love crispy skin!?! Adding some baking powder to the dry brine mixture (1 part baking powder to 3 parts kosher salt), raises the skin’s pH levels which allows the proteins to break down more efficiently. The result is crispier, more evenly browned skin.
Important! Make sure to use aluminum free baking powder since it has a neutral taste. DO NOT accidentally grab baking soda or your turkey will have a horrible metallic taste.
Do you rinse off the dry brine?
No – don’t rinse it off! The salt will be absorbed and rinsing the turkey will ruin your chances of the perfect crispy skin by undoing all the surface-drying achieved in the dry brine process.
How long do you dry brine a turkey?
Let turkey dry brine for 24 to 72 hours.
Step-By-Step Roast Spatchcock Turkey
Now that we have discussed how to spatchcock and dry brine in detail, let’s walk through the full process of making this delicious roast turkey recipe.
STEP 1: Spatchcock Turkey and Dry Brine
Spatchcock the turkey: Details on how to do this are discussed in detail above.
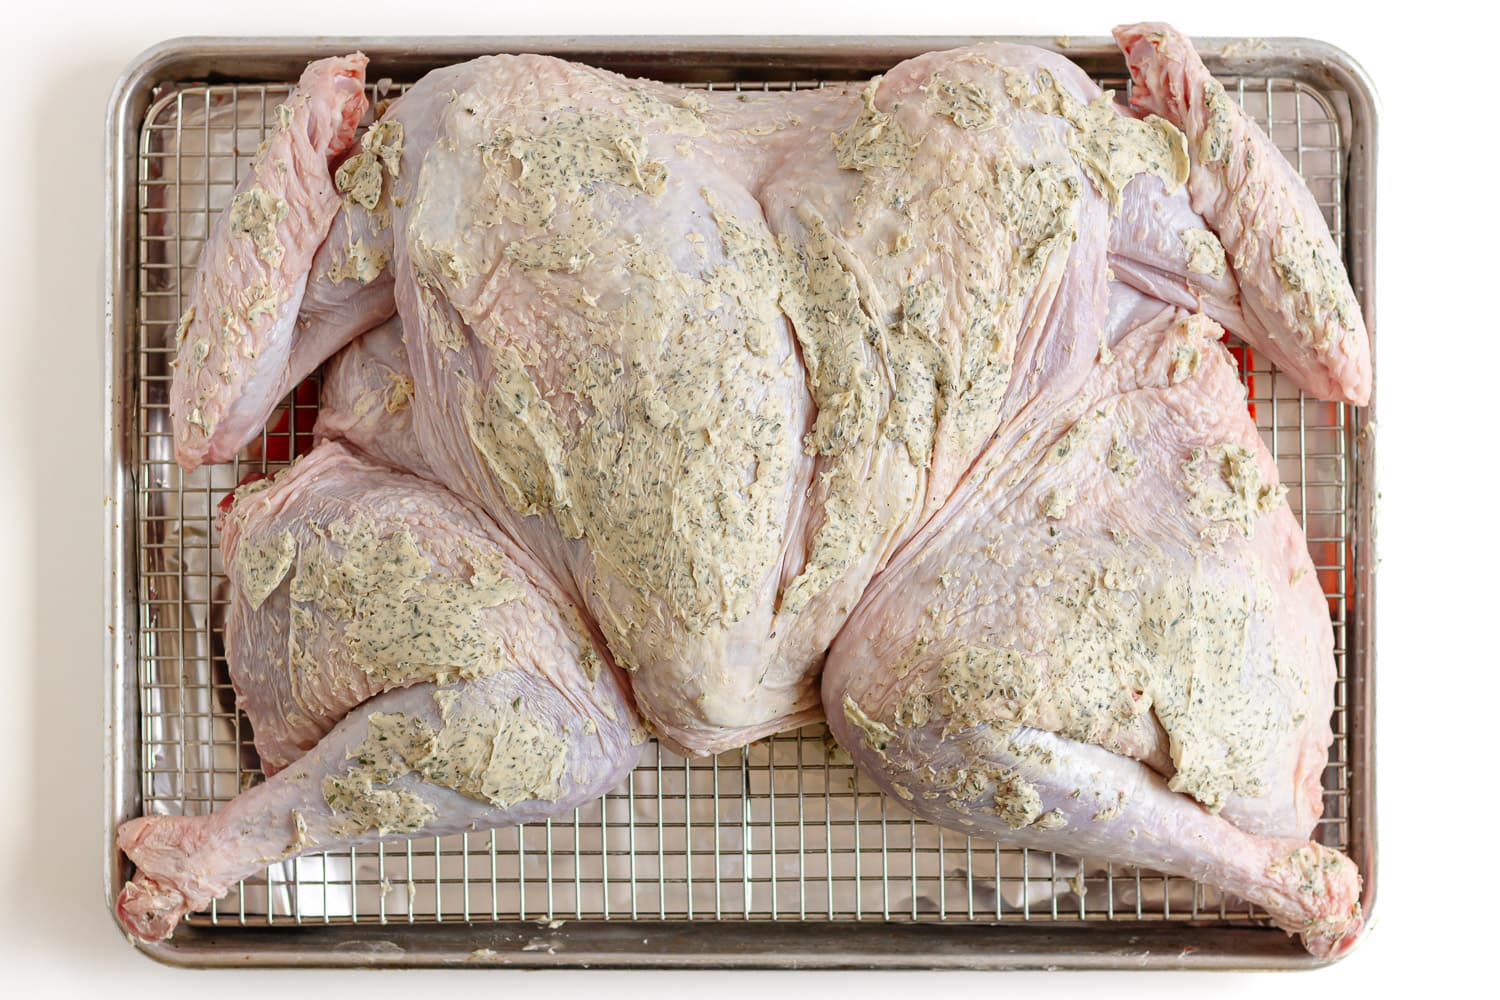
Create pockets under skin: Using your fingers, gently separate the skin of the turkey from the breast and thigh meat to create pockets. Go in through the bottom of the breast and work up along both breast halves and thighs. Be careful not to tear any holes or detach the skin from the turkey entirely.
Dry brine the turkey: The process is discussed in detail above. You basically just sprinkle on a mixture of kosher salt and baking powder and pop the turkey in the fridge. So EASY!!
STEP 2: Prepare Turkey For Roasting
Bring turkey to room temperature: Take turkey out of the fridge 1-2 hours before roasting and pat dry with a paper towel.
Make herb butter for turkey: Mix finely chopped sage, thyme, rosemary and some freshly ground black pepper into some softened butter. Or blitz together in a food processor for a smoother consistency. Spoon some under the skin of the turkey breasts and thighs. Massage the remainder all over the turkey.
STEP 3: Roast The Turkey
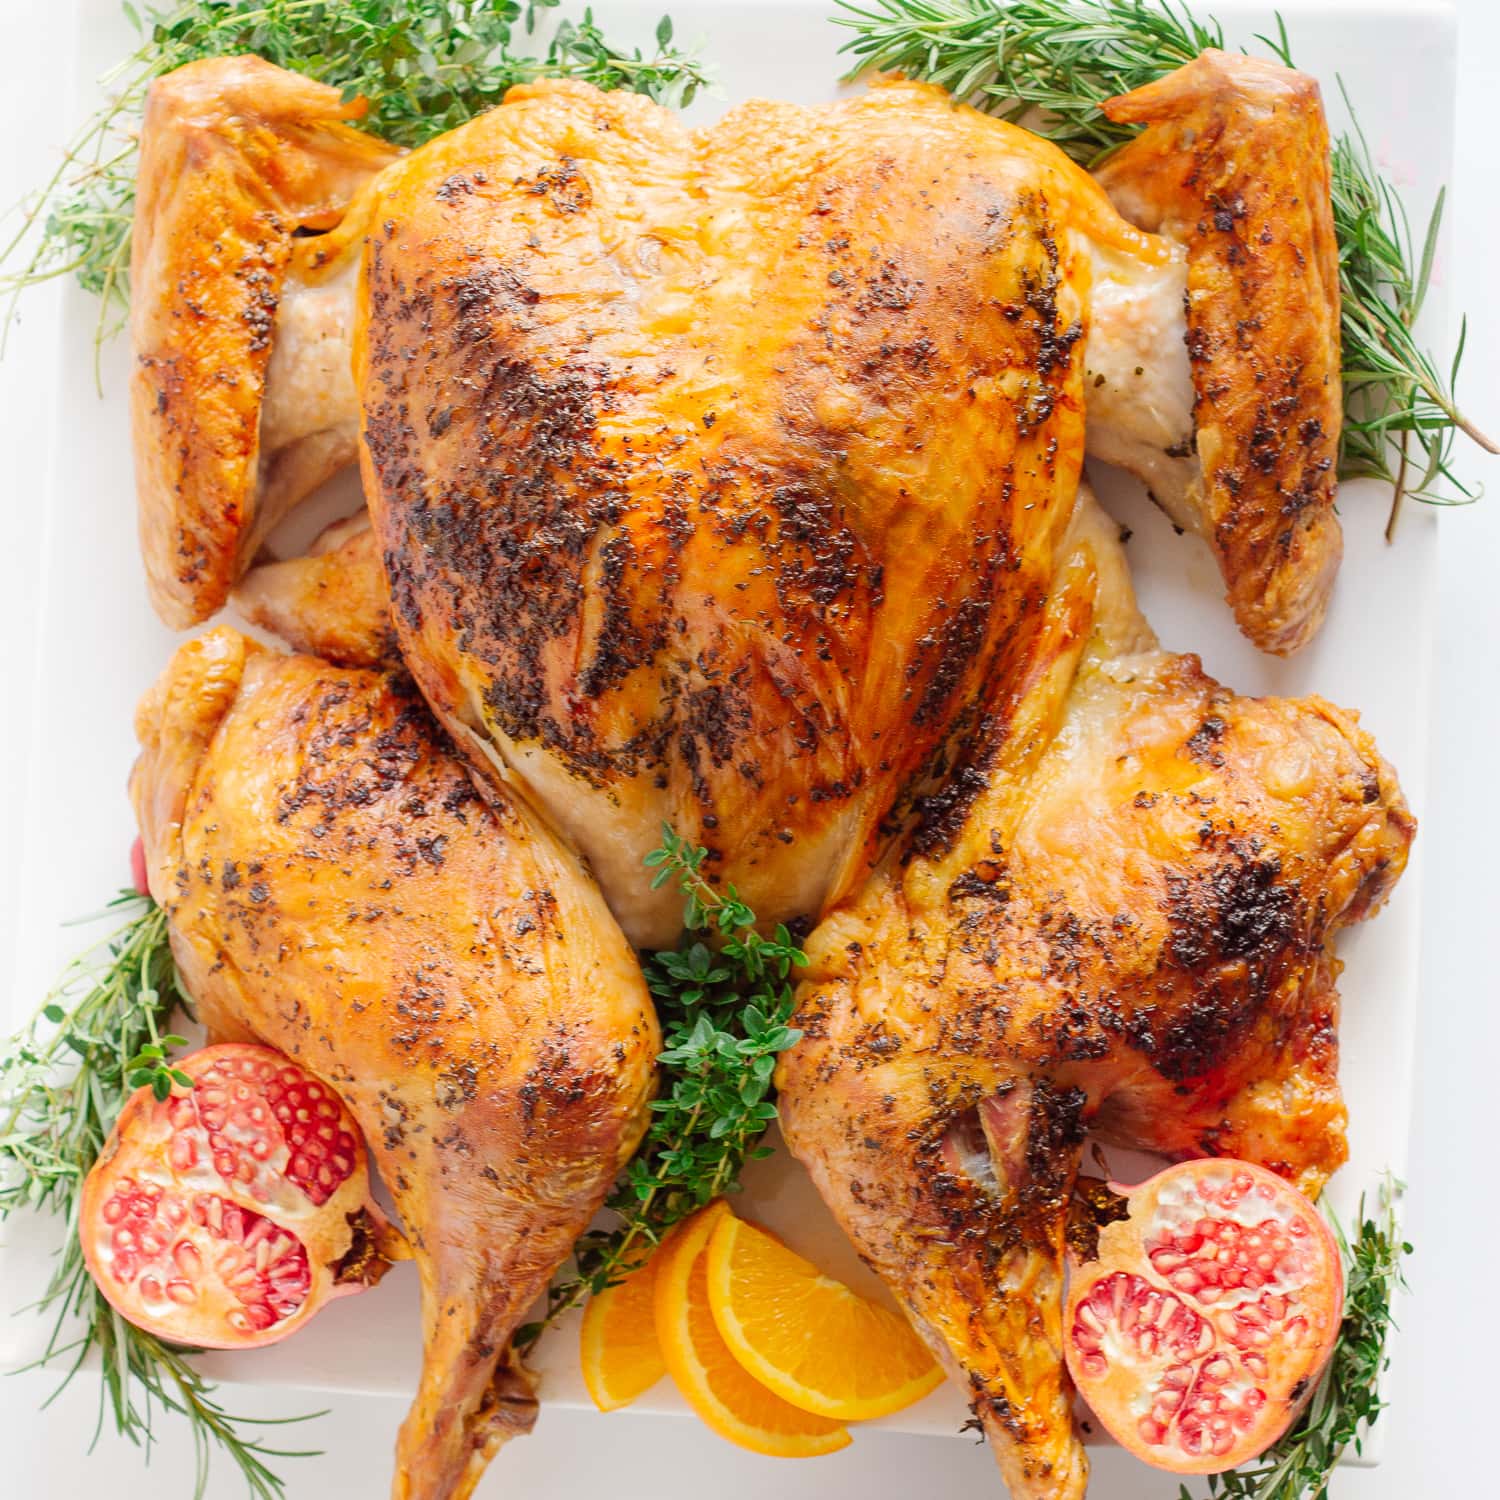
Roast: Place turkey on a wire baking rack fitted over a foil-lined baking sheet. Pour 3 cups of water into the bottom of the tray to prevent drippings from smoking (along with some chopped onions, carrot and celery for more flavorful drippings). Roast turkey at 450F (425F convection) until a thermometer reads 150F on the breast and at least 165F on the thickest part of the thigh (about 90 minutes or less). If the skin is perfectly browned before the meat is cooked, just cover loosely with foil.
Tip: Place foil on the oven rack below to catch any excess drippings. Sometimes as the turkey cooks a leg can splay out a bit over the edge of the baking sheet causing drippings to fall to the bottom of the oven which can smoke.
STEP 4: Rest and Carve
Rest: Allow the turkey to rest 20-30 minutes before carving.
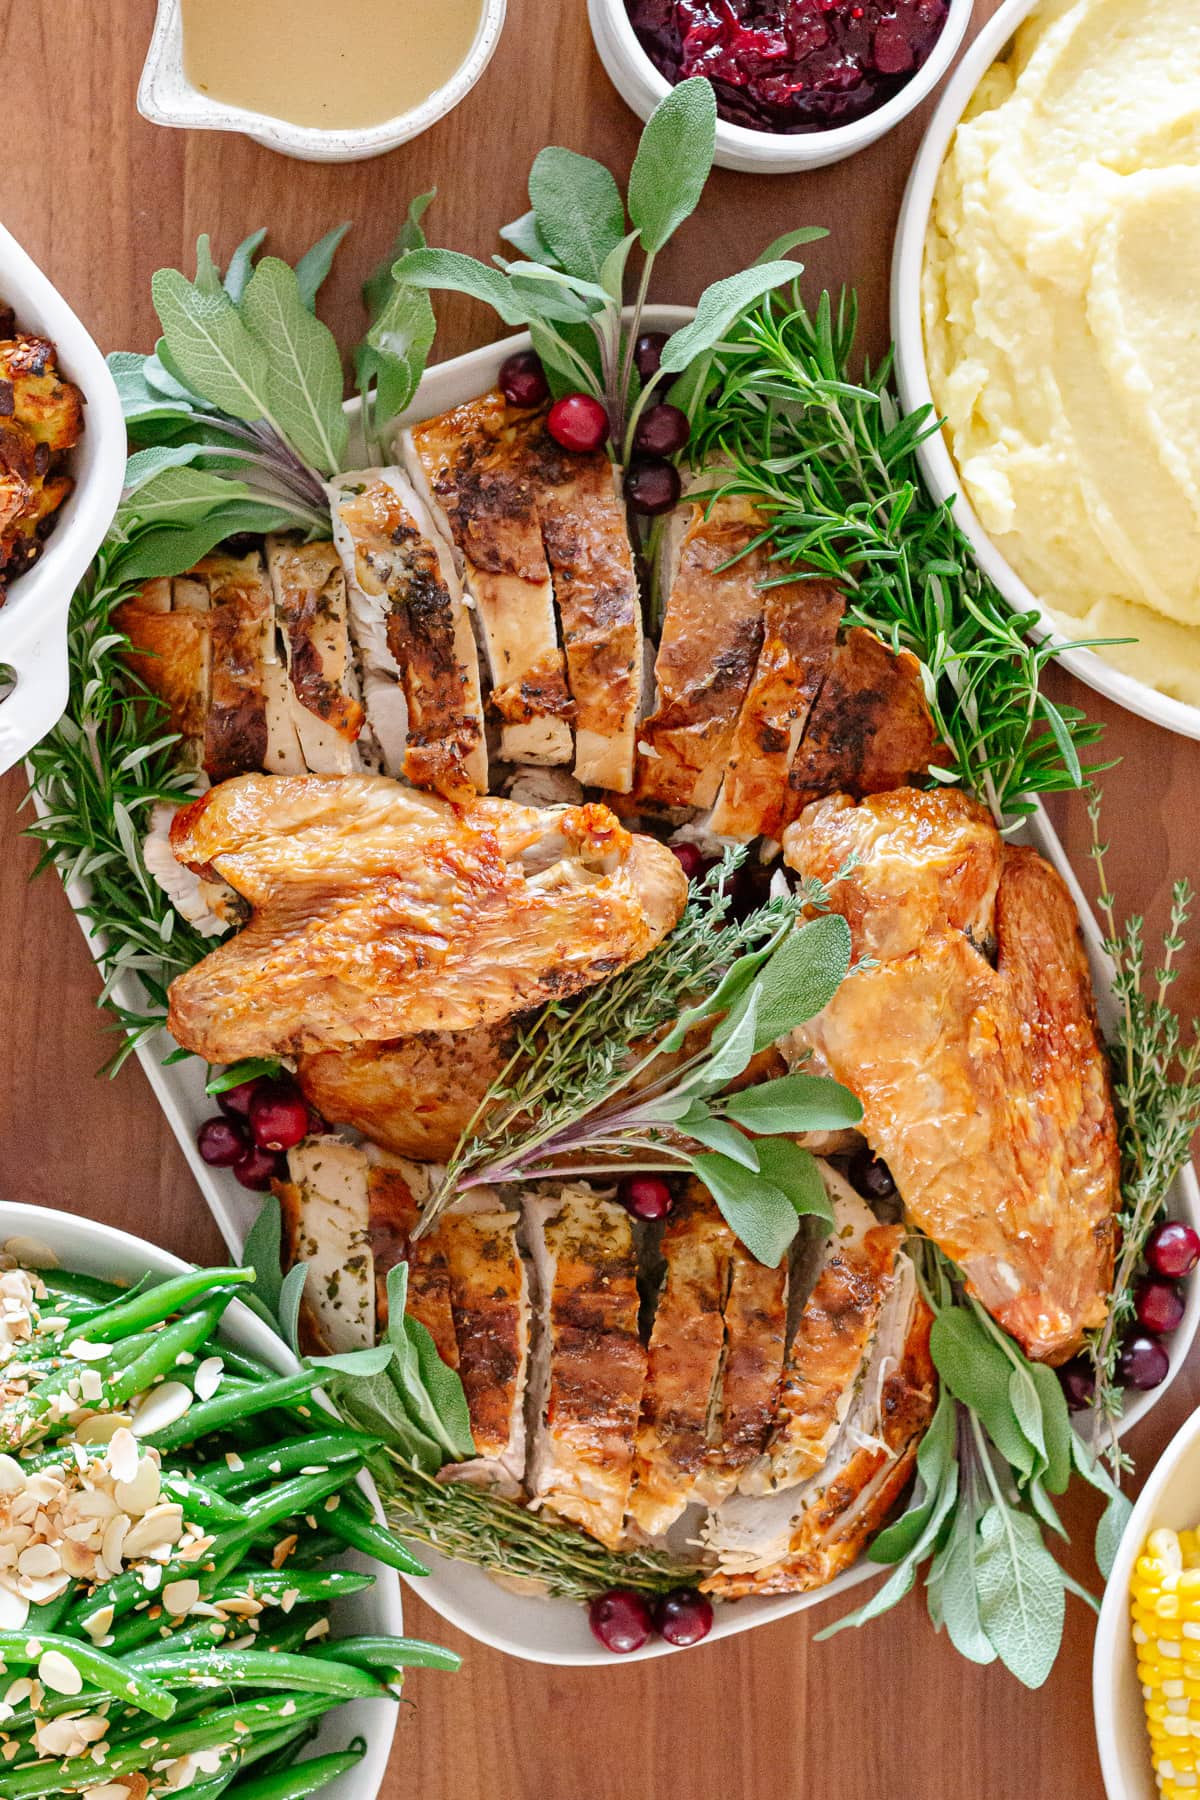
Carve + Enjoy! Carve the turkey and enjoy! I like to serve mine with this Make Ahead Turkey Gravy and Cranberry Orange Sauce.
Spatchcock Turkey Cooking Time
How long does it take to cook spatchcock turkey? It generally takes about 90 minutes (1 hour 30 minutes) for a 12-14 pound turkey but can also sometimes take less time especially if the turkey is on the smaller end of the size range.
My biggest tip is to always use a meat thermometer! It’s the best way to know when your turkey is cooked perfectly.
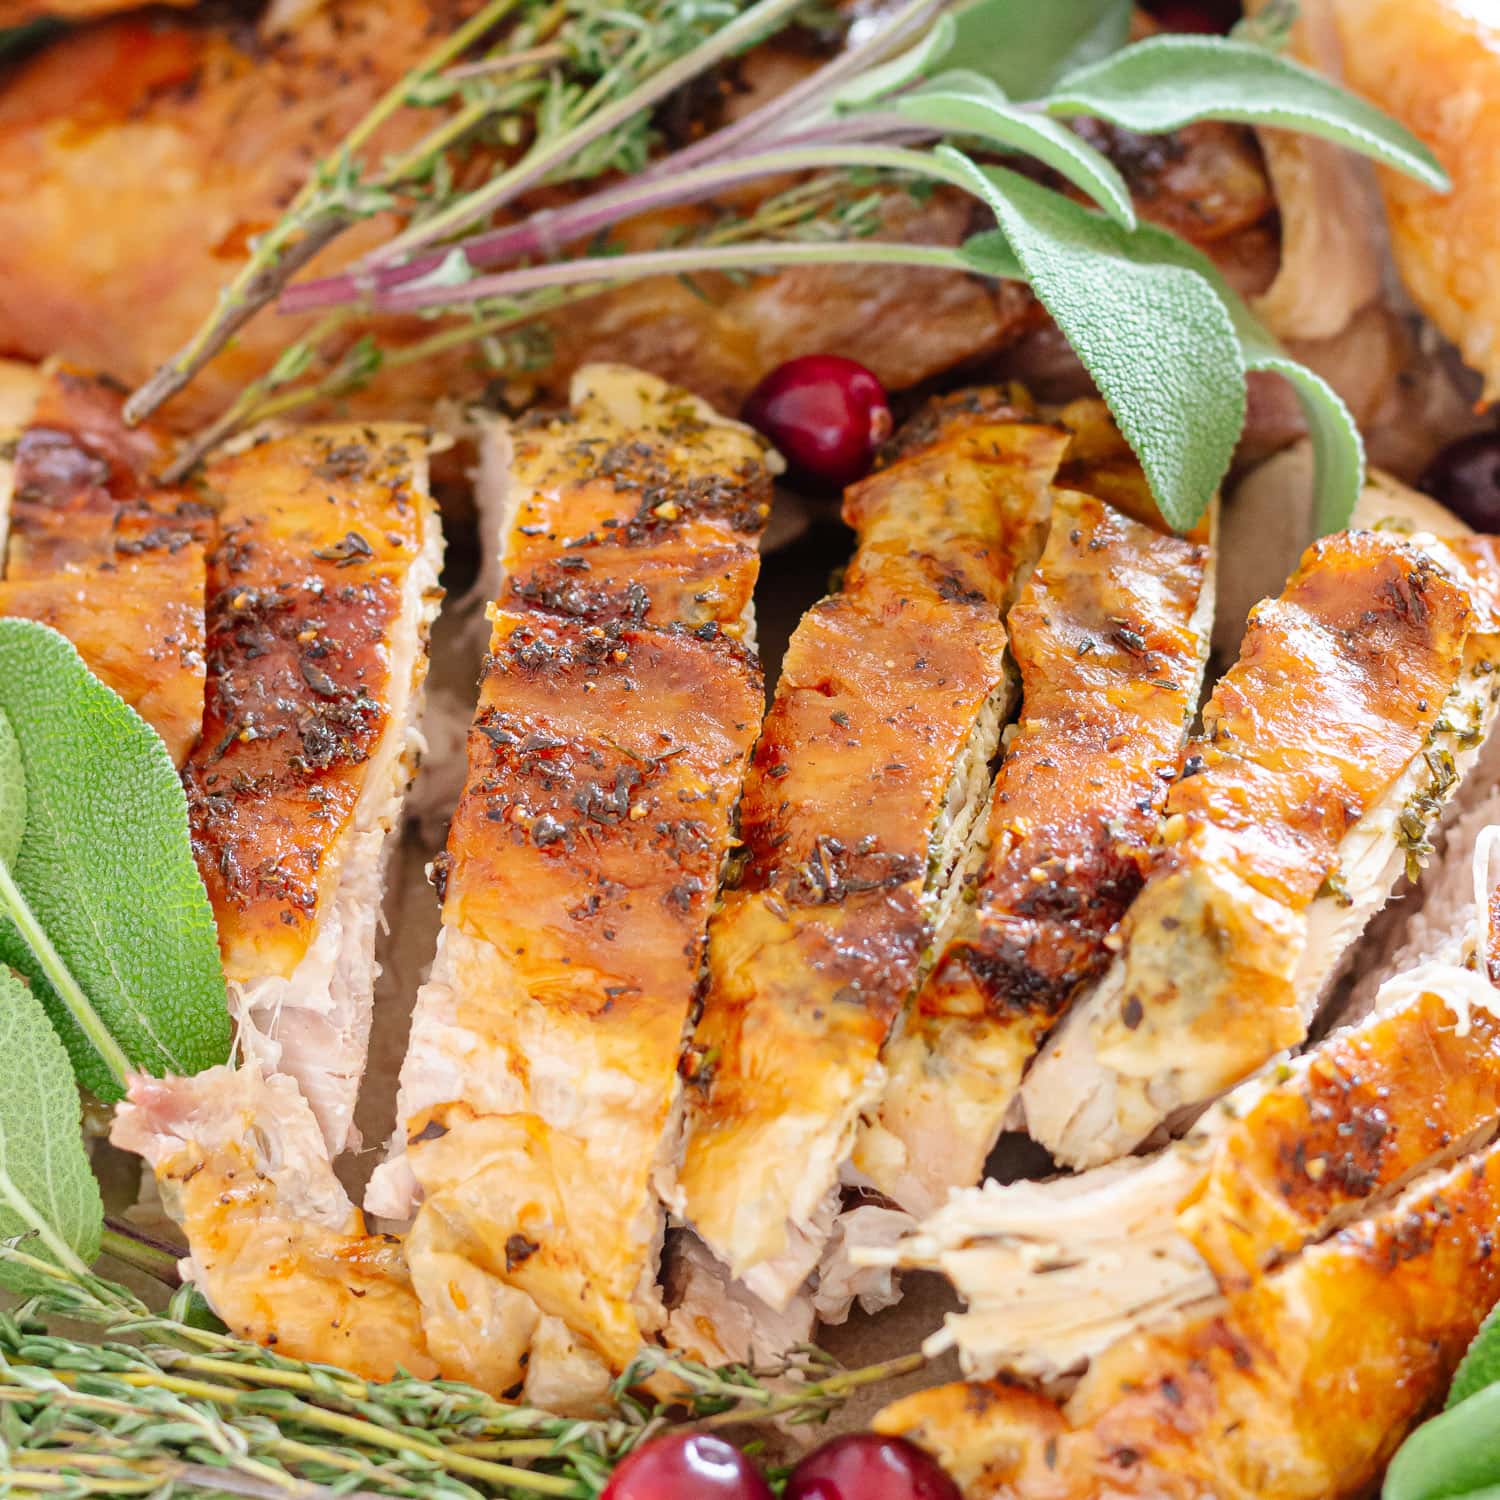
How To Carve A Spatchcock Turkey
I find carving a spatchcocked turkey to be a lot easier than a whole turkey. Watch this video to see how it is done.
- Remove the leg and thigh from each side by slicing through the joints.
- Remove the wings.
- Remove the breasts by starting at the breast bone and cutting the turkey breast away from the bone. Repeat on the other side. Then cut each breast into slices.
- Arrange everything on a platter.
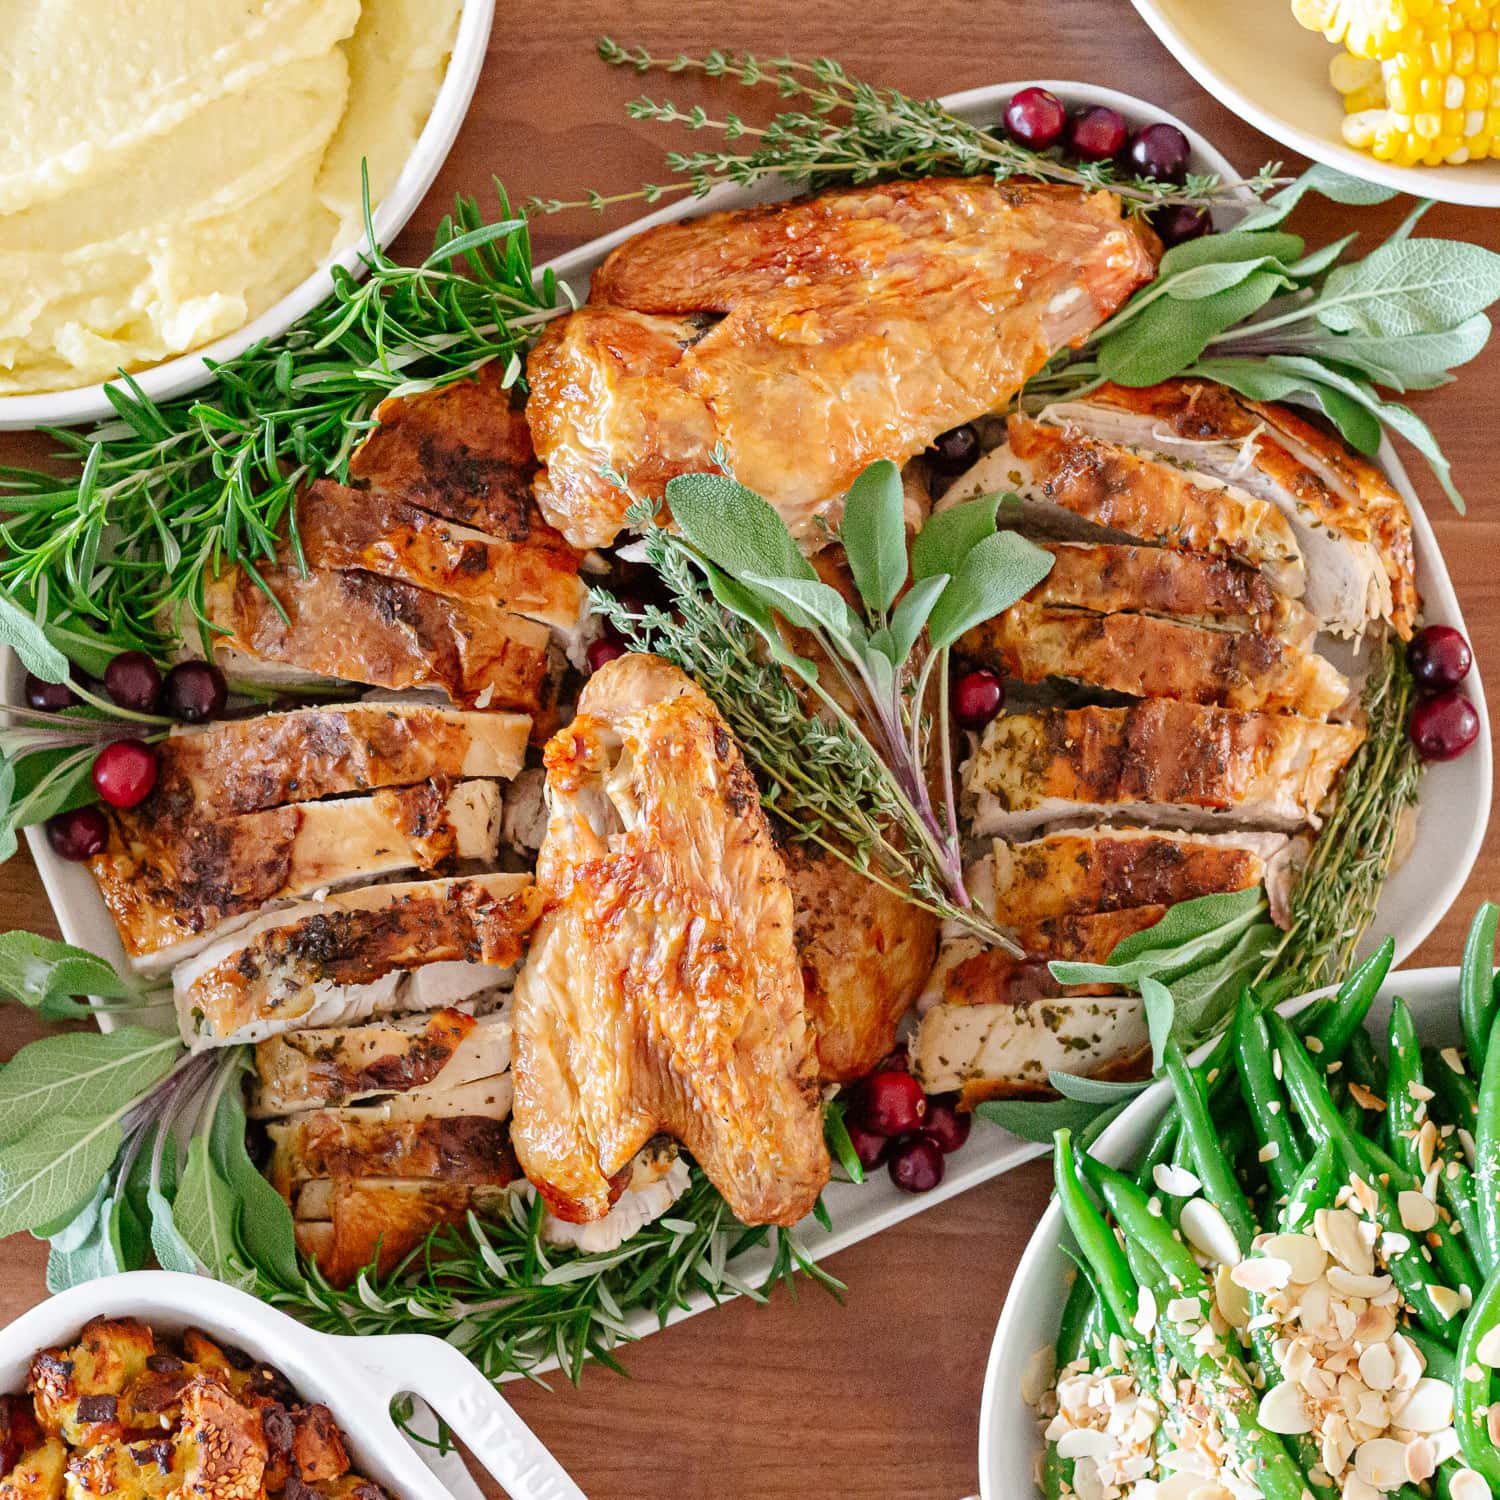
What To Serve With It
Serve your turkey with this delicious Make Ahead Turkey Gravy and Cranberry Orange Sauce as well as your favorite holiday or Thanksgiving side dishes. Here are a few ideas:
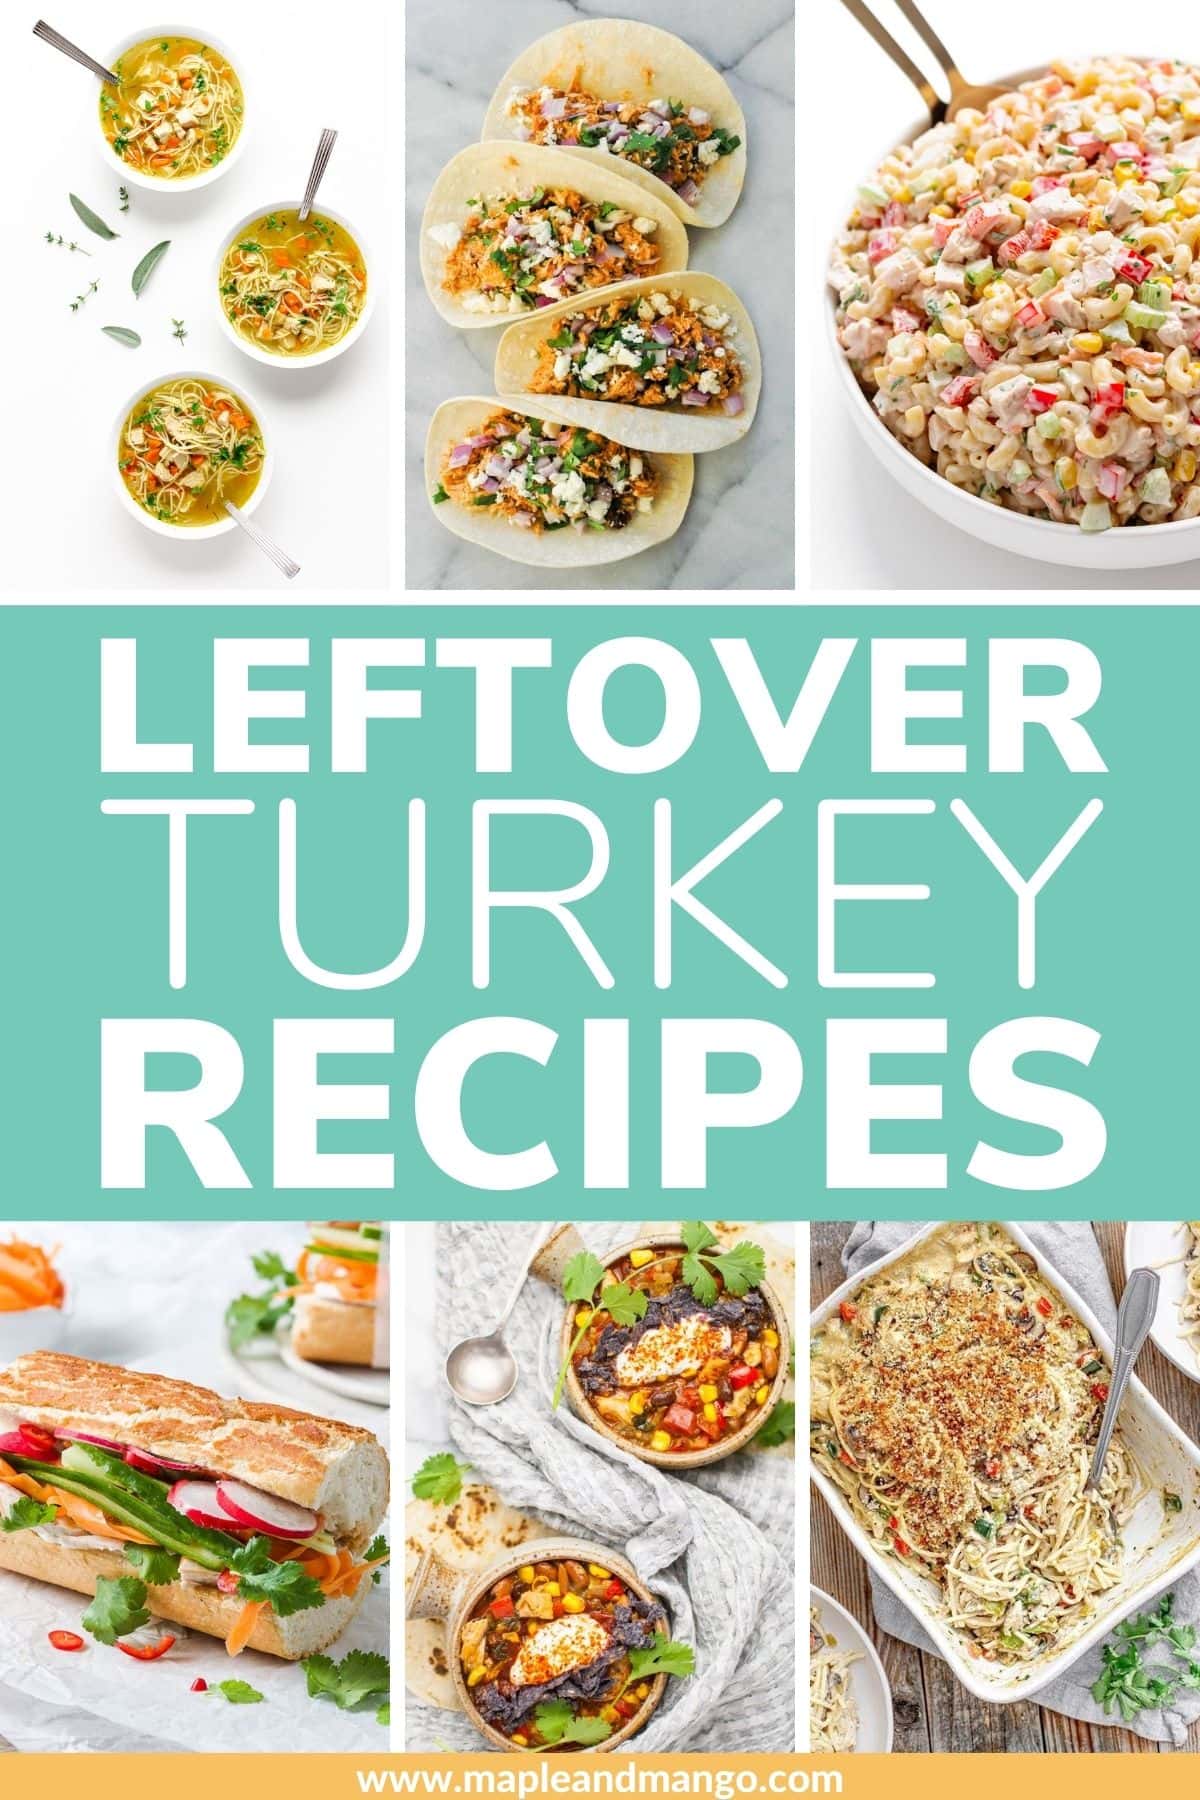
Ways To Use Leftovers
Don’t toss that turkey carcass when you are done! Transform it into this delicious Turkey Bone Broth (stock) and then make this Easy Turkey Soup with the broth and leftover turkey.
Make sure to also go check out these Leftover Turkey Recipes for tons of amazing ideas to help you transform your turkey leftovers into something delicious!
Small Turkey Dinner Idea: For a small Thanksgiving dinner, you might also enjoy these Crispy Baked Turkey Wings!
Did you make this spatchcock turkey recipe? Let me know in the comments below or tag me on Instagram!
Dry Brine Spatchcock Turkey With Herb Butter
- Prep Time: 30 min (plus 1-3 days brining)
- Cook Time: 90 min
- Total Time: 2 hours (plus dry brine time)
- Yield: Serves 10-12
- Category: Main Course
- Method: Roast
- Cuisine: American
Description
This delicious roast spatchcock turkey with herb butter is juicy, crispy-skinned and only takes 90 minutes to cook! Learn how easy it is to spatchcock and dry brine your Thanksgiving or holiday turkey.
Ingredients
- 1 12-14 pound turkey (fresh or defrosted)
- 3 tablespoons kosher salt
- 1 tablespoon aluminum free baking powder
- Optional: 1 onion, 1 carrot and 1 celery stalk chopped up
For The Herb Butter
- 1/2 cup softened butter (can also use ghee)
- 2 tablespoons finely chopped sage
- 1 tablespoon finely chopped thyme
- 1 tablespoon finely chopped rosemary
- Freshly ground pepper, to taste
Equipment Needed:
- Baking Sheet: A regular rimmed, uncoated baking sheet (half-sheet sized)
- Wire Rack: Make sure it is ovenproof to high temps, stainless steel and designed to fit inside baking sheet. This wire rack is great for roasting!
- Poultry Shears: A sharp pair of poultry shears are required if you are spatchcocking the turkey yourself.
- Digital Meat Thermometer: To ensure a perfectly cooked turkey, I like to use a duo of an alarm thermometer to track the internal temperature while roasting and an instant read thermometer to verify doneness temps in the breast and thighs.
Instructions
- Spatchcock the turkey: Ask the butcher to do this for you! Make sure to ask for the backbone to use for stock or gravy. If having a butcher spatchcock the turkey for you isn’t an option, here are the steps to do it yourself:
- Remove the neck and giblets from inside the turkey.
- Place the turkey breast-side down and cut along both sides of the backbone with a sharp pair of poultry shears to remove it.
- Cut a small incision on the cartilage that is between the two breast bone. Optionally, you could also remove the whole wishbone to make carving easier later. Flip the turkey over so that it is breast-side up and using both hands, firmly press down on the breast bone to flatten out the turkey (you will hear it crack). Trim off any excess fat or skin you might see near the neck or cavity areas.
- Create pockets under skin: Using your fingers, gently separate the skin of the turkey from the breast and thigh meat to create pockets. Go in through the bottom of the breast and work up along both breast halves and thighs. Be careful not to tear any holes or detach the skin from the turkey entirely.
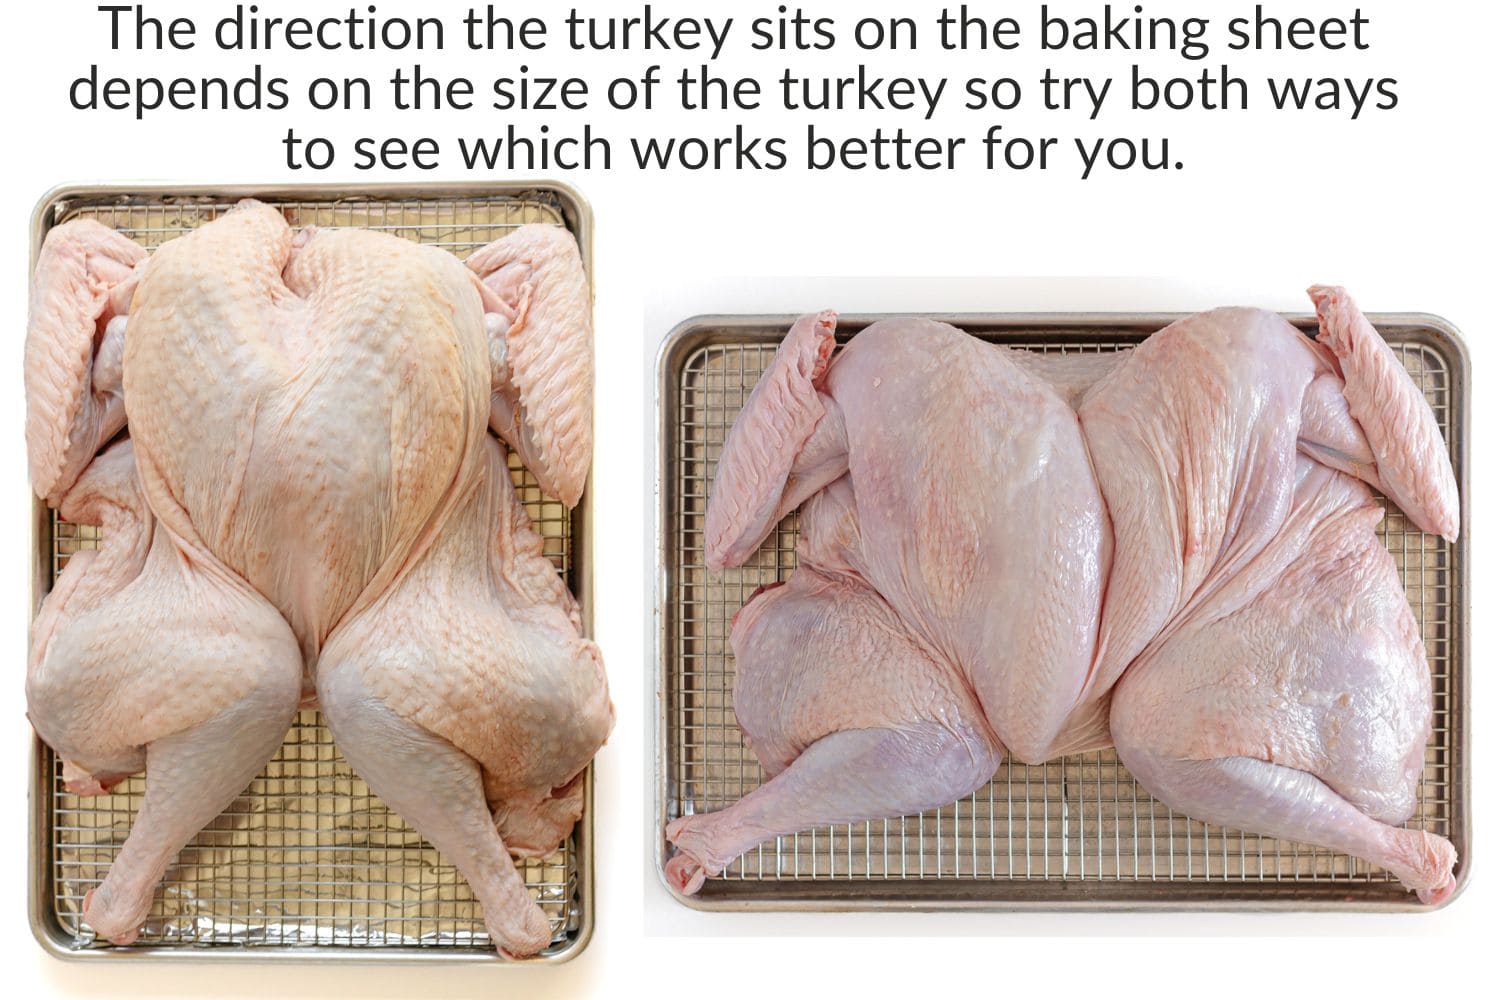
- Dry brine turkey: Dry the turkey off with a paper towel. Combine the kosher salt and baking powder in a small dish. Sprinkle it all over the outside of the turkey on all sides. You may have extra salt mixture (you want to sprinkle on an even layer all over the turkey but it doesn’t need to be a really thick layer – simply discard any extra you might have). Set a wire rack on top of a baking sheet and lay the turkey on top (skin side up). The direction the turkey sits on the baking sheet depends on the size of the turkey so try both and see which is better. Loosely cover with some plastic wrap and place in the fridge for 1-3 days. For really crispy skin, remove the plastic wrap and leave uncovered in the fridge for the last 12-24 hours.
- Bring turkey to room temperature: Take turkey out of the fridge 1-2 hours before roasting and pat dry with a paper towel.
- Make herb butter: Mix together herb butter ingredients in a small bowl (can also blitz in a food processor for a smoother consistency). Spoon some under the skin of the turkey breasts and press your fingers on top of the skin to spread the butter underneath around evenly. Do the same thing under the skin on the thighs. Massage remaining herb butter all over the outside of the turkey.
- Prep turkey for oven: Adjust oven rack to middle position and preheat oven to 450F (425F convection). Lay turkey flat on a wire baking rack fitted over a clean foil-lined baking sheet. The turkey should be skin side up with legs spread out. Tuck wing tips behind the breasts. Pour 3 cups water into bottom of the tray to prevent drippings from smoking (along with the optional chopped onion, carrot and celery for more flavorful drippings).
- Roast: Roast turkey until a meat thermometer reads 150F on the breast and at least 165F on the thickest part of the thigh (about 90 minutes or less). If the skin is perfectly browned before the meat is cooked, just cover loosely with foil. Tip: It can be helpful to place foil on the oven rack below to catch any excess drippings (sometimes a leg can splay out a bit over the baking sheet as the turkey cooks causing drippings to fall to the bottom of the oven which can smoke).
- Rest and carve: Let rest for 20-30 minutes before carving. Enjoy! I like to serve with Make Ahead Turkey Gravy and Cranberry Orange Sauce and all my favorite side dishes.
Notes
- Make sure to use a natural turkey! This recipe is not suitable for a preseasoned or self basting bird. You can find natural turkeys at the butcher shop, in many grocery stores or have it delivered through ButcherBox.
- Salt: Use kosher salt to dry brine. The granules are larger and easier to distribute. Table salt is too fine and will make the turkey too salty.
- Baking Powder: The baking powder helps to make the skin crispy. Make sure to use aluminum free baking powder since it has a neutral taste. DO NOT accidentally grab baking soda or your turkey will have a horrible metallic taste.
- Keep the turkey carcass to make Turkey Bone Broth (stock).
- Meat thermometers: The thermometer duo that I love to use for perfectly cooked turkey is the ChefAlarm to monitor while roasting (without opening oven door) and the Thermapen to quickly verify doneness in multiple areas.
- Check out the post for more details and FAQ on the spatchcocking, dry brining and carving process.


This method sounds incredibly delicious – I need to try it. And I especially love your suggestion to ask the butcher to do the spatchcocking- that was always intimidating to me 🙂
It’s just another reason why I love to purchase my turkey from a local butcher!
this is perfect for the holiday!
I did this recipe for our “friendsgiving” gathering and it was a hit. The skin was perfectly crispy and the turkey was so juicy!
I’m so happy to hear that everyone enjoyed it!
One look at this turkey and I want to celebrate Thanksgiving all over again! I’ve only ever spatchcocked a chicken but it’s a great way to cook a bird in less time and that dry brine results in perfectly crispy skin.
I started with spatchcock chicken as well many years ago and loved it so much that I knew it would be a great way to roast turkey as well. We haven’t gone back since!
This sounds like it would make the turkey extra “juicy”. *cue drooling haha*
Sure is drool worthy! 🤤
I made this recipe for Thanksgiving yesterday and the herb butter was amazing. The turkey turned out juicy and flavorful. I have a conventional oven and I started with a 450 degree oven. About 15 minutes into the cook I had to put aluminum foil on the turkey and drop the oven temp to 400. About 20 minutes later I dropped it to 350 degrees. After a total of 90 minutes I took the aluminum foil off and let the skin continue to get dark. When the turkey reached 165 degrees in the breast and 185 degrees in the thighs I took it out and let it rest. The turkey was juicy and the skin was crunchy and delicious. I Don’t think you’d be able to cook this at 460 degrees for 90 minutes and have anything but a dry or burnt turkey. I had a 12 pound turkey. Again, the recipe was delicious, just don’t be afraid to drop the oven temp to 350-375 degrees.
Thanks for taking the time to leave a comment! For years, I have cooked mine the entire time at 450F or 425F convection with no problems. Its’s actually a fairly common temperature to use for spatchcock turkey from what I have seen. Occasionally, if the turkey was on the larger size of the size range listed (14 lbs), I would have to cover loosely with foil once the skin was already browned (I mention this in the recipe). Your experience is definitely a good reminder though to pay attention to your turkey since some ovens may run hotter. Also will depend on how close to the elements the turkey is placed in the oven (which rack) and the size of the oven since a smaller oven will automatically have the turkey closer to the elements. So many factors to consider! I’m so happy that you loved the herb butter and enjoyed a flavorful Thanksgiving turkey!
After applying the Brine and waiting the 2 days should you rinse the bird before applying the butter and cooking??
Hi Thomas! There is no need to rinse the turkey off. In fact, rinsing a dry brined turkey would actually undo all the surface-drying achieved by the process which will give you the crispy skin!
You’ve totally made the case for this cooking method. Crispy skin and shorter cooking time…I’m in! Thank you for that gorgeous photos with the step by step. I’ve got this.
Glad you found the step by step photos helpful! Once I started cooking my turkey this way, I never turned back.
Haha – good idea! I always get the butcher to do it – one of the perks of buying the bird from a local butcher:)
Hi! Do you use salted or unsalted butter? My turkey is about 20 pounds I do have a tray big enough but do you suggest changing the cooking temperature and how long should I expect to cook it for?
Both salted or unsalted butter work – I have used both in the past depending on what I had. A 20 pound bird is definitely a lot larger than what normally will nicely fit on a regular baking sheet once spatchcocked so you must have a really large tray and oven! A turkey that much larger than what this recipe calls for will also be a lot thicker. I would start it at 425F for 30 minutes and then lower to 350F or so for the remainder. You will need to monitor it with a digital thermometer (preferably one that can stay in it while in the oven) and may need to cover the skin loosely with foil if you notice it getting too brown before the turkey is cooked through. I’m not sure exactly how much longer it will take to cook – the thermometer is truly your best friend for perfectly cooked meat!
Interesting, I spatchcock my chicken all the time to cut down on cooking time. Never thought about doing it with a turkey! I think given the size of the turkey I need to get for Christmas or Thanksgiving, I might save the cutting bit to the butcher!