This post may contain affiliate links. See my disclosure policy.
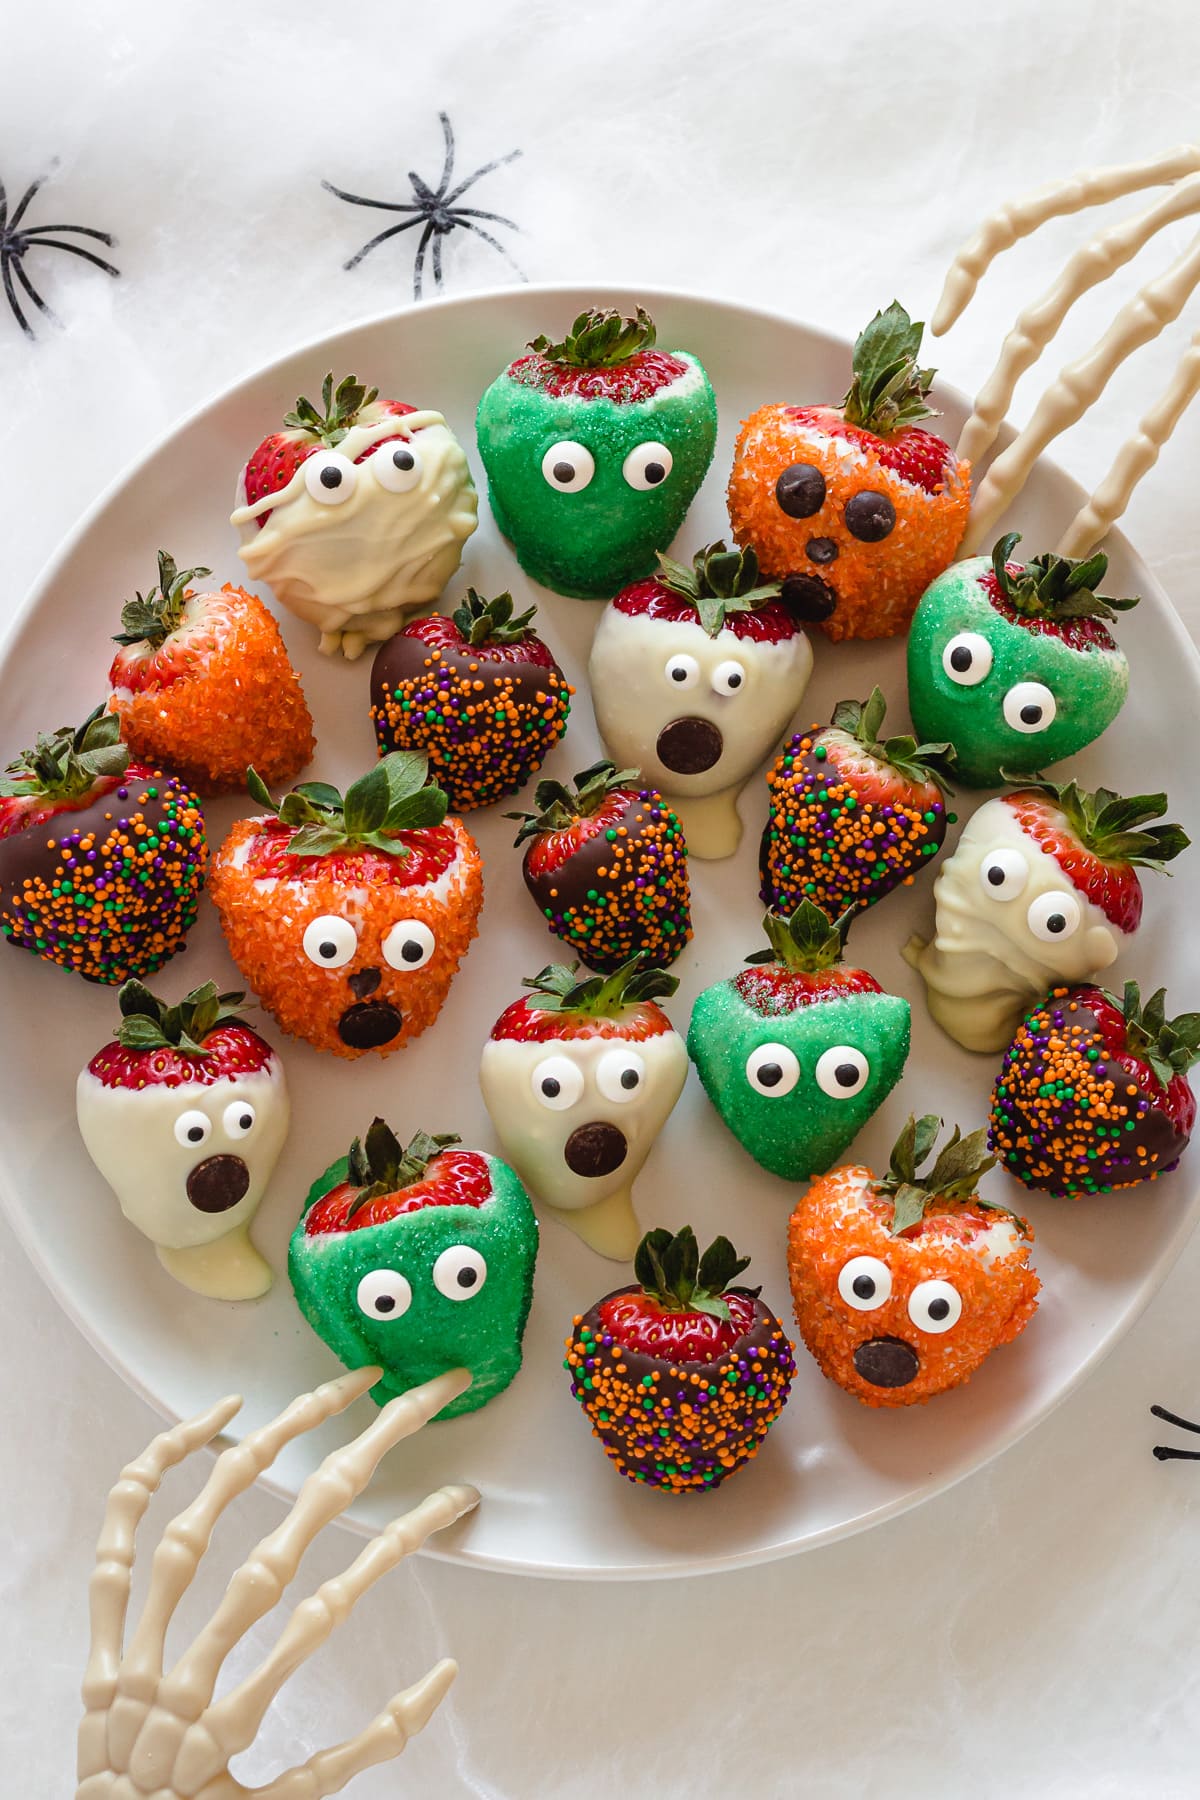
These spooky Halloween Strawberries are a fun and cute Halloween themed dessert or treat that everyone will love! After all, who can resist strawberries dipped in chocolate?! Just 3 ingredients and super easy to make!
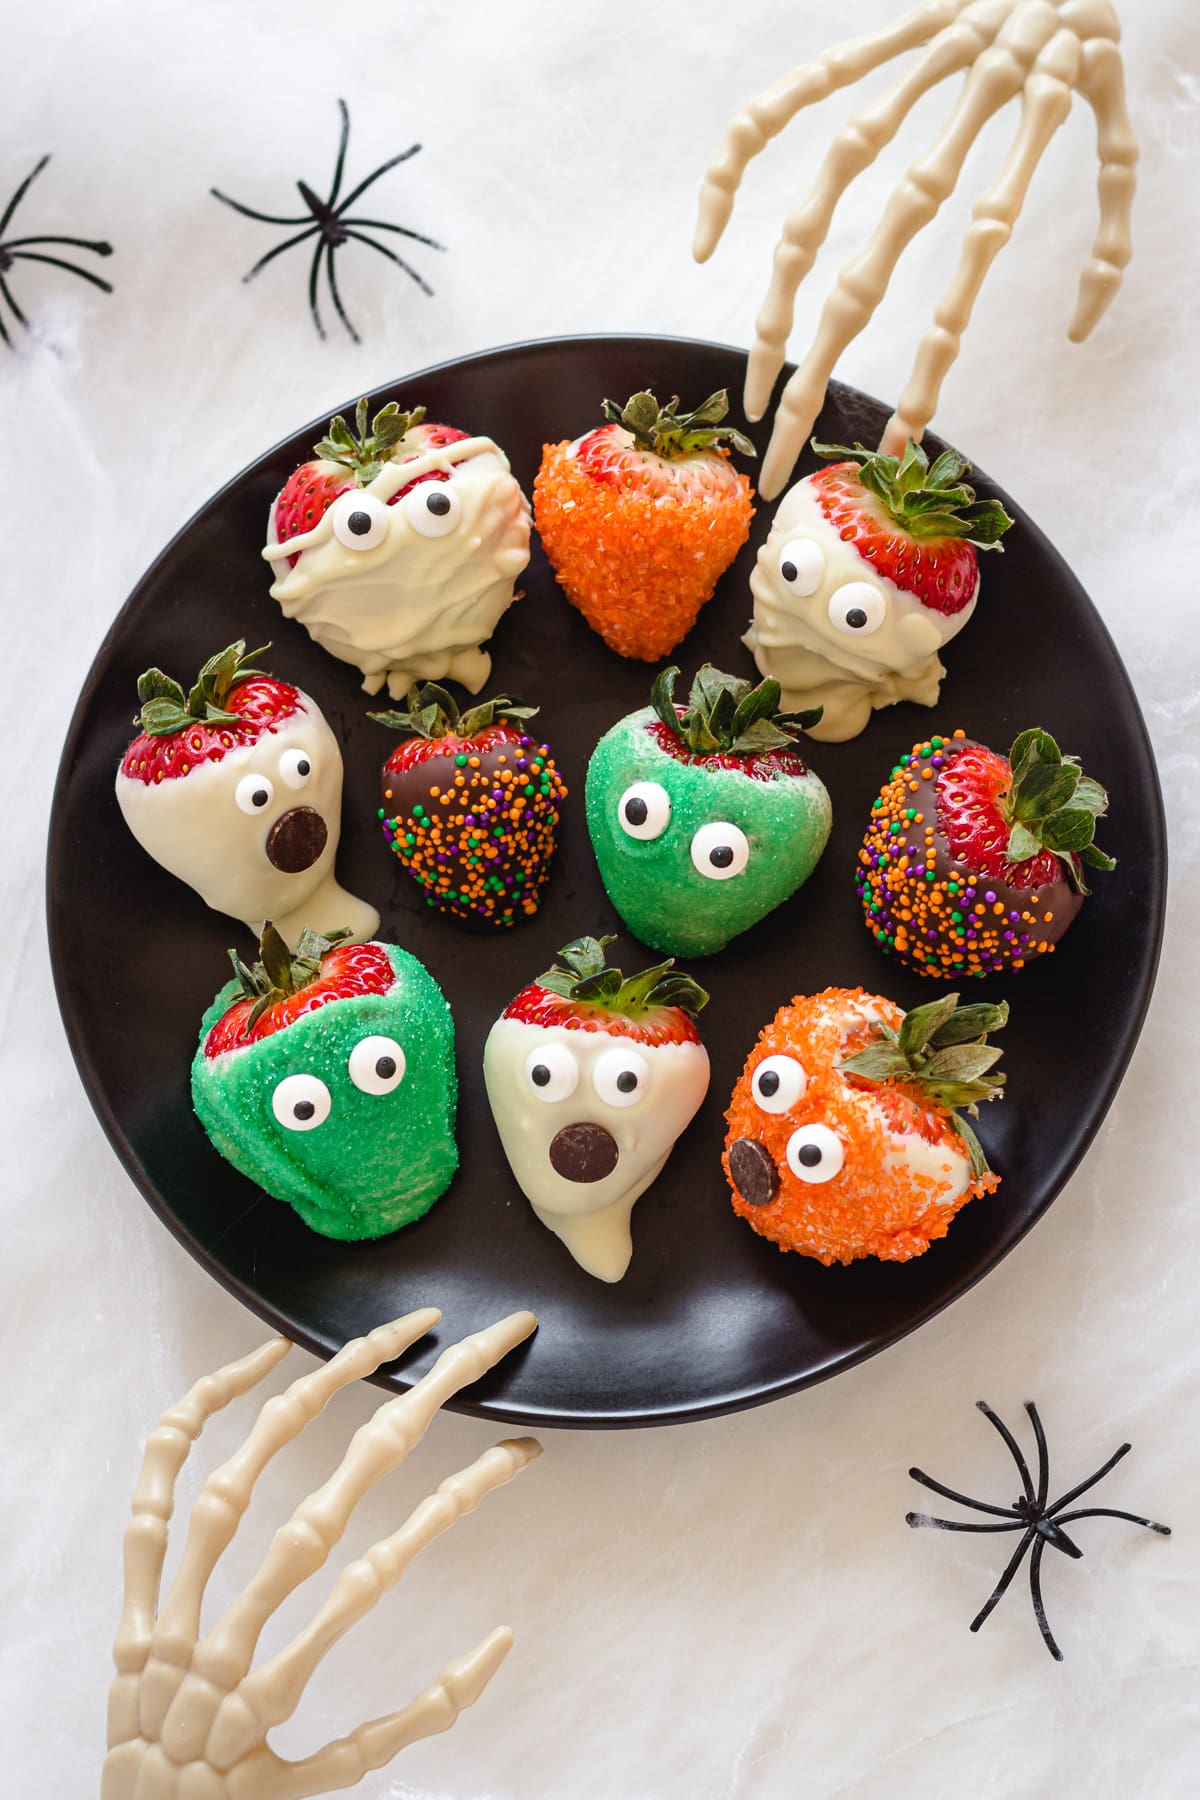
How cute are these Halloween chocolate covered strawberries?! The best part is that they are easy to make. And I mean EASY! No piping bags or advanced decorating skills required here!
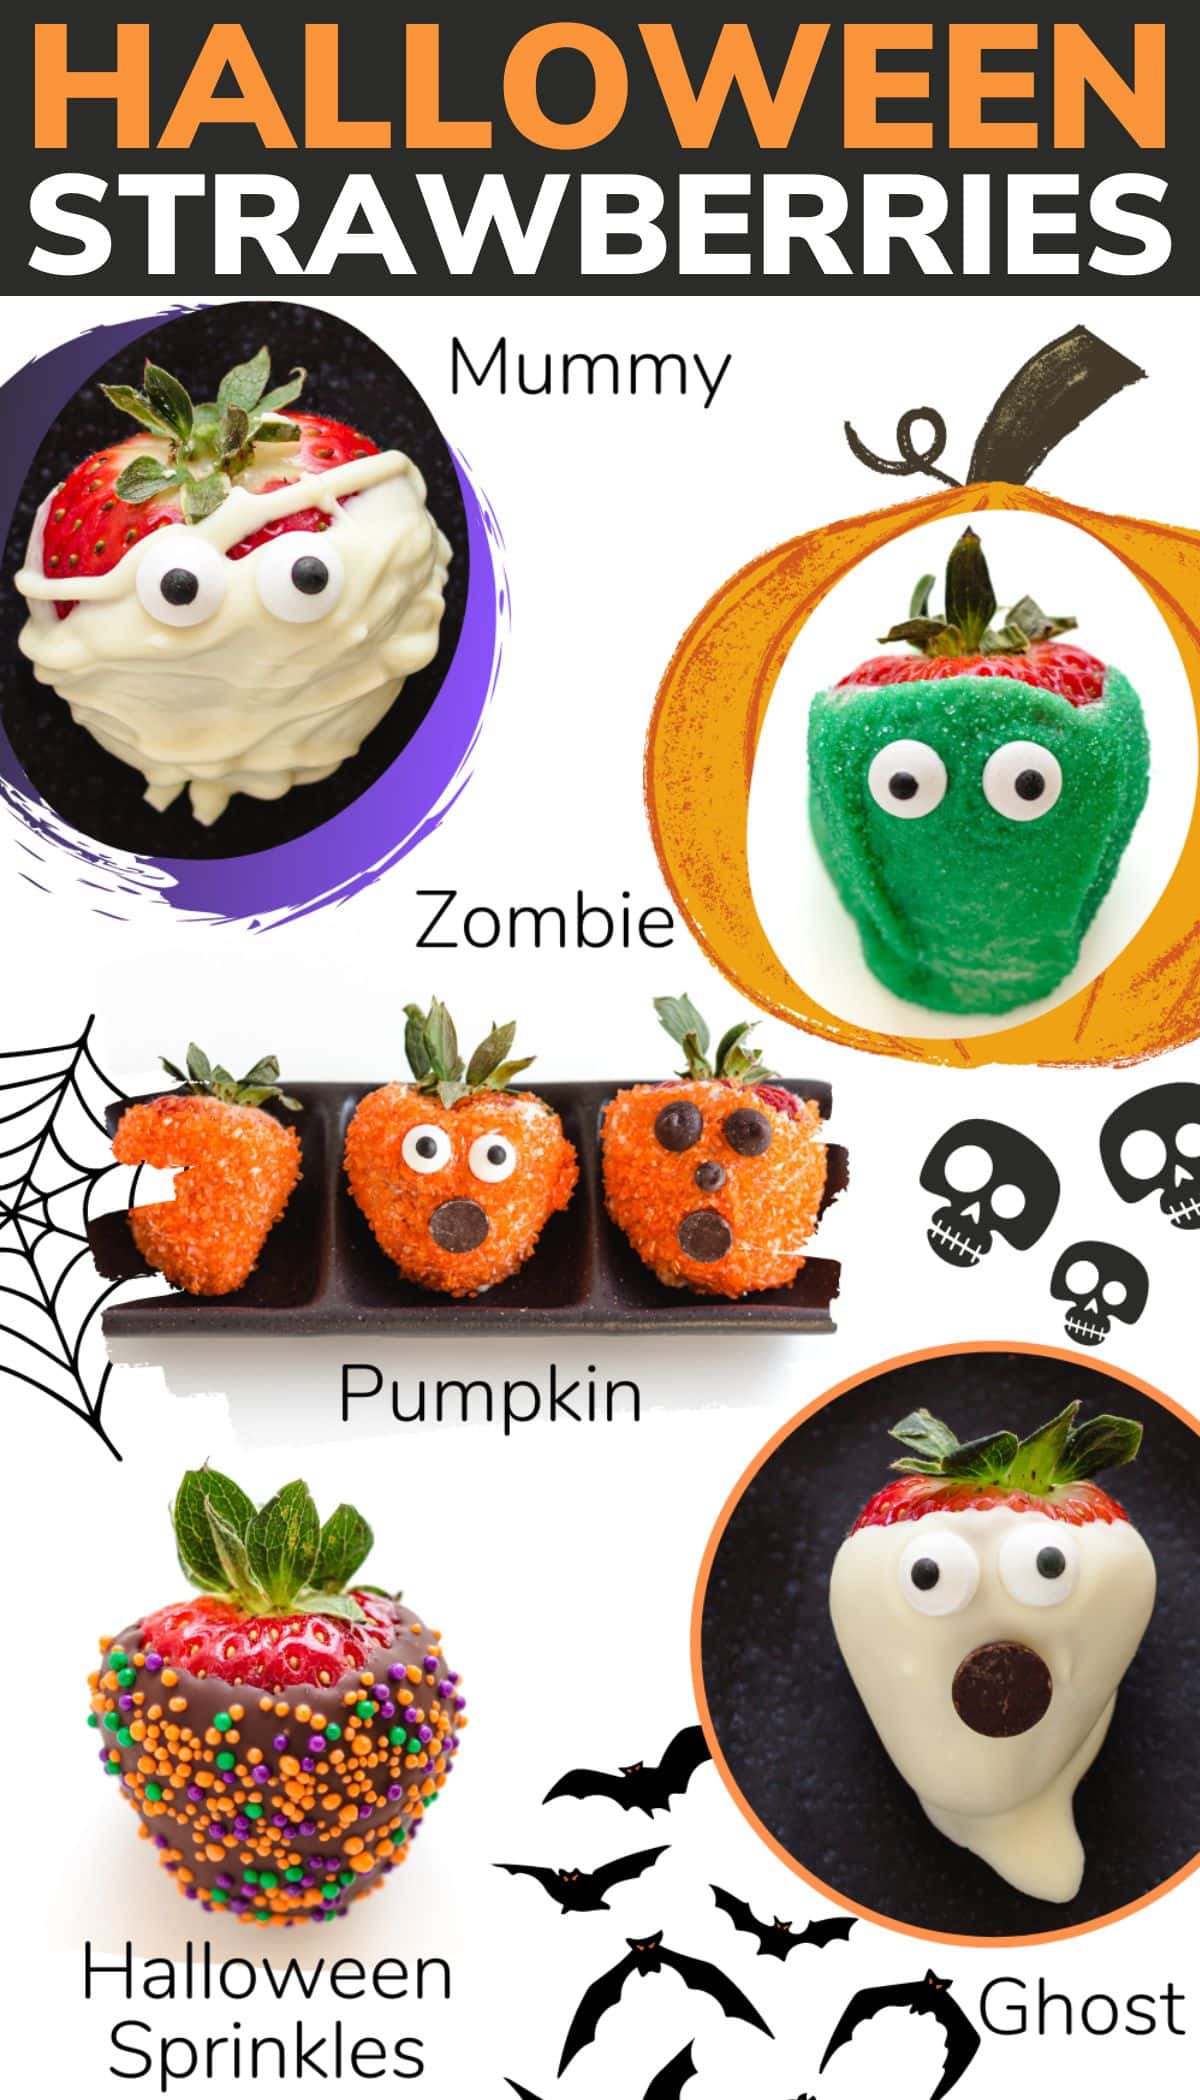
Table of Contents
- Reasons To Love These Spooky Strawberries
- What You’ll Need
- How To Make Easy Halloween Strawberries
- Ghost Strawberries
- Mummy Strawberries
- Halloween Sprinkle Strawberries
- Zombie Strawberries
- Halloween Pumpkin Strawberries
- Tips For Perfect Chocolate Covered Strawberries
- A Few Questions Answered
- More Halloween Recipes
- Easy Halloween Chocolate Covered Strawberries Recipe
Reasons To Love These Spooky Strawberries
Anyone who loves chocolate covered strawberries (and who doesn’t?!) won’t be able to resist this cute and spooky Halloween version. They are…
- A fun and spooky Halloween dessert (cute spooky that is!)
- Perfect for Halloween parties and potlucks – always a hit!
- Made with just 3 ingredients – fresh strawberries, melted chocolate and simple decorations.
- Easy to make! Emphasis on easy here – no piping bag or advanced decorating techniques.
- Kid friendly! Kids, adults…everyone loves these!
What You’ll Need
All you need is three simple ingredients to make these easy Halloween strawberries!
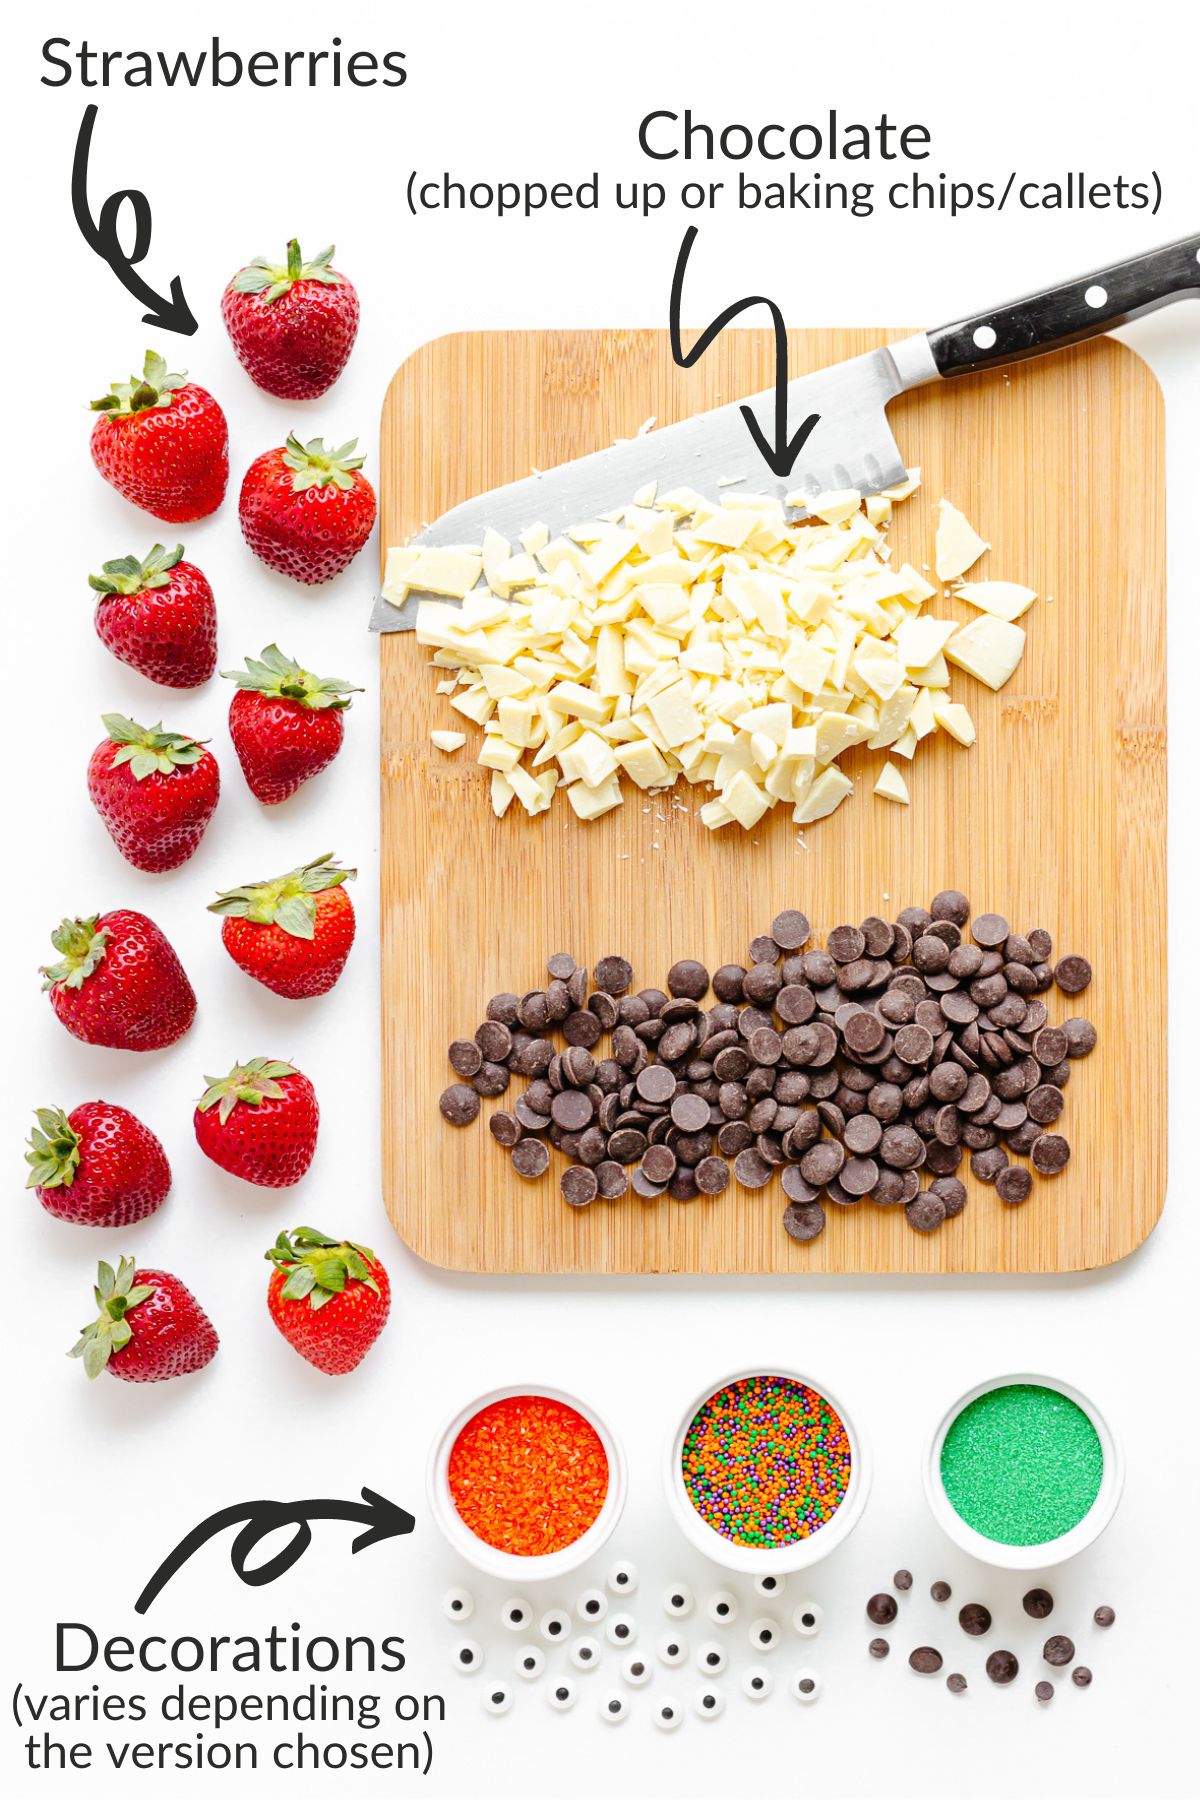
- Strawberries: Find some nice looking fresh strawberries (not overripe). I prefer to use medium to large sized ones since really small strawberries can be more difficult to decorate.
- Chocolate: Good quality baking chocolate works best. It melts easily and tastes delicious. Make sure it has cocoa butter in the ingredients. The type of chocolate needed (white, milk or dark) will depend on which version of these Halloween strawberries you choose to make.
- Decorations: Candy eyeballs are needed for most of the versions. You may also need sprinkles or chocolate chips depending on which type of Halloween strawberry you choose to make.
Here are a few recommended chocolate brands that work well for melting. If using a bar, chop it up first into small pieces before melting.
Detailed ingredient list and directions located in the recipe card below.
How To Make Easy Halloween Strawberries
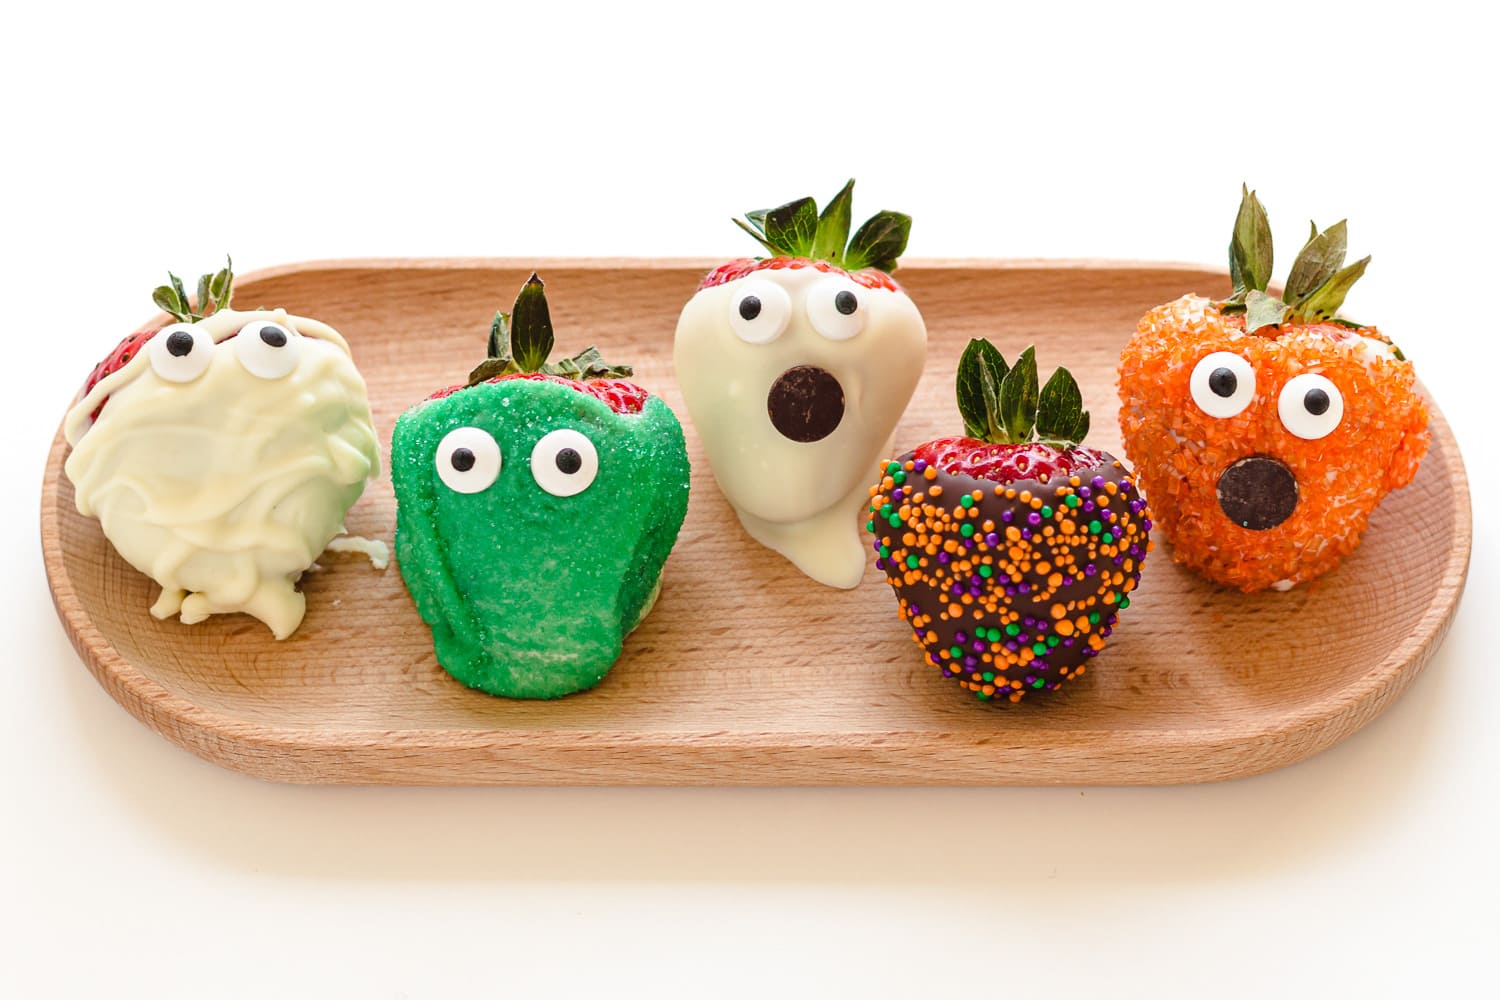
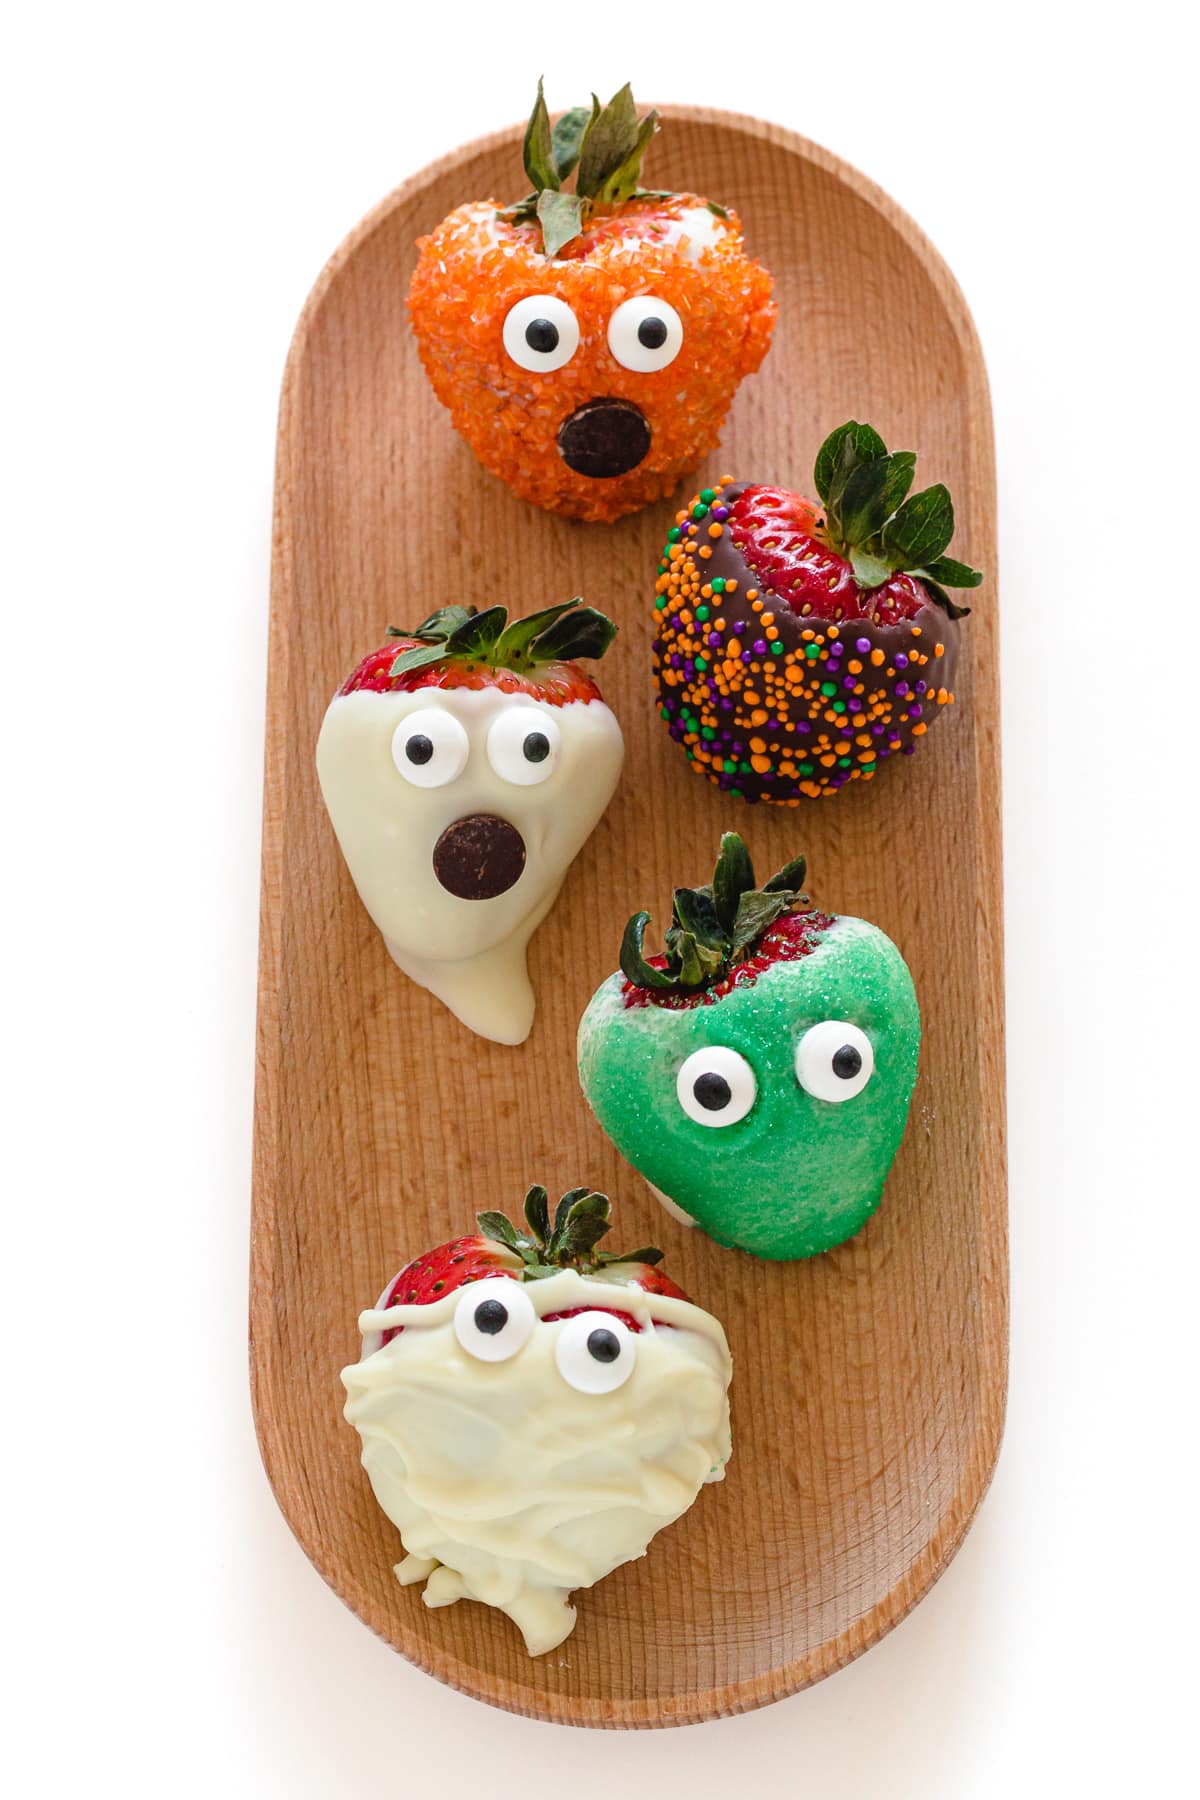
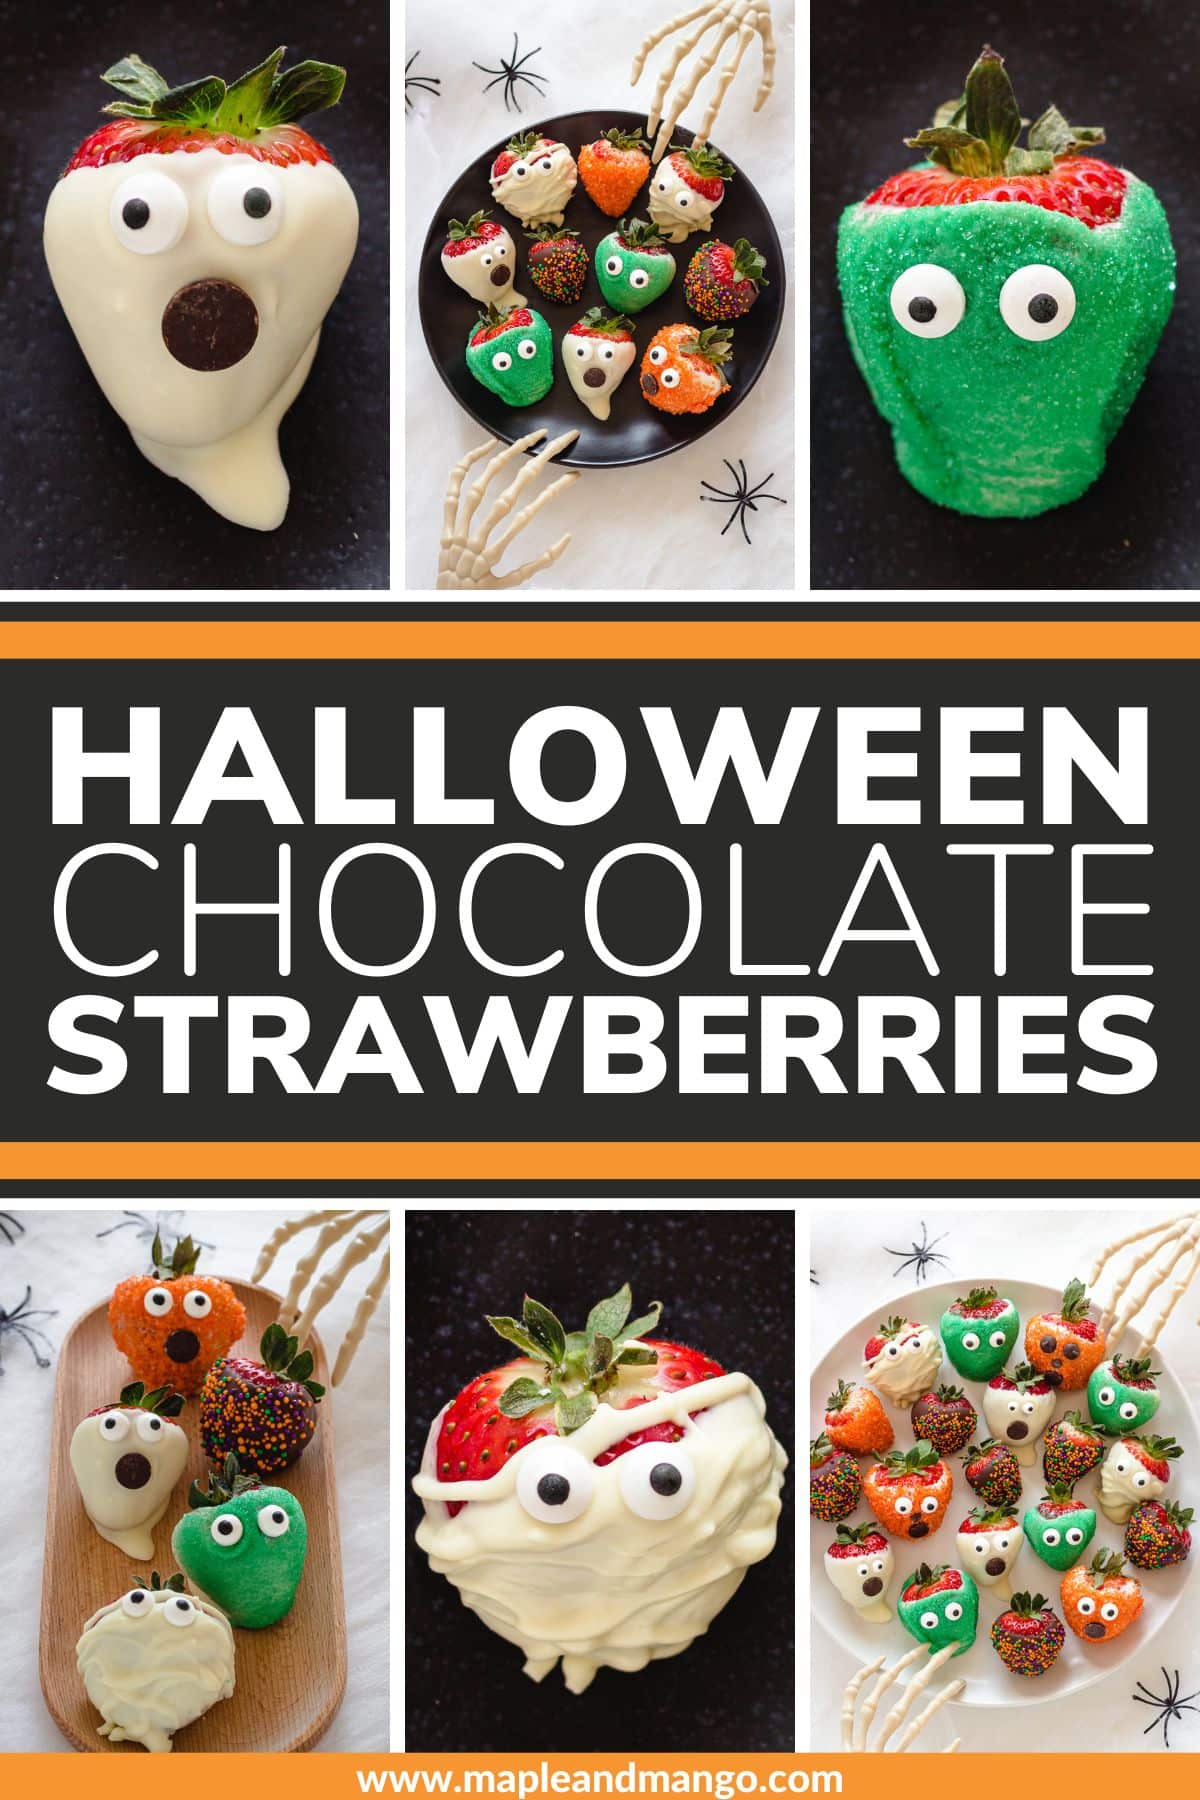
Let me walk you through how to make these Halloween strawberries. Choose from ghosts, mummies, zombies, Halloween pumpkins or sprinkle covered. Pick one type or make a variety.
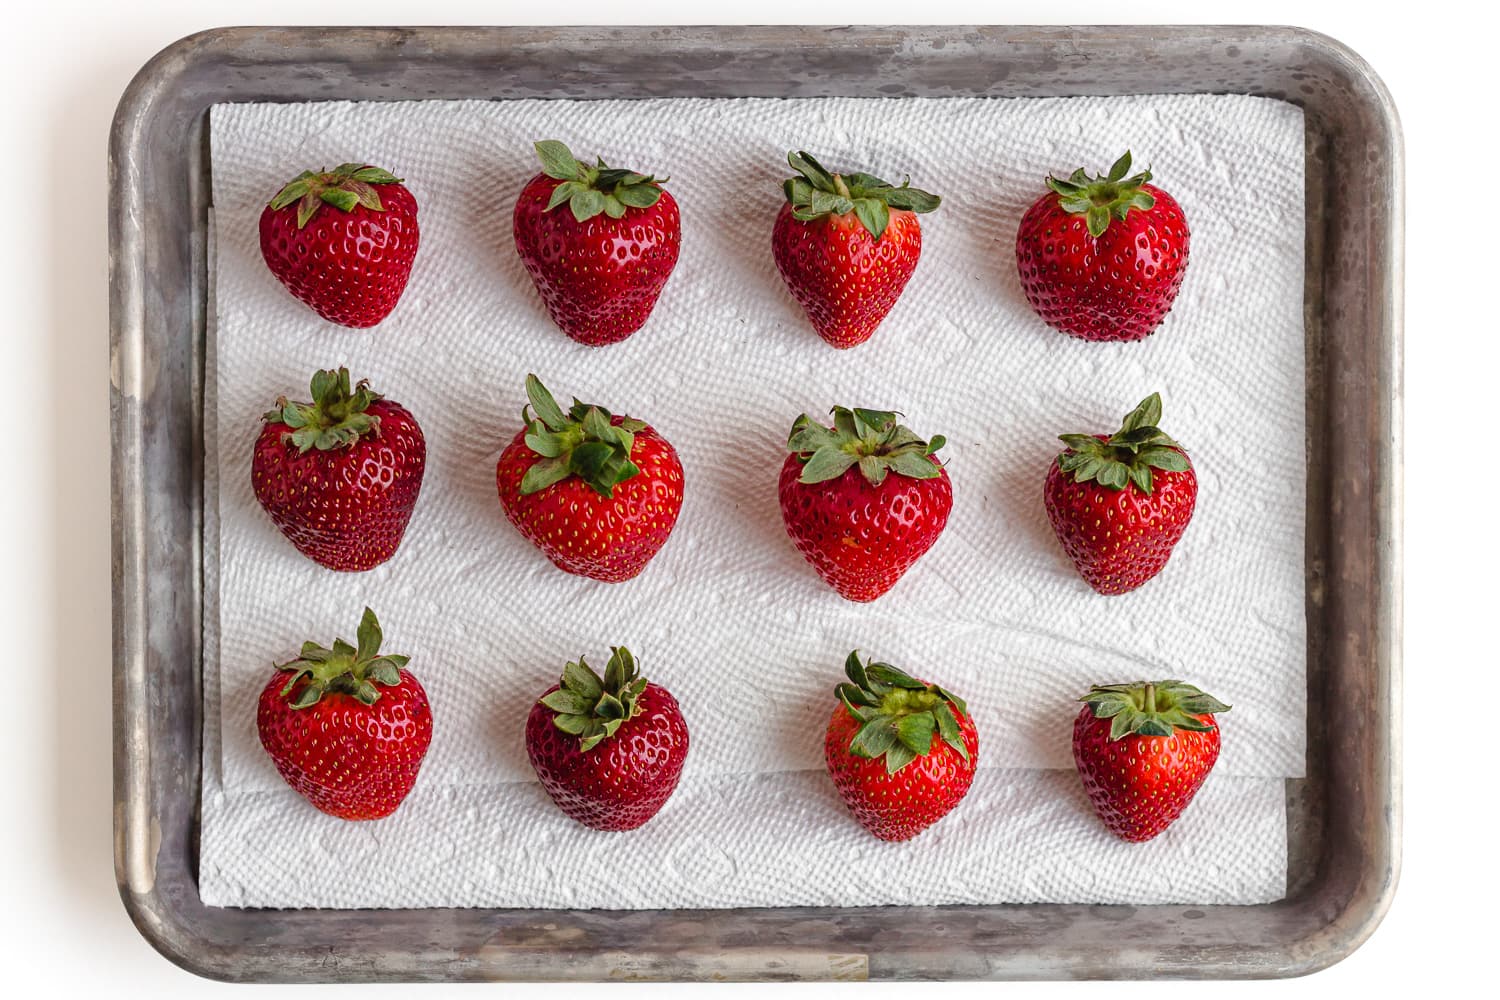
Prep Strawberries
Wash the strawberries and then pat each strawberry individually with a paper towel making sure that they are completely dry. Chocolate doesn’t coat wet strawberries very well and water can also cause the chocolate to seize and have a grainy texture.
Melt Chocolate
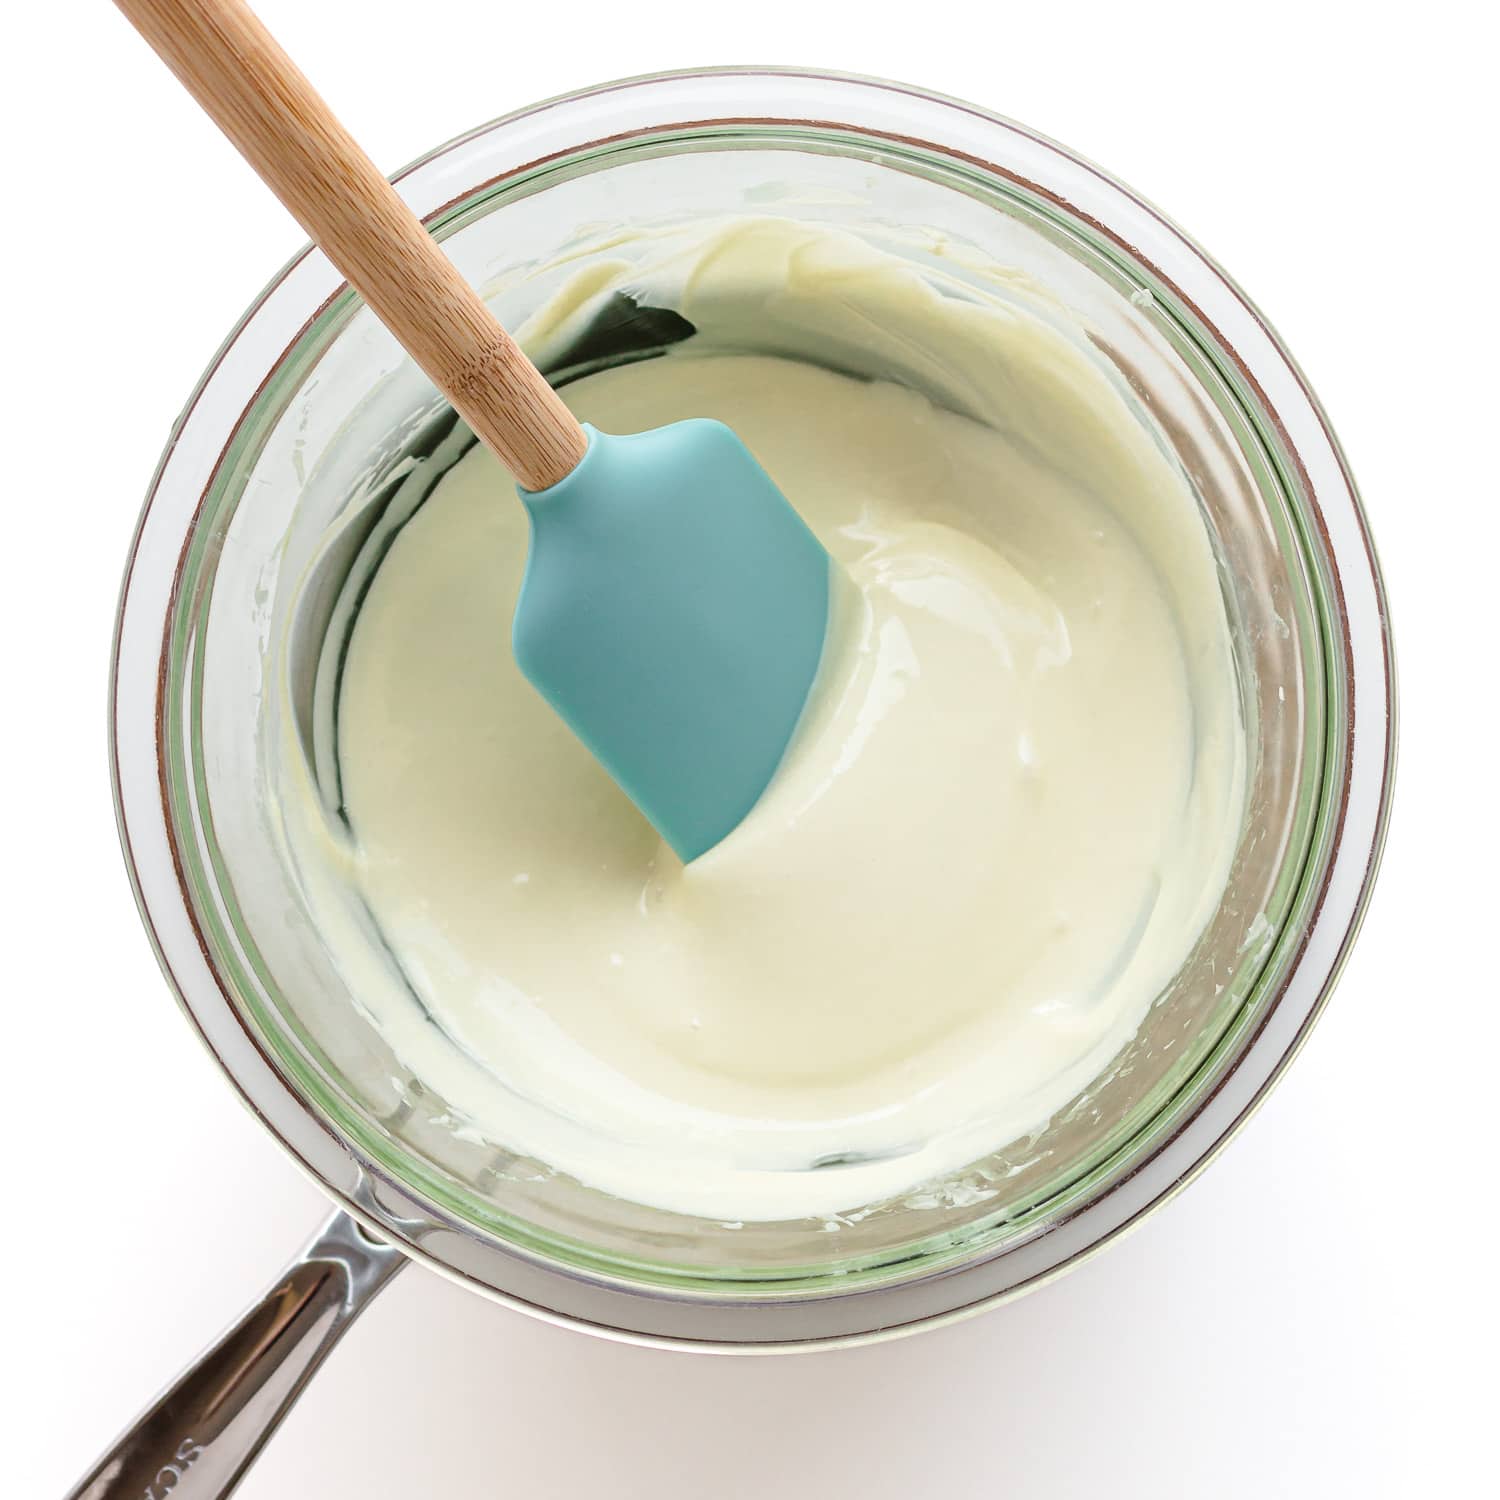
My preferred method for melting the chocolate is to use a homemade double boiler (heat-safe glass bowl and saucepan). If you happen to have a real double boiler, use that!
Set aside a small handful of the chocolate. Place the remaining chocolate in a heat-proof bowl set over a saucepan filled with 1-inch of barely simmering water (making sure the water does not touch the bottom of the bowl). Stir constantly until the chocolate is melted. Remove the bowl from the heat and set on a kitchen towel. Add the reserved chocolate and stir until melted and the mixture is smooth.
Can I use the microwave to melt the chocolate? Yes, but there is a higher risk of scorching it. If using the microwave, melt the chocolate in 20-second increments, stirring between each one. Be careful not to overheat or burn the chocolate.
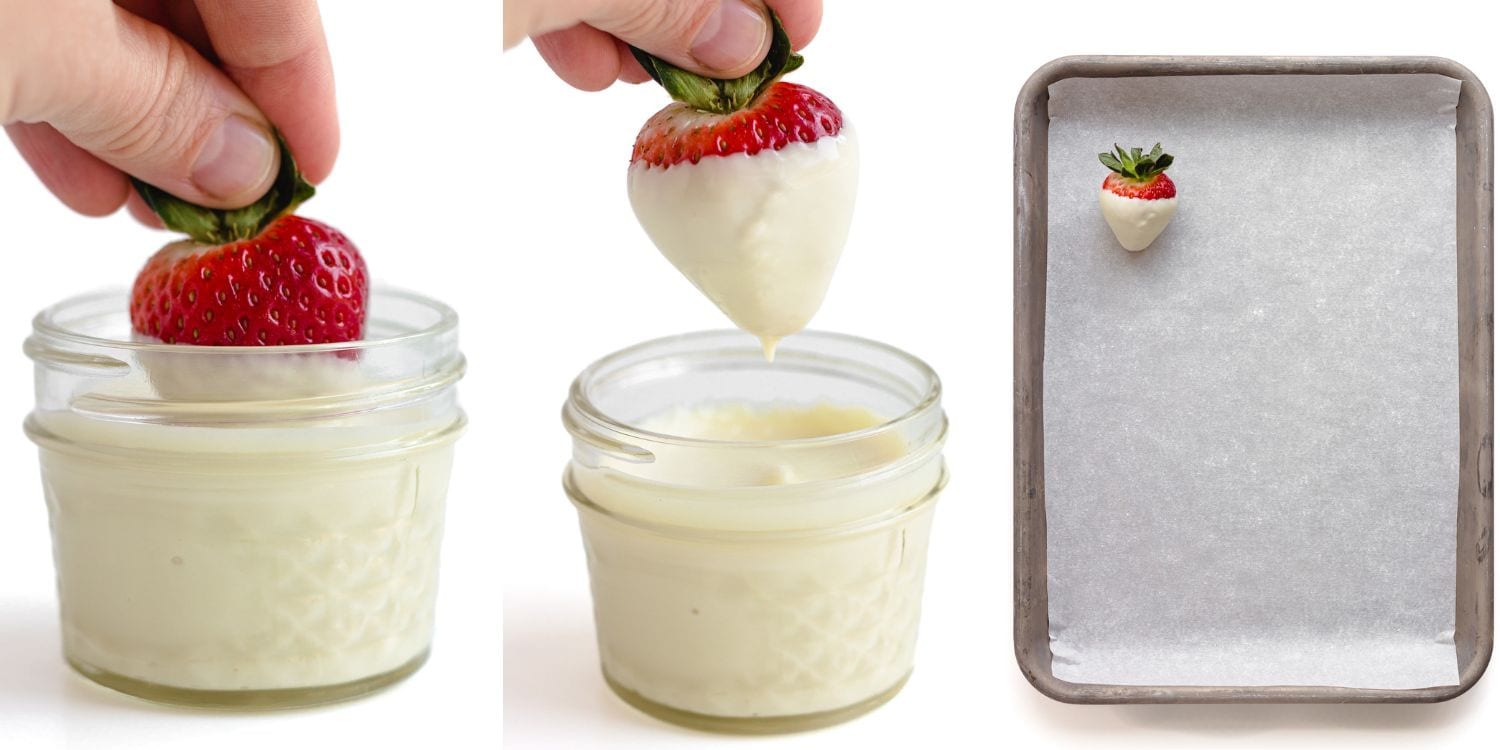
Dip Strawberries
Hold the strawberry at the top, pulling back the leaves to use as a handle and dip into the melted chocolate until evenly coated. Lift the strawberry letting the excess chocolate drip back into the bowl. Lightly scrape the bottom against the rim of the bowl and place on a baking sheet lined with parchment paper.
Time To Decorate
Now comes the fun part! Turn that chocolate covered strawberry into a ghost, mummy, zombie, pumpkin or simply coat it with Halloween sprinkles! See below for details on how to make each version.
Place decorations on the strawberry while the chocolate is still wet so that they stick. I like to dip and decorate one strawberry at a time. Let the chocolate set completely before serving. To quick set, place in the refrigerator for 5-10 minutes. Remove after that time so that the strawberries don’t sweat.
Ghost Strawberries
Dip the strawberry in melted white chocolate. Let some but not all of the excess chocolate drip back into the bowl. Place on a parchment paper lined baking sheet, letting the excess chocolate pool in the front to create the bottom of the ghost. Press on two candy eyeballs and an upside down chocolate chip for the mouth (bottom flat circular side facing out) or a chocolate callet. Repeat with remaining strawberries.

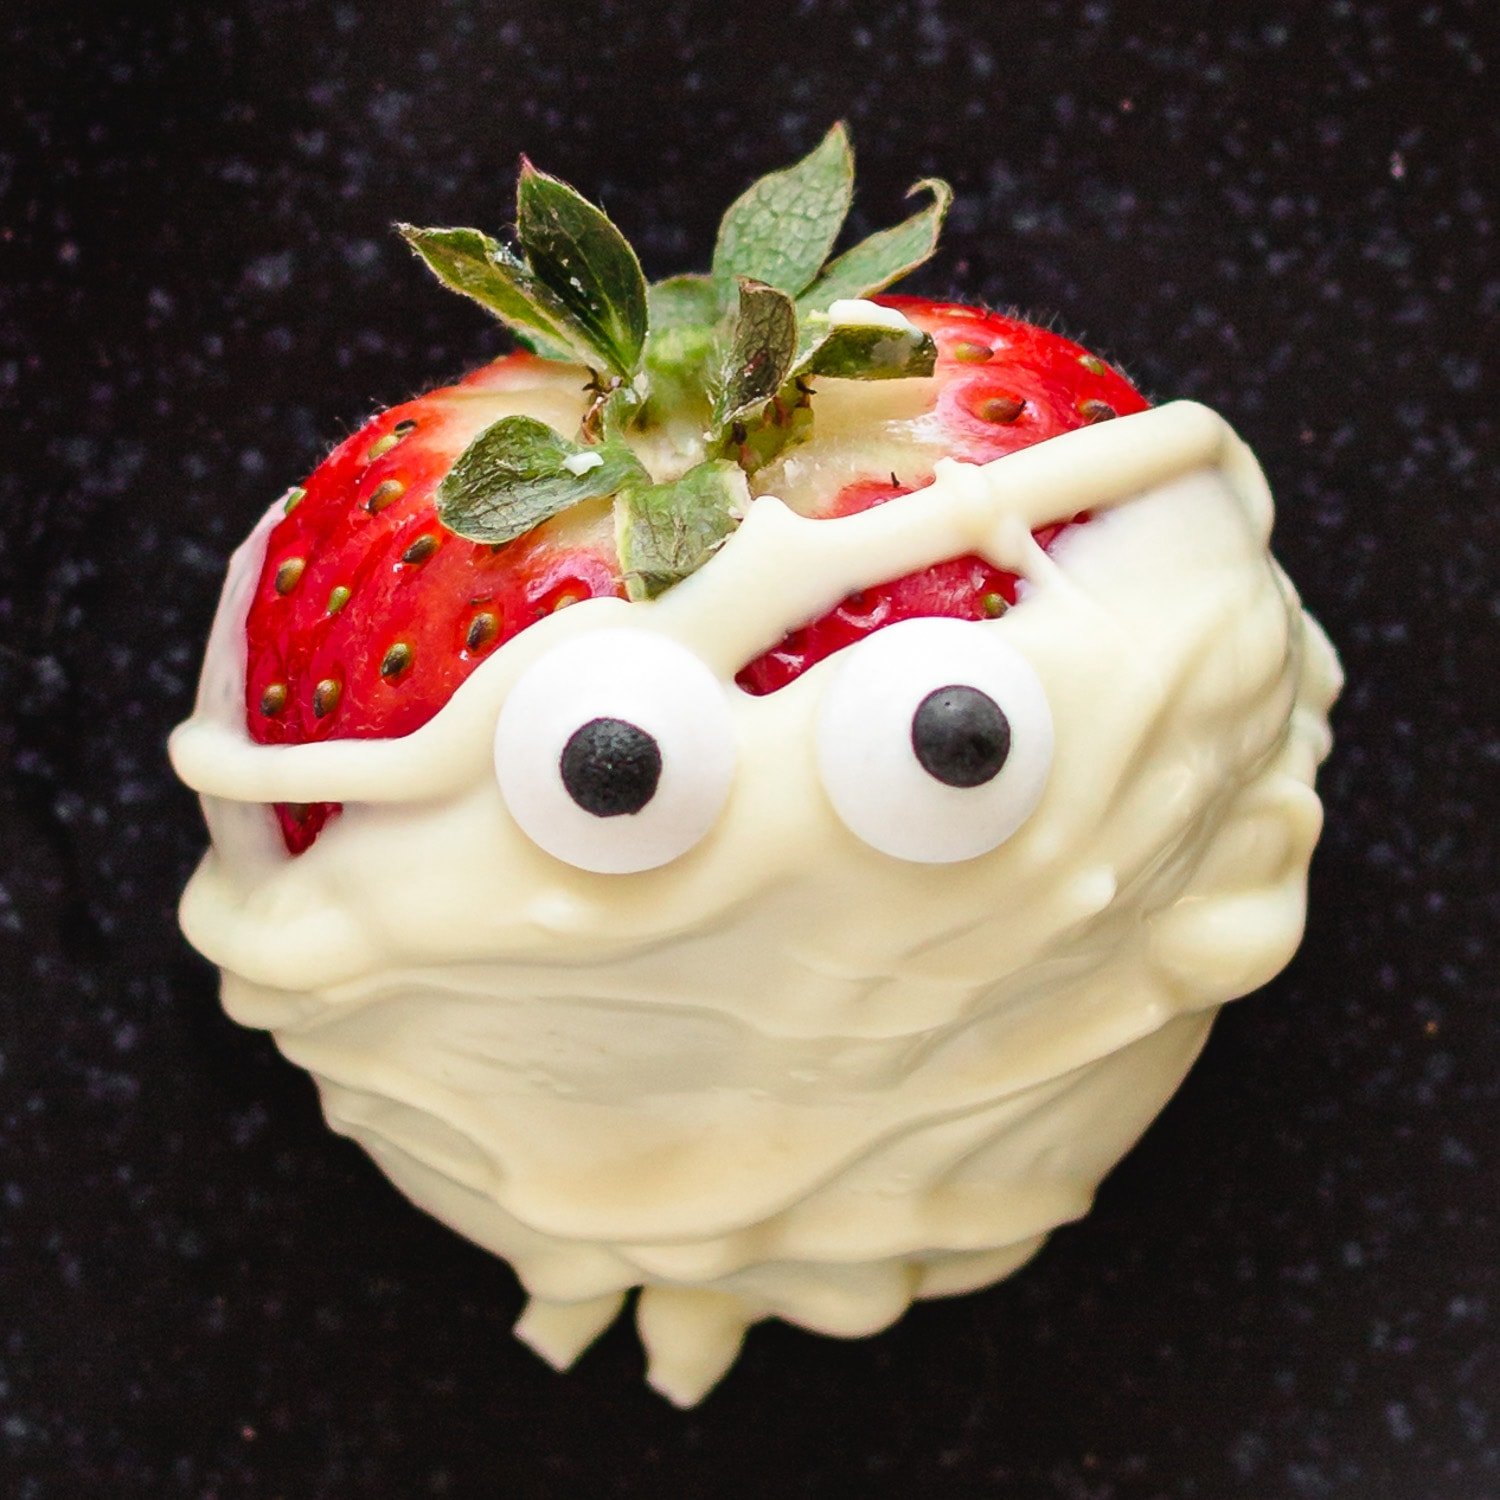
Mummy Strawberries
Dip the strawberries in melted white chocolate and place on a parchment paper lined baking sheet. Allow to set for a minute or two. With a spoon or fork, drizzle over the remaining melted white chocolate in a back and forth motion to resemble mummy bandages. Press two candy eyeballs onto each strawberry.
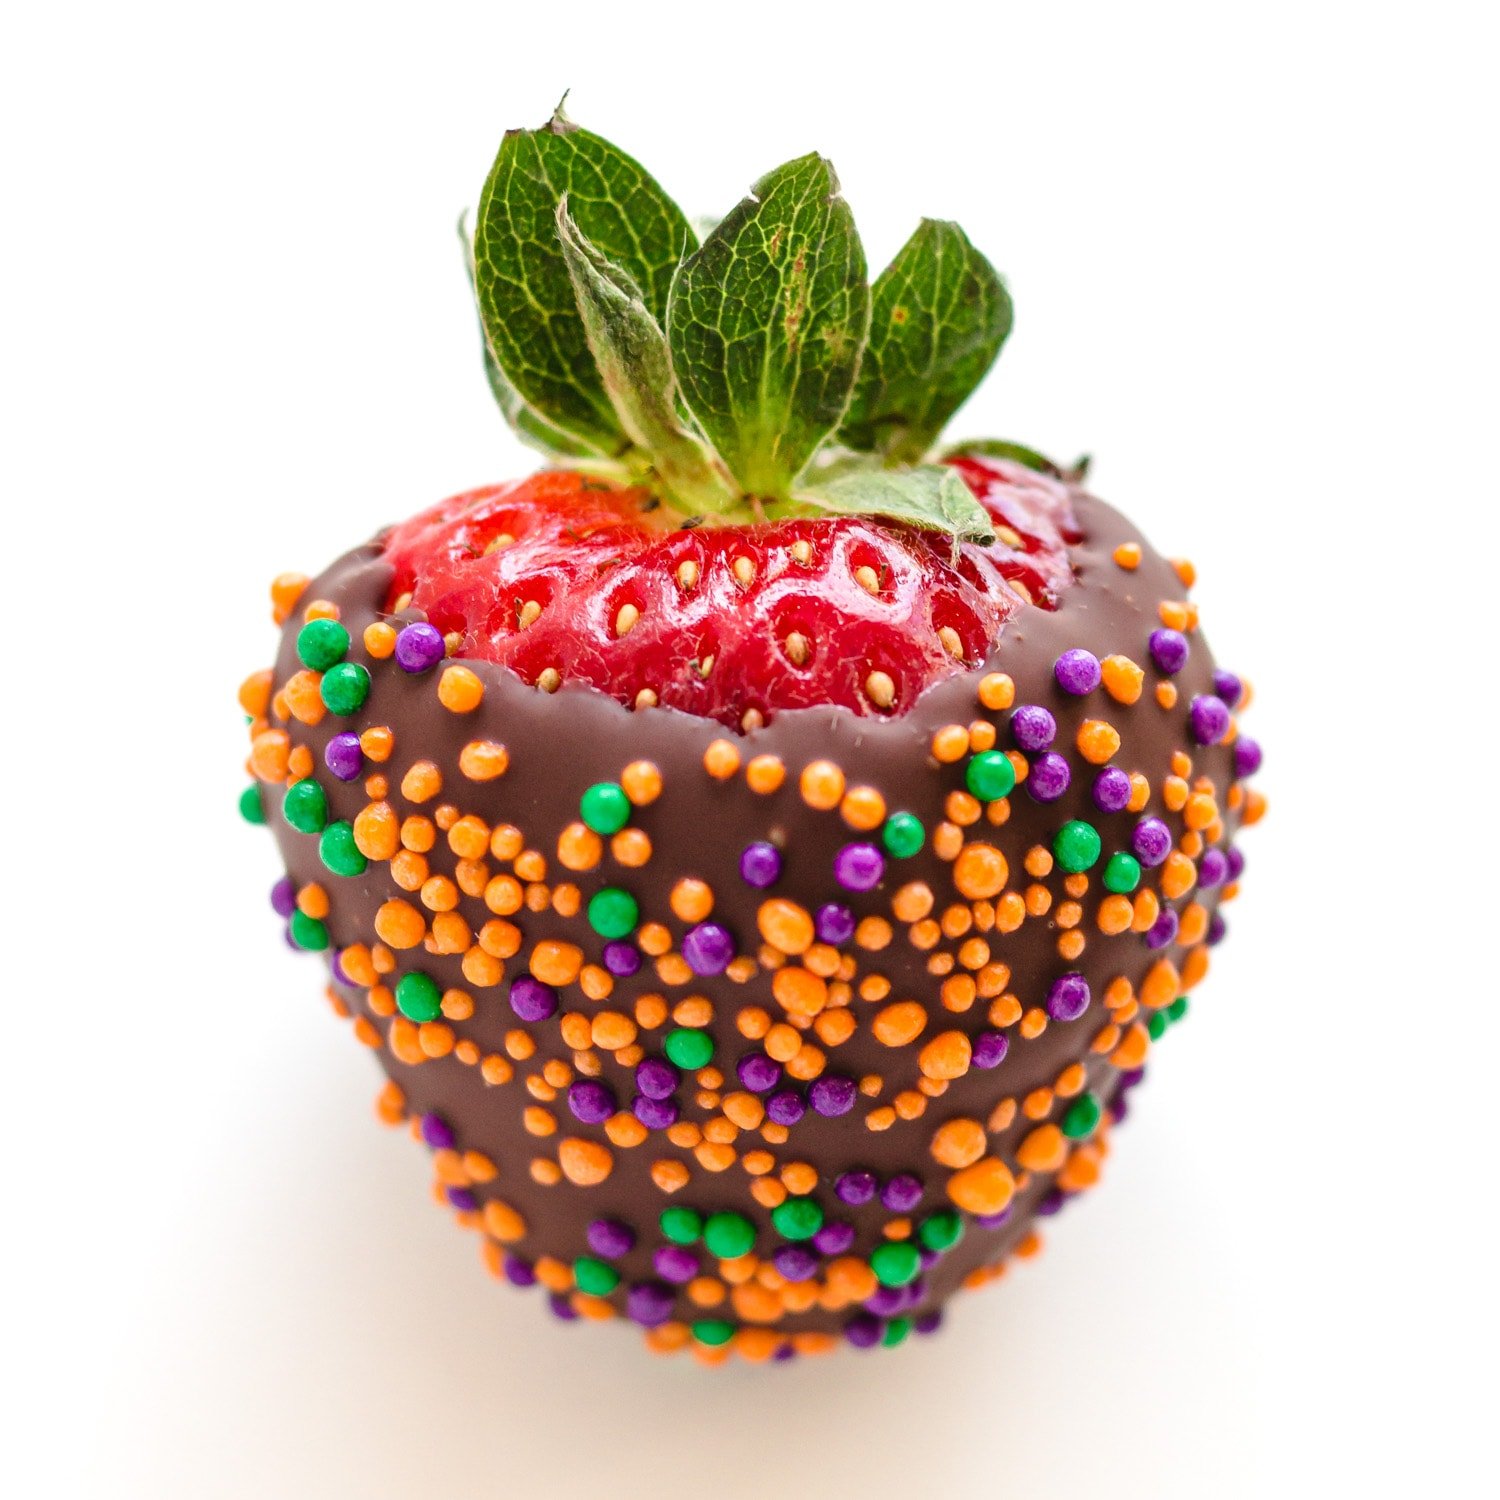
Halloween Sprinkle Strawberries
Dip the strawberry in any type of melted chocolate that you like (milk, white, semi-sweet, dark). Sprinkle on some Halloween colored sprinkles while holding over a bowl to catch the excess to reuse. Place on a parchment paper lined baking sheet and repeat with remaining strawberries.
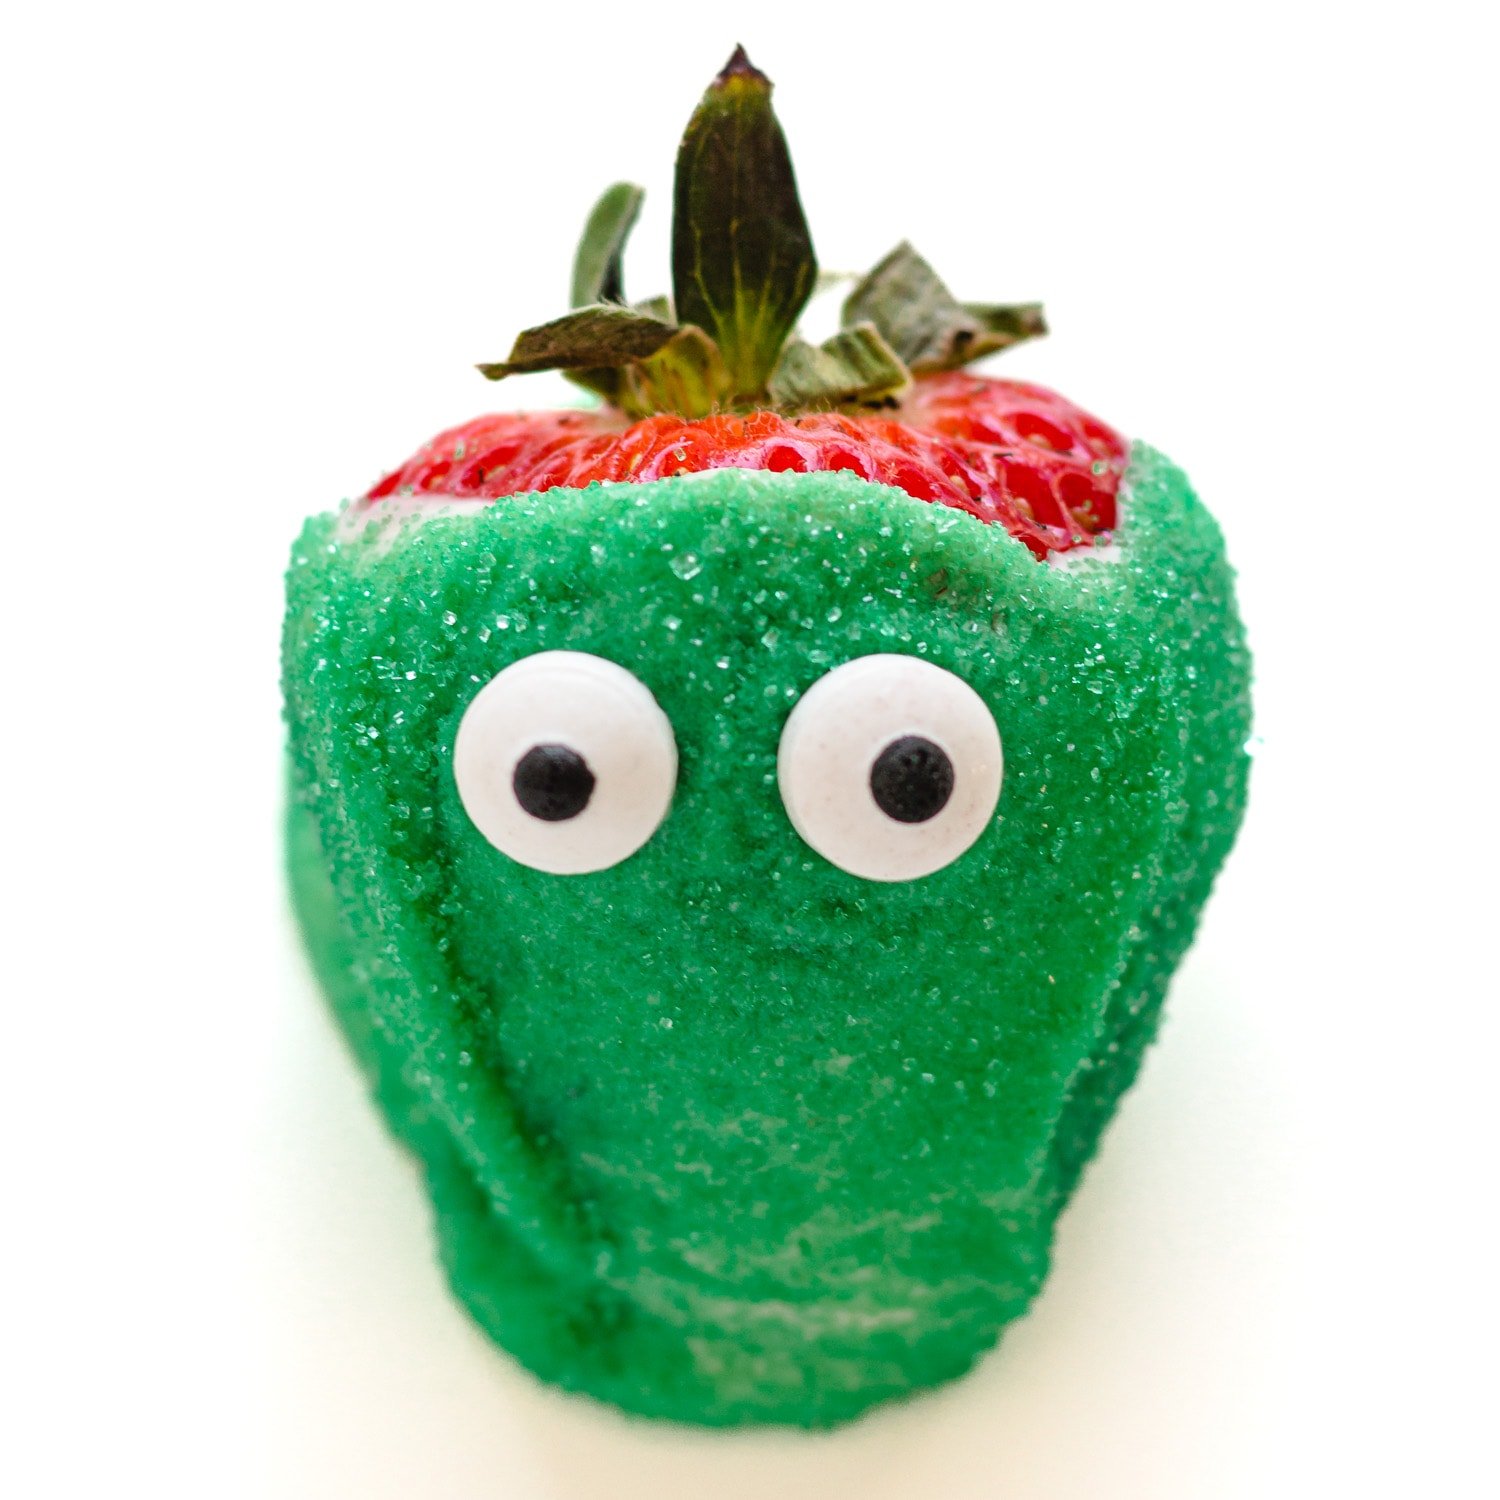
Zombie Strawberries
Dip the strawberry in melted white chocolate. Sprinkle on some green sanding sugar sprinkles while holding over a bowl to catch the excess to reuse. Place on a parchment paper lined baking sheet and press on two candy eyeballs. Repeat with remaining strawberries.
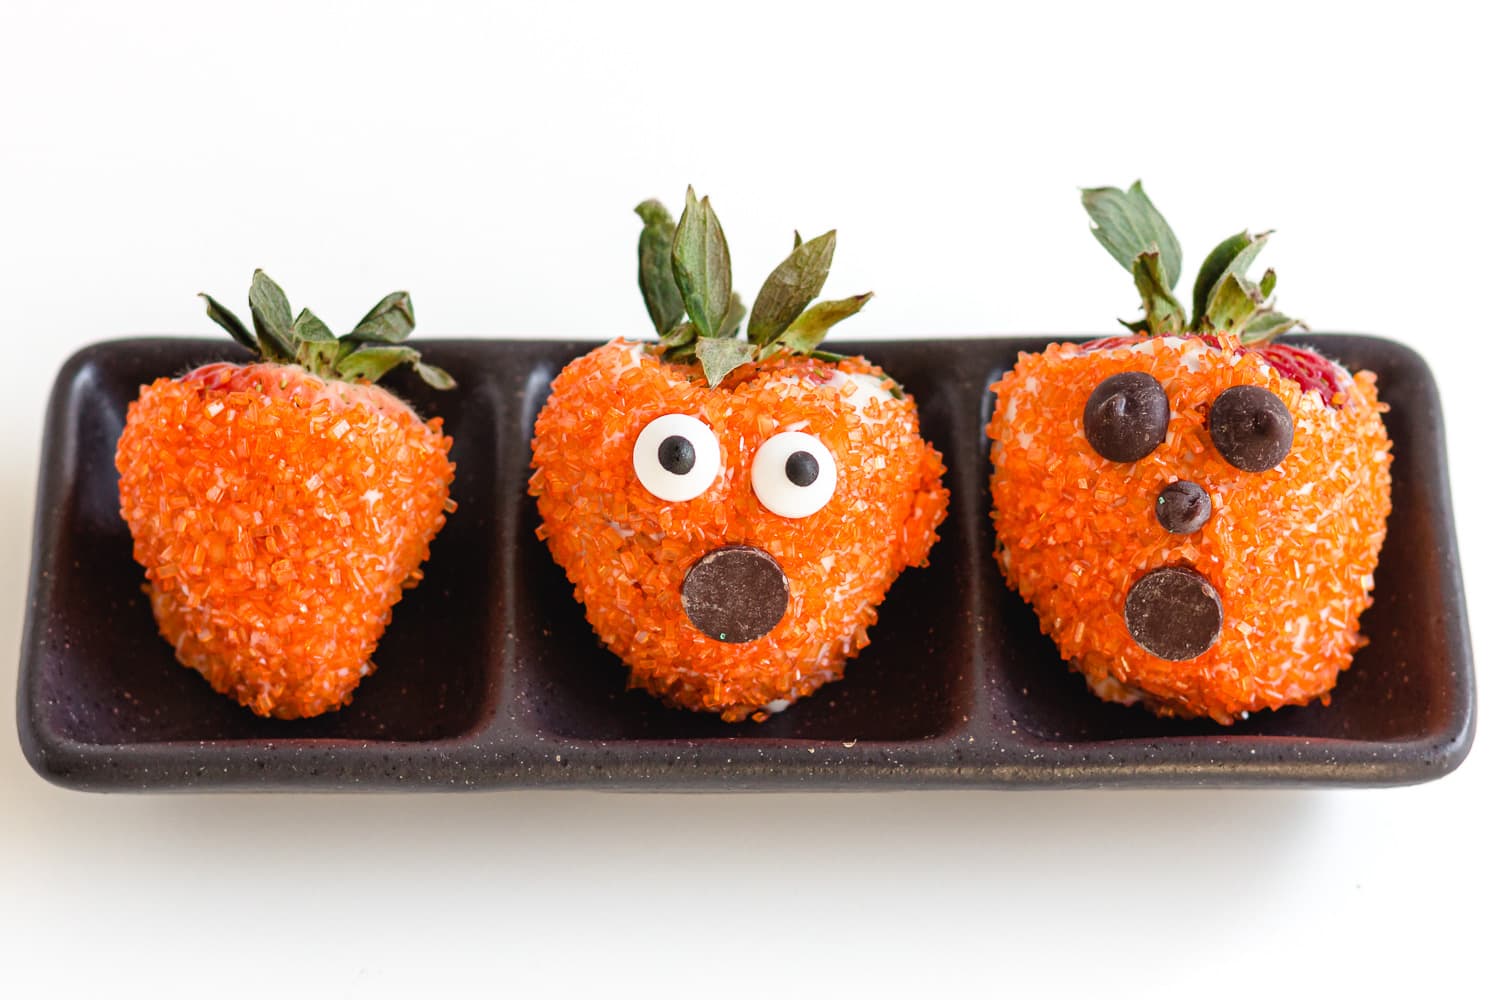
Halloween Pumpkin Strawberries
Dip the strawberry in melted white chocolate. Sprinkle on some orange sanding sugar or sparkling sugar sprinkles while holding over a bowl to catch the fallen sprinkles to reuse. Place on a parchment paper lined baking sheet. Leave as is for a pumpkin or add a face to turn it into a Jack-o’-lantern. Repeat with remaining strawberries. For the faces, I used candy eyeballs or chocolate chips for the eyes, mini chocolate chip for the nose (on some) and an upside down chocolate chip for the mouth (or a chocolate callet).
Tips For Perfect Chocolate Covered Strawberries
- Make sure strawberries are super dry! Otherwise the chocolate will not stick well and water causes melted chocolate to seize up and separate.
- Use room temperature strawberries! This prevents condensation from forming which leads to the chocolate shell separating from the strawberry.
- Temper the chocolate! Tempering is a method of heating and cooling chocolate to stabilize it so that once the melted chocolate sets it has a smooth and glossy finish and isn’t sticky to the touch. We do this the easy way here by simply reserving a bit of the chocolate and stirring it in at the end after most of the chocolate has already been melted and removed from the heat.
- Water is the enemy! Avoid getting any water in the chocolate while it is melting or it will seize up (looks grainy, dry and thick). We already talked about making sure the strawberries are dry but also make sure that the bowl and rubber spatula or mixing spoon is also dry to begin with. Using a rimmed bowl can also be helpful to keep steam out.
- Dip and decorate one strawberry at a time! The chocolate needs to be wet for the decorations to stick. Therefore, it is best to dip one strawberry in chocolate, immediately decorate and then repeat with the remaining strawberries.
- Make dipping easier by pouring the chocolate into a small glass or jar since it will have more depth. Remember to first dry off the condensation from the bottom of the melting bowl before pouring to avoid any water in your chocolate! You can also just leave the melted chocolate in the bowl and dip and roll to evenly coat the strawberry.
A Few Questions Answered
They are ideally stored at room temperature (uncovered) for up to 12 hours. If you need to store them for longer, they can also be stored in the fridge for 2 days. Please note that moisture will cause the black part of the candy eyeballs to run. To prevent this from happening, store them uncovered at room temperature and consume within 12 hours. If you need to store them in the fridge, place some paper towels on the bottom of an airtight container first to reduce the moisture.
Chocolate covered strawberries are best enjoyed the same day they are made. They will last 12 hours at room temperature and 2 days in the fridge. So technically they can be made ahead but after about 12 hours, they start to get juicy and don’t look as pretty (but still taste good).
Storing in the fridge creates moisture which can lead to soggy strawberries. It’s best to store them uncovered at room temperature and eat them the same day. If storing in the fridge, place some paper towels on the bottom of the container to minimize the sweating.
I wouldn’t recommend it! They will be rock hard when frozen and become mushy when thawed.
Excess moisture will cause the chocolate not to stick. Make sure the strawberries are very dry before dipping them. Pat each one individually with paper towel to thoroughly dry.
Make some Halloween chocolate bark! Pour the melted chocolate onto a sheet of parchment paper and sprinkle over remaining decorations. Once it sets, break it up into pieces and enjoy.
Nothing beats the taste of real chocolate in my opinion which is why I prefer to use it. Candy melts are made from vegetable oils and flavorings and designed to easily melt. If you choose to use them, just follow the directions on the package to melt.
Did you make these Halloween strawberries? Please leave me a comment below or tag me on Instagram to show me your cute and spooky creations!
Easy Halloween Chocolate Covered Strawberries
- Prep Time: 20 min
- Total Time: 20 min (plus time to set)
- Yield: 12 strawberries 1x
- Category: Dessert
- Method: No Bake
- Cuisine: American
Description
These spooky Halloween Strawberries are a fun and cute Halloween themed dessert or treat that everyone will love! Super easy to make too! Choose one of the versions below or make a variety.
Ingredients
Ghost Strawberries
- 6 ounces (170 g) white chocolate, chopped into small pieces or baking chips
- 12 strawberries, medium to large size
- 24 candy eyeballs
- 12 chocolate chips or chocolate callets
Mummy Strawberries
- 6 ounces (170 g) white chocolate, chopped into small pieces or baking chips
- 12 strawberries, medium to large size
- 24 candy eyeballs
Halloween Sprinkle Strawberries
- 6 ounces (170 g) chocolate (dark, milk, semi-sweet or white), chopped into small pieces or baking chips
- 12 strawberries, medium to large size
- Halloween sprinkles
Zombie Strawberries
- 6 ounces (170 g) white chocolate, chopped into small pieces or baking chips
- 12 strawberries, medium to large size
- green sanding sugar sprinkles
- 24 candy eyeballs
Halloween Pumpkin Strawberries
- 6 ounces (170 g) white chocolate, chopped into small pieces or baking chips
- 12 strawberries, medium to large size
- orange sanding sugar or sparkling sugar sprinkles
- Optional: candy eyeballs and chocolate chips
Instructions
- Prep strawberries: Wash and dry the strawberries thoroughly with paper towel. Make sure they are completely dry!
- Melt chocolate: Set aside a small handful of the chocolate. Place the remaining chocolate in a heat-proof bowl set over a saucepan filled with 1-inch of barely simmering water (making sure the water does not touch the bottom of the bowl). Or use a real double boiler if you have one. Stir constantly until the chocolate is melted. Remove from heat and stir in the reserved chocolate until melted and the mixture is smooth.
- Dip and decorate: Hold a strawberry at the top, pulling back the leaves to use as a handle and dip into the melted chocolate. Let the excess chocolate drip back into the bowl, gently scrape the bottom against the rim and place on a baking sheet lined with parchment paper. Decorate (see instructions below for the version you chose) and repeat with remaining strawberries. Allow the chocolate to set completely before serving.
Decorating Instructions
- For the Ghost Strawberries: For this version, let some but not all of the excess melted white chocolate drip back into the bowl. Place on a parchment paper lined baking sheet, letting the excess chocolate pool in the front to create the bottom of the ghost. Press on two candy eyeballs and an upside down chocolate chip for the mouth (bottom flat circular side facing out) or a chocolate callet.
- For the Mummy Strawberries: Dip all the strawberries in melted white chocolate and place on a parchment paper lined baking sheet. Allow to set for a minute or two. With a spoon or fork, drizzle over the remaining melted white chocolate in a back and forth motion to resemble mummy bandages. Press two candy eyeballs onto each strawberry.
- For the Halloween Sprinkle Strawberries: After dipping a strawberry into the melted chocolate, sprinkle on some Halloween colored sprinkles while holding over a bowl to catch the excess to reuse. Place on a parchment paper lined baking sheet and repeat with remaining strawberries.
- For the Zombie Strawberries: After dipping a strawberry into the melted white chocolate, sprinkle on some green sanding sugar sprinkles while holding over a bowl to catch the excess to reuse. Place on a parchment paper lined baking sheet and press on two candy eyeballs. Repeat with remaining strawberries.
- For the Halloween Pumpkin Strawberries: After dipping a strawberry into the melted white chocolate, sprinkle on some orange sanding sugar or sparkling sugar sprinkles while holding over a bowl to catch the fallen sprinkles to reuse. Place on a parchment paper lined baking sheet. Leave as is for a pumpkin or add a face to turn it into a Jack-o’-lantern. Repeat with remaining strawberries. For the faces, I used candy eyeballs or chocolate chips for the eyes, a mini chocolate chip for the nose (on some) and an upside down chocolate chip for the mouth (or a chocolate callet).
Notes
- Recommended chocolate: Good quality baking chocolate works best since it melts easily and tastes delicious. Make sure your chocolate has cocoa butter in the ingredients. Here are a few brands that work well: Callebaut chocolate callets, Ghirardelli baking chips, Lindt chocolate bars, Baker’s baking chocolate and Guittard baking chocolate.
- Can I use the microwave to melt the chocolate? Yes, but there is a higher risk of scorching it. If using the microwave, melt the chocolate in 20-second increments, stirring between each one. Be careful not to overheat or burn the chocolate.
- Storage: Chocolate covered strawberries are ideally stored at room temperature (uncovered) and best enjoyed within 12 hours. If you need to store them for longer, store in the fridge for two days in an airtight container lined with paper towel to absorb some of the moisture (otherwise the candy eyeballs will start to run).
- Make sure to read through the Tips for Perfect Chocolate Covered Strawberries!
⬇ PIN it for later! ⬇


These are just adorable! But I especially I love that I can have my chocolate and healthy food too!
The chocolate doesn’t count when you are eating fruit with it, hehe! Glad you enjoyed them!
Adorable. I wish this holiday lasted all year. I could eat cute-spooky chocolate covered strawberries all year long. Love the tutorial, and love the photos you put together too. The skeleton hands are an especially nice touch!
Thanks so much! I’m happy that you loved the photos!
Vanessa these are absolutely adorable and so much fun to make. The kids and I are making some that they can take to daycare tomorrow and they are SO excited. Thanks for sharing this simple kid-friendly recipe. We love it!
That’s so cute! I hope the kids at daycare love them!
What fun! I love the weeks before Halloween when I see all these great Halloween treat ideas, especially easy ones like these strawberries. I’m not very crafty but I can handle a pair of candy eyes!
You got this! I’m also not incredibly crafty which is why I focused on easy Halloween strawberries here since I know my limits lol.
These Halloween strawberries are adorable and I especially love the ghosts! And I still have candy eyeballs from last year so I’ll be making these this weekend. Thanks for sharing!
The ghosts are super cute! Have fun making them this weekend!
IM so doing this for my halloween party with the kiddos! I live in Spain and there s not trick o treating here but I make sure to make a massive party with kids and friends every year and this will definitely be on the table! I’ll send you a pic! Thanks for sharing!
What a fun thing to do for your kids and friends! Hope everyone loves these Halloween strawberries!
Fun! And so easy 🙂 It’ll be great for a Halloween party this year!
They are such a crowd pleaser – perfect for Halloween parties!
Adorable! Can’t wait to make these next weekend.
Have fun making them….and eating them of course!
These were so fun! The kids loved it. Will make again!!
I’m so happy to hear that!
These strawberries are so so adorable!! I can’t wait to make them for Halloween – my kids are going to love them!
Have fun with them!